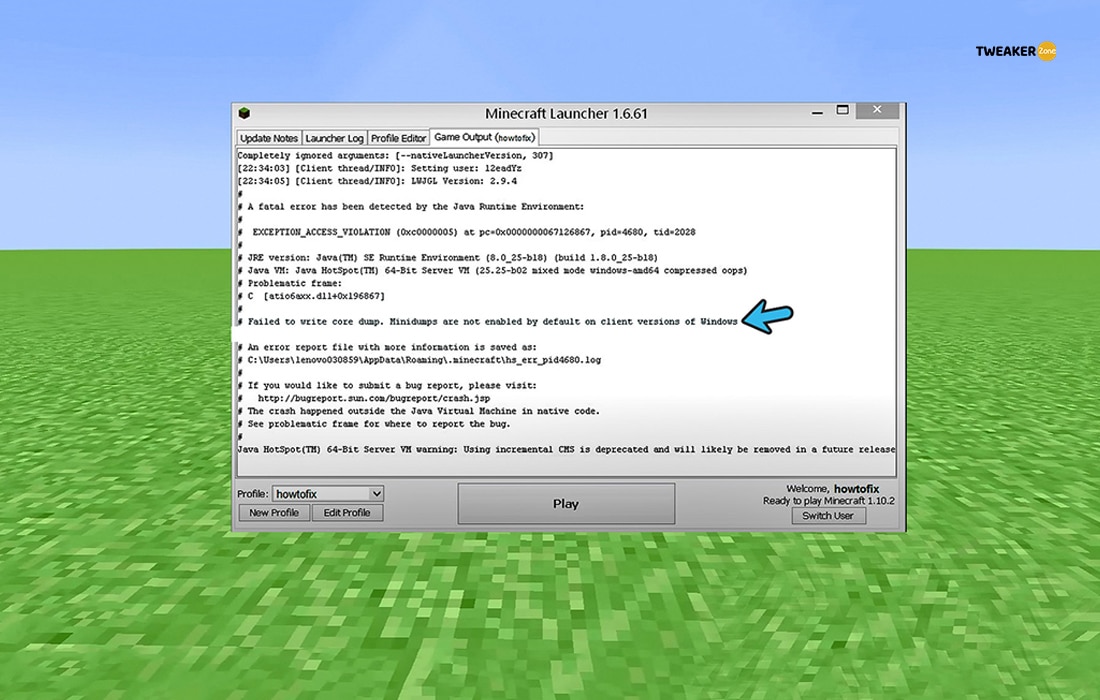
We all love to play Minecraft, as it is one of the most thrilling sandboxes ever produced. But it does irritate us whenever the system has failed to write core dump repeatedly, isn’t it? However, the issue can be way more deep-rooted than you can possibly imagine.
Using an obsolete version of Windows, Java, or even GPU driver can trigger the core dump error in Minecraft. Besides, a disabled small memory dump or an incompatible JDK version can cause this issue. It can also trigger if you have disabled the VSync and triple buffering in Nvidia GPU.
However, a few general methods and some advanced tweaks can effectively rectify this error in no time and assure smoother gameplay. But before we delve deep, let’s understand the root causes of this error in detail.
Table of Contents
What Are The Primary Causes Of The “Failed To Write Core Dump” Error?
If your system has constantly failed to write core dump, especially while playing Minecraft, there can be several reasons behind it. But in a broader spectrum, this error can typically trigger for seven main reasons.
- You are using an outdated network or GPU driver which are incompatible with Minecraft.
- The version of your Windows OS is obsolete and needs an update.
- You are using an obsolete version of Java that is not supported by the latest Minecraft version.
- Minidumps or automatic dumps are disabled in your system.
- A third-part antivirus or firewall is interfering with Minecraft in the background.
- If you are using an AMD graphics card, you may have a faulty “Catalyst Utility” installed.
- If you use an Nvidia graphics card, you may have disabled the VSync and triple buffering options.
Even while the Mojang developers release updates in a timely manner to fix the bugs, many gamers still reported getting graphical errors, such as a broken bow or a jittery screen. If you face the same issue, you can follow our detailed guide to repair bows in Minecraft on the Windows system.
3 Quick Fixes To Solve The Core Dump Error
If your system previously failed to write a core dump, you should try to rectify the bug by following the generic fixes before resorting to any pro methods that need advanced tweaks. And in most cases, these generic fixes will rectify the bug.
1. Update Windows Version
Microsoft releases security and bug-fixing updates for their Windows OS at frequent intervals. If you are yet to update your OS, you should do it right now, as it can effectively solve core dumping issues on your system.
- Step 1: Navigate to the bottom-left corner of your taskbar and click on the “Magnifying Glass” icon to launch the “Windows Search” dialog box.
- Step 2: Type “Windows Update” and click on the first result from the displayed options.
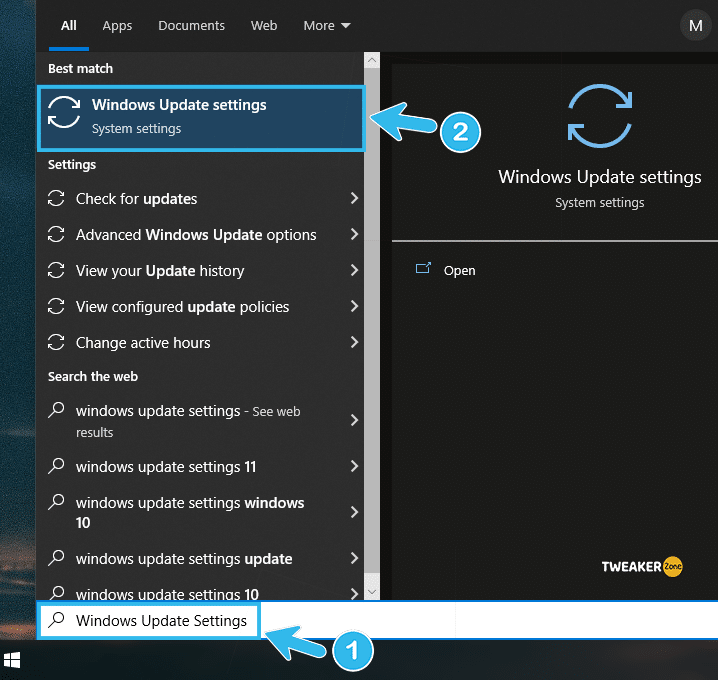
- Step 3: Once the “Update & Security” window launches, click on the “Windows Update” tab located on the left column.
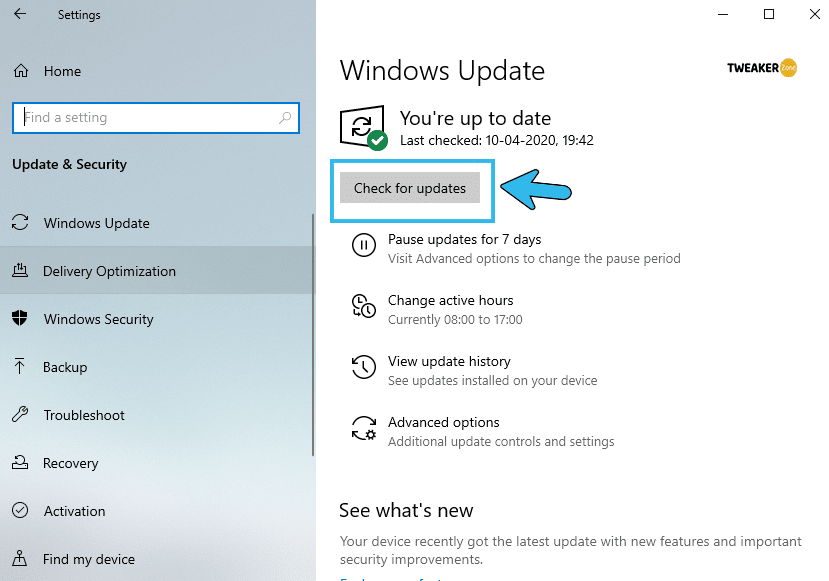
- Step 4: Select the “Check for updates” option from the right column and let your system find the right update version.
- Step 5: Follow the on-screen instruction to install the update and reboot your system.
Once you update the latest Windows version but still use an obsolete network driver, you may face an undefined network error.
2. Update Graphics Card Driver
Not just GPU, you should always install the latest updates on each of your drivers once it is available for your OS version. This practice will not just solve all your minor bugs but will also completely diminish the security loopholes in your Windows system.
- Step 1: Press “Windows Key + S” together to initiate the search bar and write “Device Manager” on that.

- Step 2: Once the result appears, click on the first option to launch “Windows Device Manager” on your PC.
- Step 3: Scroll down and click on the “Display Adapters” option to expand it.
- Step 4: Search your graphics card driver from that expanded menu and right-click to launch the additional options.
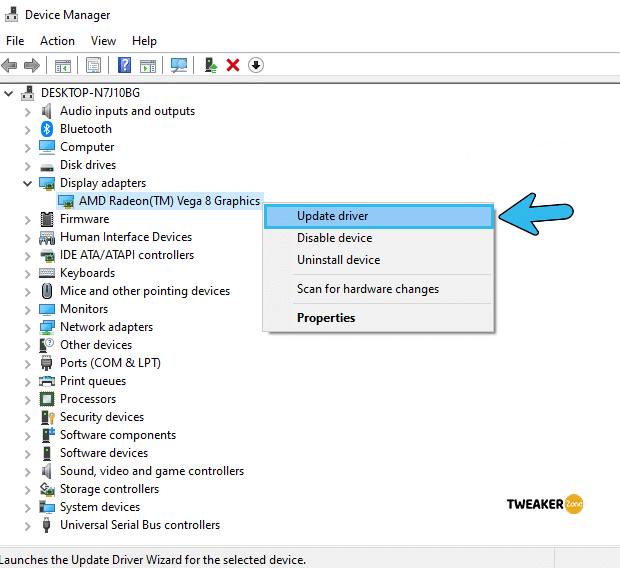
- Step 5: Select the “Update Driver” option from the list and click on the “Search automatically for drivers” option from the new pop-up window.
- Step 6: Follow the on-screen instruction to update your GPU driver and reboot your system once it is done.
3. Update Java
You may have already noticed that Minecraft often failed to write core dump as minidumps are not enabled on your system. This issue mainly triggers if you are using an outdated version of Java on your Windows computer. In such cases, updating Java is the only option to rectify this error.
- Step 1: Right-click on the “My Computer” or “This PC” icon on your desktop and select the “Properties” option from the additional menu.
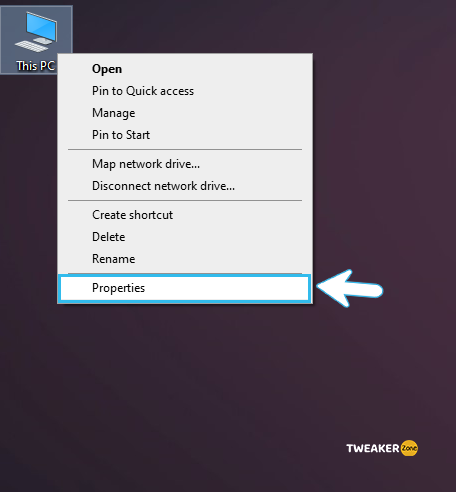
- Step 2: Once the “About” window launches, note down the OS architecture displayed under the “System Type” option. (It will be either 32-bit or 64-bit)
- Step 3: Close the Window and visit the official website of Java to download the latest compatible version for your OS architecture.
- Step 4: Once the installer is downloaded, click to initiate it and follow the on-screen instructions.
- Step 5: Open the root directory and copy the latest Java version from that folder.
- Step 6: Launch the “Windows Explorer” menu by pressing “Windows Key + E” together.
- Step 7: Go to the root directory (“C:\\Program Files\\Java” for 32-bit and “C:\\Program Files (x86)\\Java” for 64-bit architecture) of Java on your system.
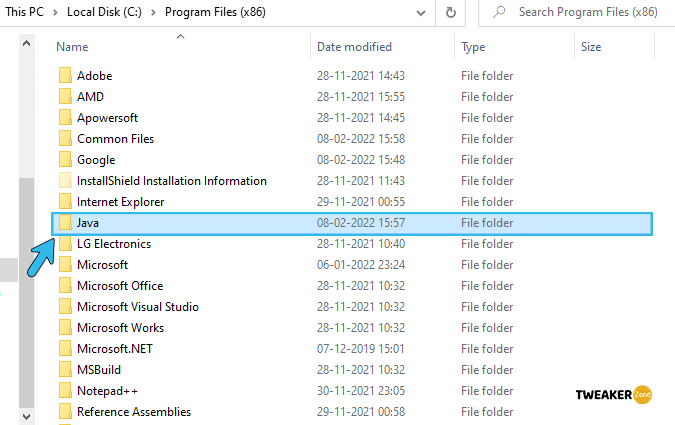
- Step 8: Paste the entire folder which you have already copied, and click on the “Replace All” option.
- Step 9: Launch “Minecraft” and go to the “Forge MOD Manager” from the welcome screen.
- Step 10: Once the new menu appears, click on the “Edit Profile” button, and paste the correct path under the “Java settings (Advanced)” box.
- Step 11: Reboot your system and see if the dumping error still triggers.
If you are not sure about the right architecture of your system or are disabled to access it by your admin, you can simply download the “Online” variant on your Windows system. It will automatically detect the architecture and install the correct one.
7 Advance Fixes For The Core Dumping Error In Minecraft
If your Windows failed to write core dump in Minecraft even after trying the generic fixes we have mentioned above; your problem may be way more deep-rooted than you can possibly imagine. In such cases, you should resort to more advanced fixes to rectify this error.
4. Enable Small Memory Dump
Although the small memory dump is enabled in every Windows system by default, your system may have disabled it in the background due to the interference of any third-party app. In that case, enabling the core dump manually is the only solution.
- Step 1: Press the “Magnifying Glass” icon on your taskbar and type “View advanced system settings” to display the result.
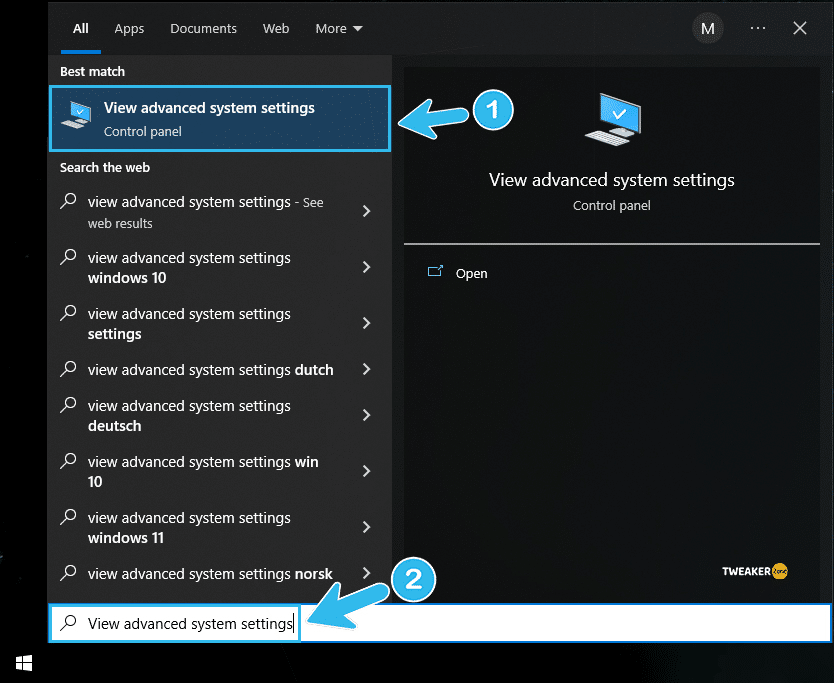
- Step 2: Click on the first result to open the “System Properties” window.
- Step 3: Navigate to the “Advanced” tab and scroll down to find the “Setup and Recovery” tab.
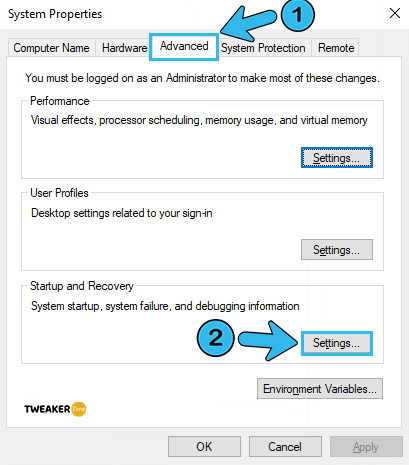
- Step 4: Click on the “Settings” option to launch the new window and navigate to the “Write debugging information” tab
- Step 5: Click on the box to fetch the drop-down menu and select the “Small memory dump (256 KB)” option.
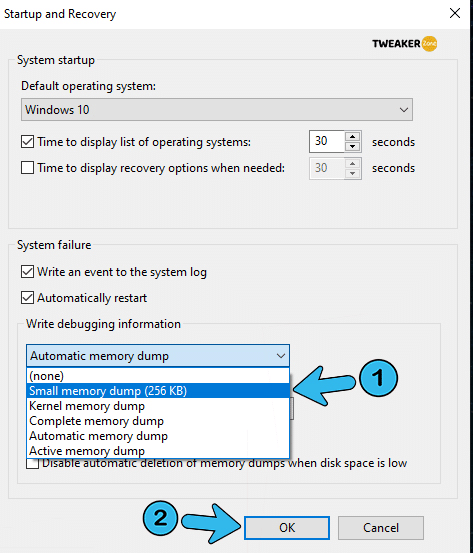
- Step 6: Press “OK” to save the settings and reboot your system.
The default is “Automatic memory dump,” which you can also use if the small memory dump option is not solving the issue. However, it is better to create a restore point before changing the debugging options.
5. Restore A Previous JDK Version
Many gamers have reported getting memory dump issues while using the latest version of Java. In such cases, you can restore a previous compatible version of Java on your system to solve this issue.
- Step 1: Press the “Windows Key + S” button together to launch the search bar.
- Step 2: Type “Apps & features” on the search bar and click on the first result to launch the settings option.
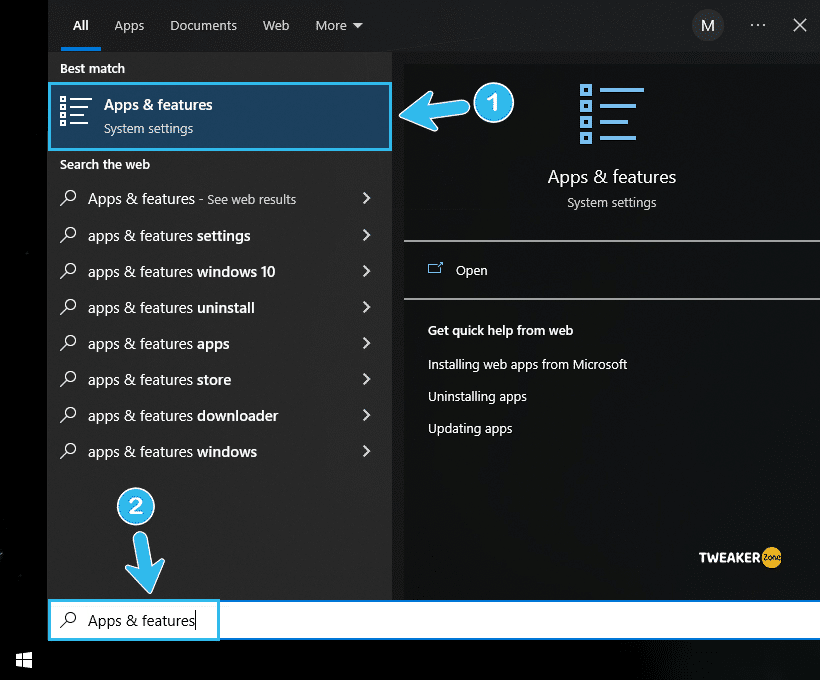
- Step 3: Scroll down and find “Java” from the right panel and click to expand it.
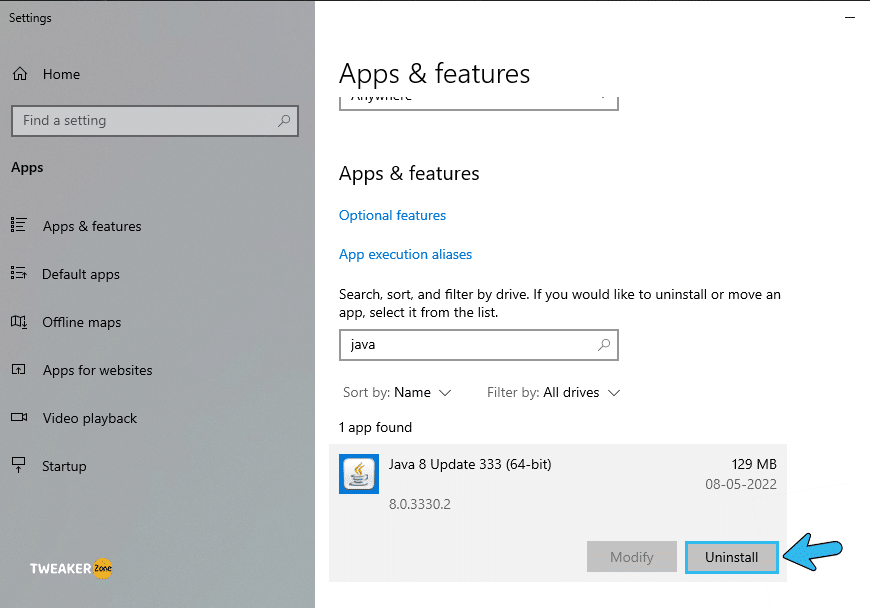
- Step 4: Click on the “Uninstall” button and follow the on-screen instruction.
- Step 5: Once the Java is completely removed, visit the official Java website to download the desired version.
- Step 6: Click on the “.exe” file to initiate the installation process and reboot your system once it is done.
Don’t try to install the previous version of Java before completely uninstalling the current one. It is better to delete the temporary files as well before you proceed with the installation process.
6. Override Minecraft File Manually
While most Minecraft comes with automatic minidumps, many gamers reported having a disabled one. But there is a solution if the minidumps are not enabled by default in your game. You just need to override the file to enable it manually.
- Step 1: Right-click on the “Minecraft” icon on your desktop and click on the “Open file location” option.
- Step 2: Once the root directory opens, navigate to the “.minecraft” folder to open it.
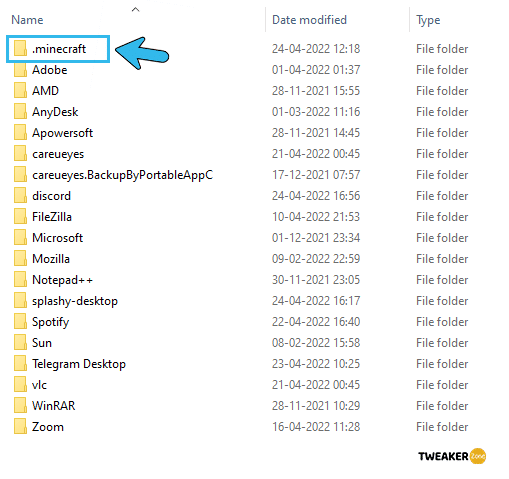
- Step 3: Scroll down, find the “Options” file, and open it with the notepad app.
- Step 4: Search for the “fboEnable” parameter and toggle it from “true” to the “false” option.
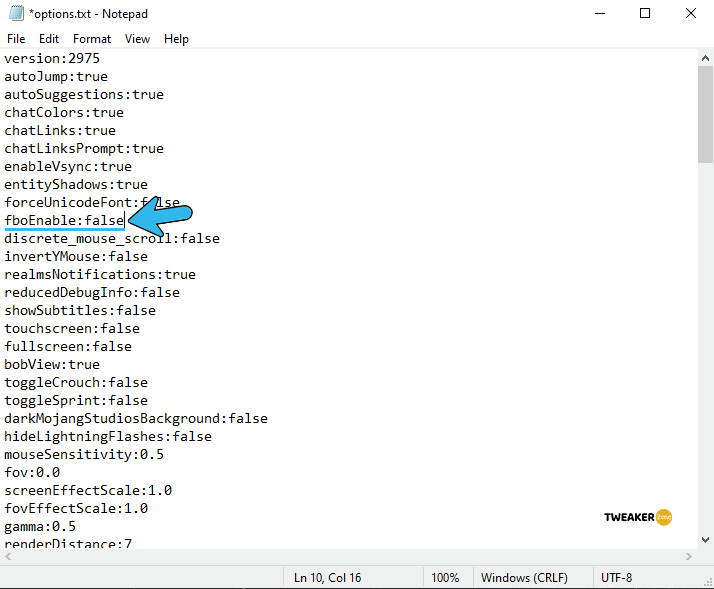
- Step 5: Save the file in actual format and relaunch your game.
You should also check if your profile name and the username are the same on Minecraft after changing this parameter. Or else, it can further create additional bugs if you don’t select the right profile to proceed with.
7. Enable Core Dump Manually
Enabling the core dump from the root directory is definitely an option to consider. But if you need to create the file exclusively for Minecraft without tweaking the system properties, you can simply do it by manually adding a command line.
- Step 1: Click on the “Magnifying Glass” icon on your taskbar and type “Java” on the search box.
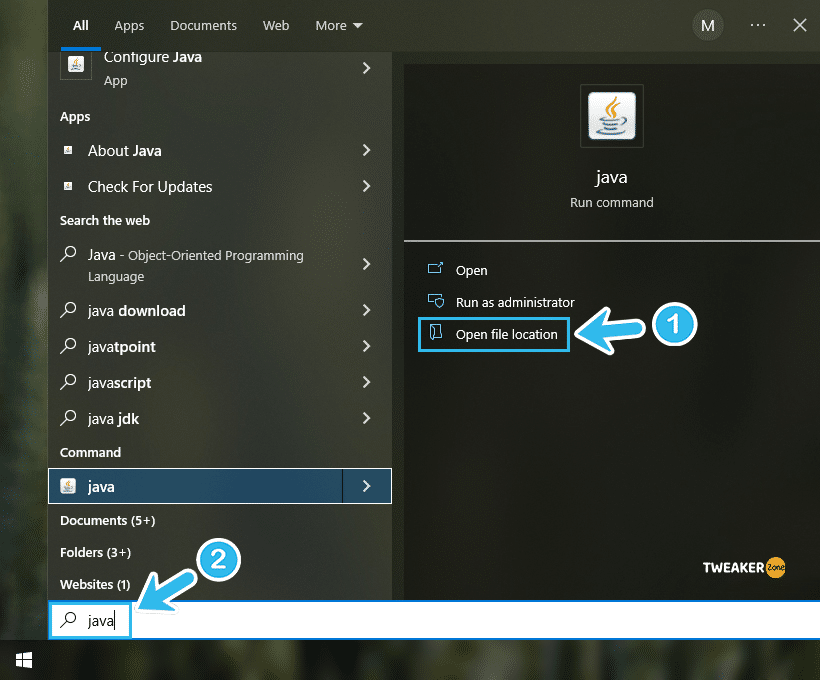
- Step 2: Right-click on the first result that appears and selects the “Open File Location” option.
- Step 3: Once the root directory opens up, right-click on the “Java” icon.
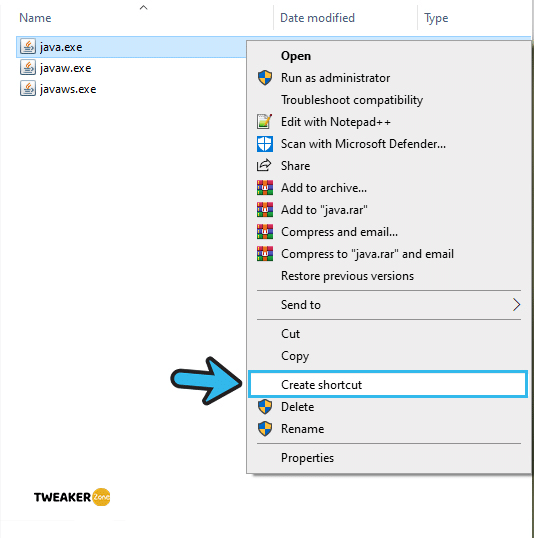
- Step 4: Click on the “Create shortcut” option from the extended menu.
- Step 5: Close that window and come to your desktop home screen. (A new Java icon should be there)
- Step 6: Right-click on the “Java” icon and select the “Properties” option.
- Step 7: Once the new window appears, paste the “java -jar crasher.jar -XX:+CreateCoredumpOnCrash” command line at the end in the “Target” text box.
- Step 8: Click “Apply” to save the settings and then “OK” to exit.
These steps are only suitable for JDK 9 or above. But for JDK 8 or older versions, follow the same steps but paste the “java -jar crasher.jar -XX:+CreateMinidumpOnCrash” command line in the eighth step.
8. Manually Create Dump File
The game itself creates a dump file when you launch it through the official launcher. But, due to Java interference or other issues, your game may not be able to create it automatically. In that case, you need to manually create it to resolve the Minecraft core dump error.
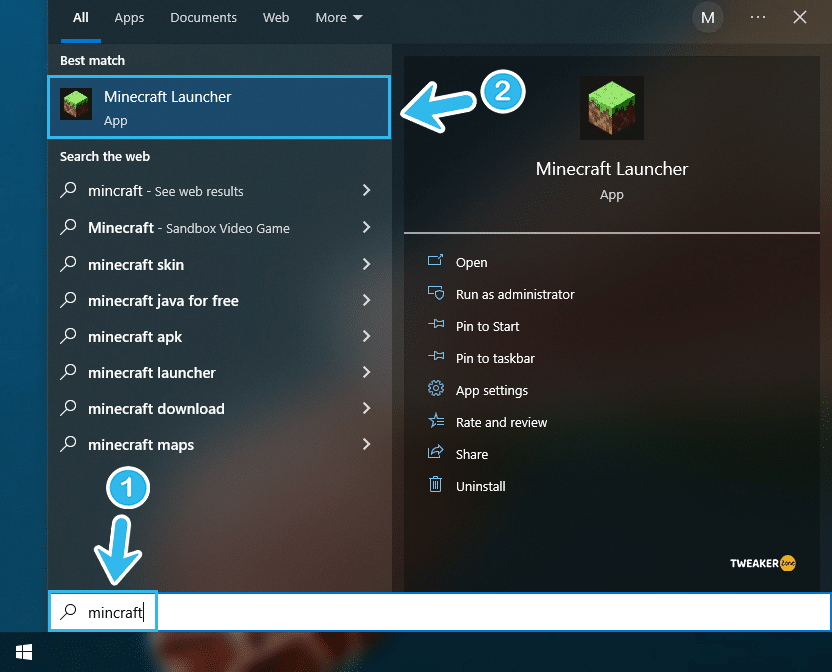
- Step 1: Click on the “Minecraft Launcher” icon to initiate the game.
- Step 2: Once the game starts and the welcome screen appears, press the “Windows Key” to minimize the game.
- Step 3: Now, press “Ctrl + Shift Key + Esc” together to launch the “Task Manager” window.
- Step 4: Navigate to the “Processes” tab and locate the “Java(TM) Platform SE Binary” application. (If you can’t find it, simply select the “Minecraft Launcher” option)
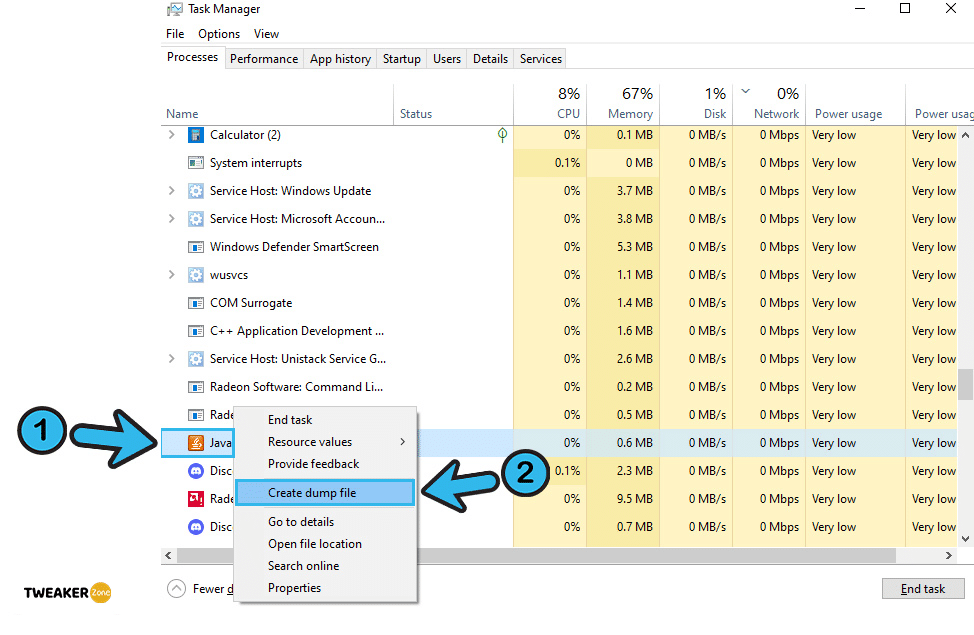
- Step 5: Right-click and select the “Create Dump File” option from the menu.
- Step 6: Once Windows create a manual dump file, reboot your system, and try to relaunch the game.
9. Enable VSync And Triple Buffering (For Nvidia GPU)
Vertical Synchronization or VSync is a feature of the Nvidia graphics card that stabilizes the frame rate to deliver a smoother gaming experience. They have also incorporated triple buffering technology that ensures a smoother rendering. The dumping error can trigger if you turn off these two features in your Nvidia graphics card.
- Step 1: Right-click anywhere on your desktop screen and click on the “Nvidia Control Panel” from the context menu.
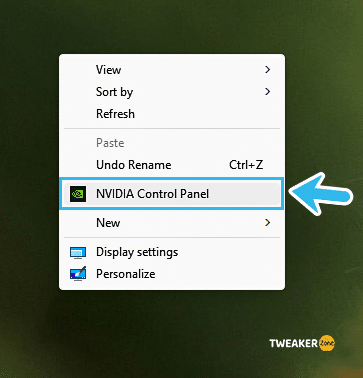
- Step 2: Once the GPU control panel opens up, click on the “3D Settings” on the left panel to expand it.
- Step 3: Click on the “Manage 3D settings” option and then select the “Program Settings” tab from the right panel.
- Step 4: Click on the “Add” button and navigate to the correct path where your Java is installed.
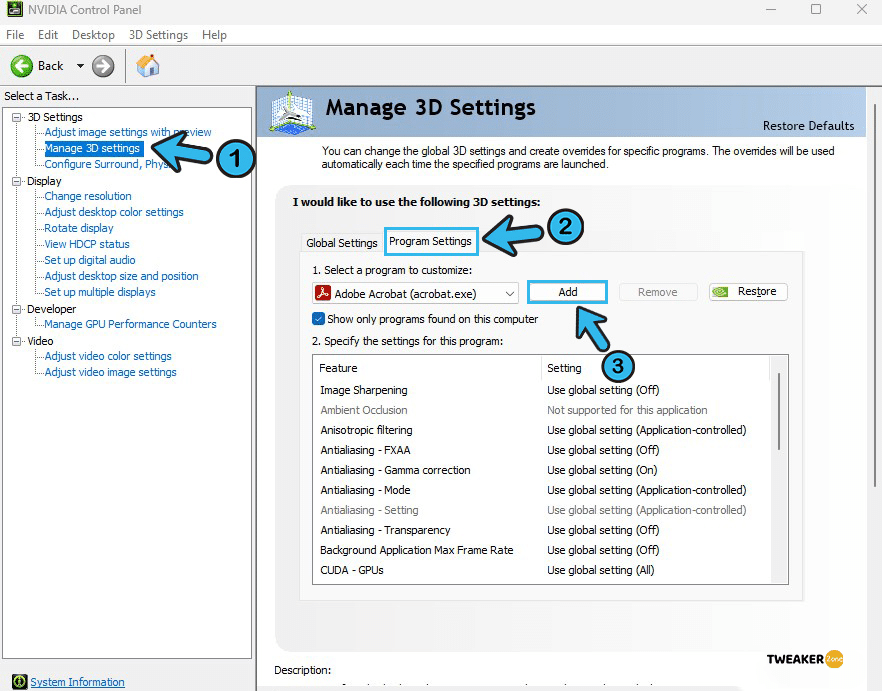
- Step 5: Select the “javaw.exe” path and click on the “Open” button.
- Step 6: Once the new setting is loaded, scroll down through the right panel, and enable both the “Vertical Sync” and “Triple Buffering” options.
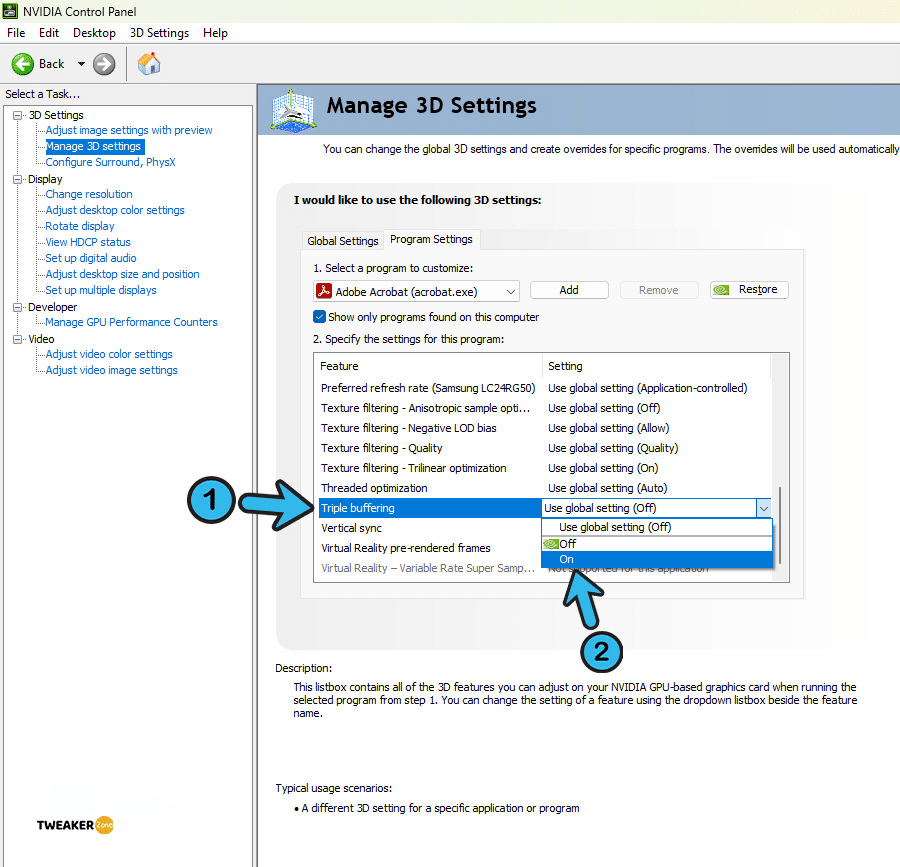
- Step 7: Click on the “Apply” button to save the settings and exit the NVidia control panel.
- Step 8: Restart your computer and relaunch your game.
You can get graphical errors or a flickering screen once you enable these two options. If any such issue persists, you can simply follow our quick fixes to resolve the Minecraft LAN Is Not Working in minecraft.
10. Reinstall AMD Catalyst Utility
If you are using an AMD Radeon graphics card on your system, the core dumping issue can easily trigger if you have a buggy version of “Catalyst Utility” installed. In that case, you need to completely uninstall the software and reinstall a fresh copy to rectify this error.
- Step 1: Press “Windows Key + R” together to initiate the “Run” dialog box.
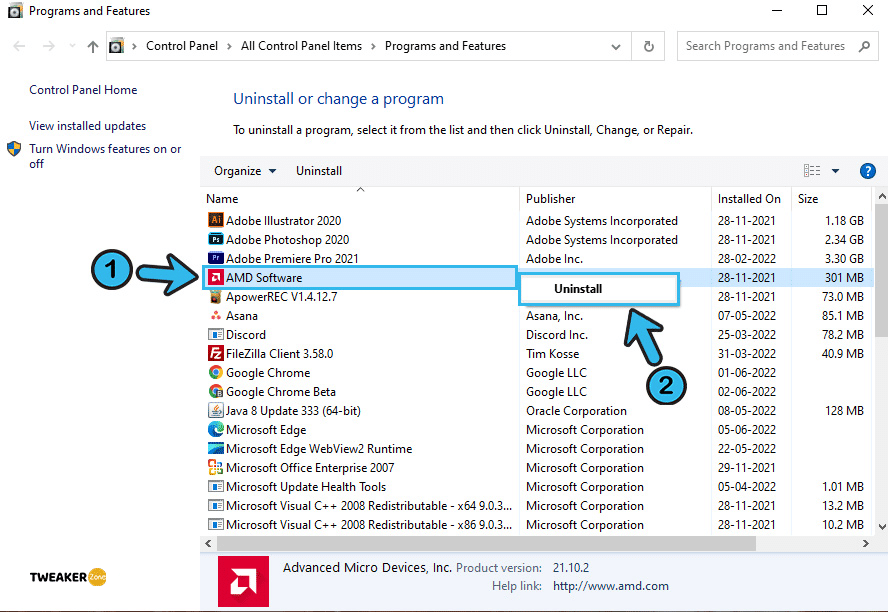
- Step 2: Type “appwiz.cpl” in that dialog box and hit enter to open the “Programs and Features” window.
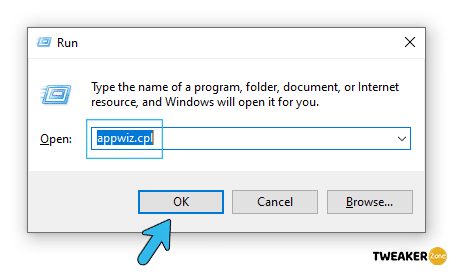
- Step 3: Scroll down and right-click on “AMD” to launch the context menu.
- Step 4: Click on the “Uninstall” option and follow the on-screen instruction to remove the software from your system.
- Step 5: Reboot your system and then visit the official website of AMDto download the latest version of the “Catalyst Utility” software.
- Step 6: Once the “.exe” file is downloaded, click to launch it and follow the on-screen instruction to install the software.
- Step 7: Reboot your system again and relaunch Minecraft.
Once you install the fresh version of AMD Catalyst Utility, your taskbar may not respond, especially if you are using an old driver.
Conclusion
Always try to resort to general fixes as they will solve this dumping error in most cases. And if you really have to imply any pro method, you should always create a system restore point on Windows so that you can roll back to the previous version if any unforeseen error is triggered.
If none of these methods are working and your system is still getting the failed to write core dump error, you can contact the support page of Minecraft. Besides, you can also drop your further queries in the comment box below!
FAQs
Q. How do I fix it if Minecraft has failed to write a core dump?
This issue mainly triggers if you are using an updated network driver or GPU driver. To solve it, go to “Device Manager” and right-click on each of your network and graphics drivers to update those. Once you have updated all of them, simply reboot your system and relaunch your game.
Q. What is a core dump error?
Core dumping or segmentation error can typically trigger in Windows systems if you are accessing a core memory that does not belong to you. If it has “Read-only” settings, Windows can’t override the file and create a dump to access it. This error can also trigger if you have any corrupted memory unit.
Q. What causes a core dump?
Core dump (AKA crash dump) is actually a memory snapshot that Windows automatically take of a running process on your system. Your OS can create a core dump when it witnesses a fatal error in memory to safeguard the running process. Windows will also create a core dump if it encounters a signal error or system exceptions.
Q. How do I enable Minidumps in Minecraft?
Open “Control Panel” and navigate to the “System and Security” tab. Click on the “System” button and navigate to the “Advanced System Settings” option. Now, click “Settings” under the “Start-up and Recovery” segment and select the “Small Memory Dump” from the drop-down menu.

Leave a Reply
View Comments