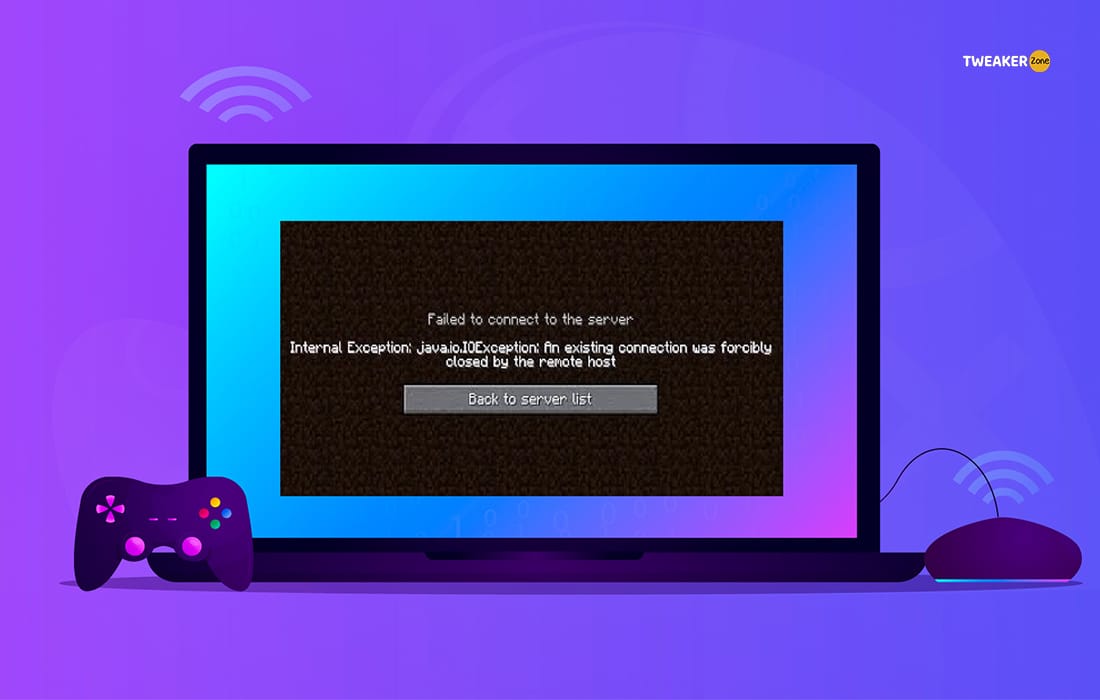
It’s exciting when someone invites you to join the realm of Minecraft. But the experience of playing and exploring the mysterious world can be marred by the “Internal Exception: Java.IO.IOException”.
The Internal Exception: Java.IO.IOException problem can be solved by reinstalling the game, updating its launcher, rebooting the system, or restarting the router. Gamers also follow advanced methods like disabling hardware acceleration or clearing DNS cache.
Before trying various solutions to the problem, it is essential to understand the meaning of the error and the possible causes behind the issue. Keep reading to find out more.
Table of Contents
What Is The Internal Exception: Java.IO.IOException Error?
Before you try to solve the error, you need to understand what this error actually is. This error is mainly triggered when your Windows system fails to make a stable and secure connection with the Minecraft game servers.
Your system should make a low-ping connection with the game server to ensure a smooth gaming experience. And you will only get this error while playing Minecraft online or in multiplayer mode.
Java errors are not the only bug you can get on Minecraft, as graphical errors are pretty common. You may often get buggy bows in Minecraft too. And in that case, you can follow our tested steps to repair the bow in Minecraft to resolve the issue.
Primary Causes of “Internal exception: Java.IO.IOException” Error in Minecraft
There can be several reasons why you are getting this error. But in most cases, the primary reasons are as follows.
- You are using an outdated version of Minecraft launcher.
- DNS of your router is unresponsive to the Minecraft game servers.
- “Server Resource Pack” is enabled in the in-game settings.
- The “Render Distance” (in graphics settings) is too high to handle by your GPU.
- The connection is interrupted by “Hardware Acceleration” or improper “Firewall” settings.
- The Windows Security app is blocking the connection in the background.
- “Java Native Sandbox” is disabled or has the wrong Java path.
You may also get this error if the Minecraft setup file is corrupted or missing. Besides, your cache and temporary system files can also cause this issue.
4 Quick Fixes ForThe Internal ExceptionError
Most people encounter this error while playing Minecraft in multiplayer mode from Windows systems. But it has four general methods that can effectively solve this error.
1. Reinstall Minecraft
Reinstalling the game itself can solve the “internal exception: Java.IO.IOException” in Minecraft in no time in most cases. But you should also clear the app data before installing the game again.
- Step 1: Click on the Windows Search Bar (Magnifying glass icon), type “Control Panel,” and hit Enter.

- Step 2: Click on “Programs” on the newly-opened window and navigate to “Uninstall A Program.”
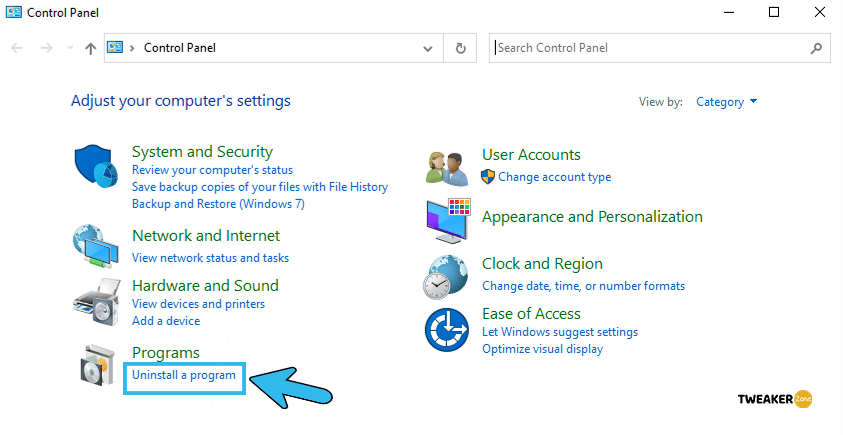
- Step 3: Navigate to “Minecraft” and right-click on it to select the “Uninstall” option.
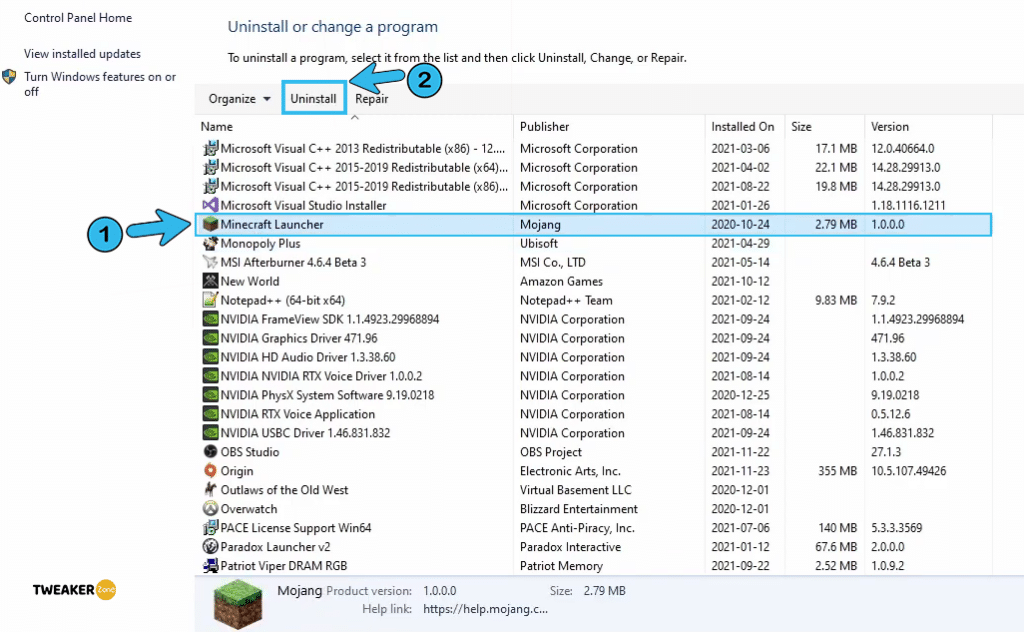
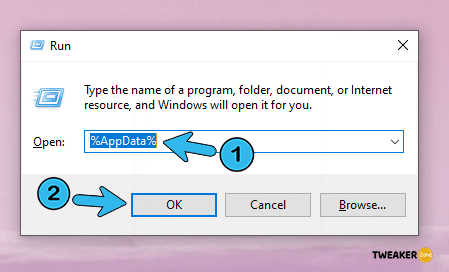
- Step 4: Once the game is removed from your system, press “Windows Key + R” to open the “Run” command.
- Step 5: Write “%AppData%” and hit Enter to open the file explorer window.
- Step 6: Open the “Roaming” folders and navigate to the “.minecraft” folder.
- Step 7: Delete the “.minecraft” folder from that directorie. Click on “Run As Administrator” if it pops up.
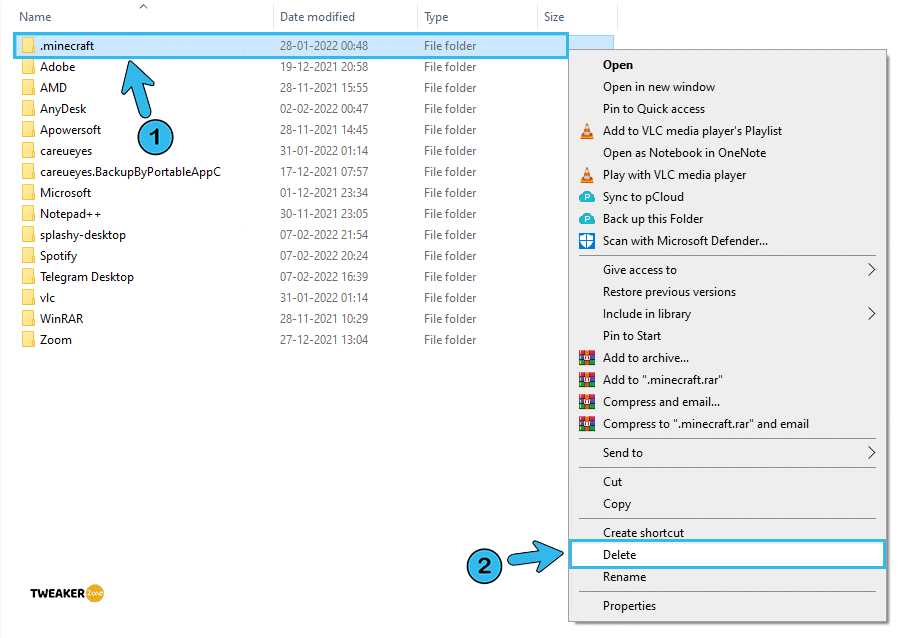
- Step 8: Reboot your system and install Minecraft again.
It’s not just the “Minecraft” game. You may also need to uninstall Java if the problem persists. However, remember to install Java again before you reinstall the game.
2. Update Minecraft Launcher
Not just the system files, but a faulty or buggy launcher can cause this issue too. So, you also need to update the launcher to see if it creates any interference!
- Step 1: Go to Minecraft launcher and double-click to open it.
- Step 2: Navigate to the “Option” button and click it to open a new window.
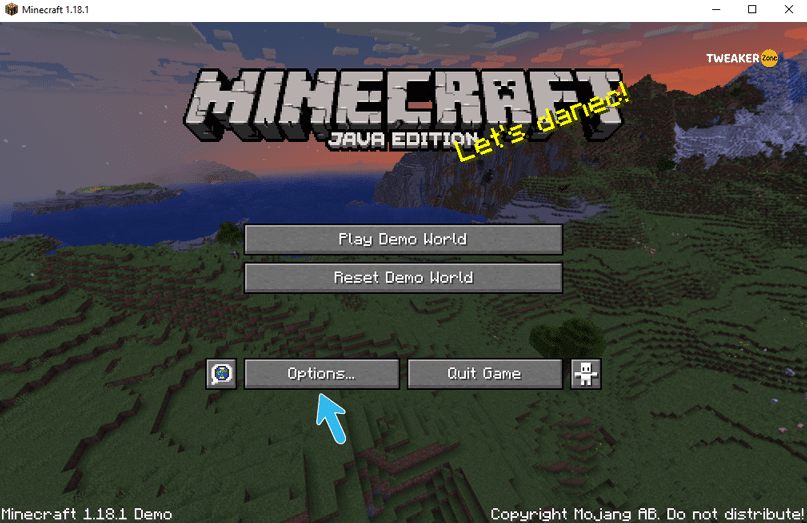
- Step 3: Go to the “Force Update” option and click it.
- Step 4: Select the “Apply The Launcher Update” from the new pop-up menu to initiate the update process.
- Step 5: Once the launcher is updated, close and relaunch the game.
It is best to use the official Minecraft launcher only! If you are using any cracked launcher, it may not initiate the update process from the game itself.
3. Clean Reboot Your System
It’s not just Minecraft; a clean reboot can solve several issues in Windows. So, if you are frequently getting the error, try the following steps.
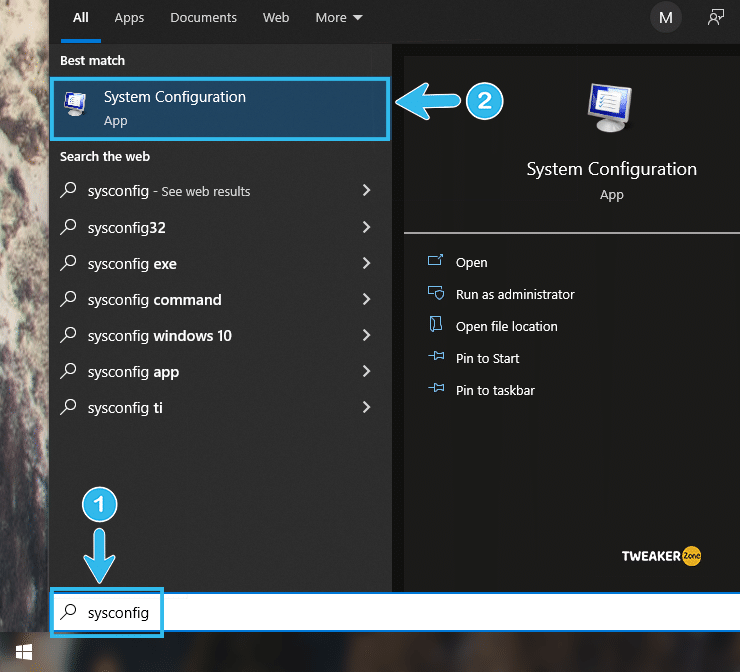
- Step 1: Click on the “Magnifying glass” icon at the bottom-left and type “System Configuration”
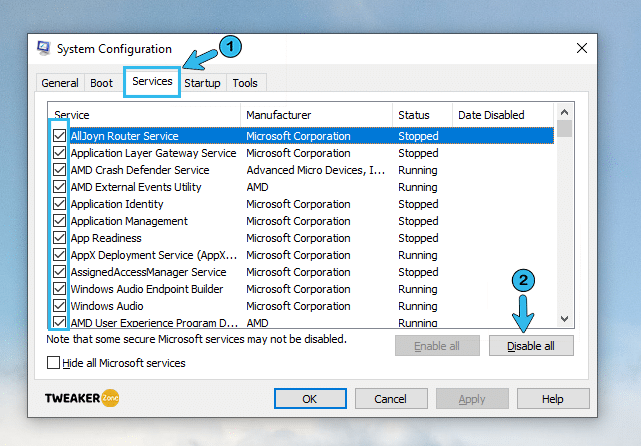
- Step 2: Now, go to the “Services” option and disable each software service option from that window. Disable services by clicking the “Disable All” Button.
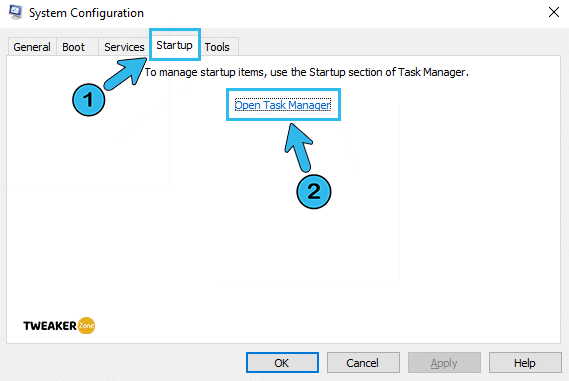
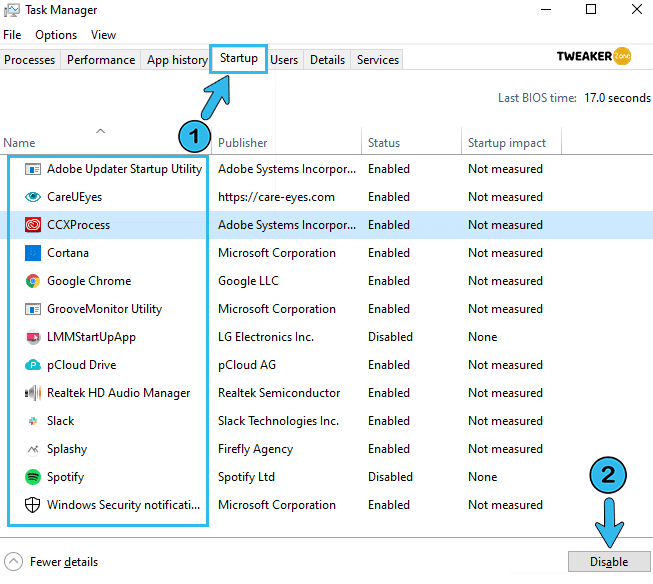
- Step 3: Now Navigate to startup option. Click on “Open Task Manager” to open.
- Step 4: Now, the Task Manager startup will open up and disable all one by one.
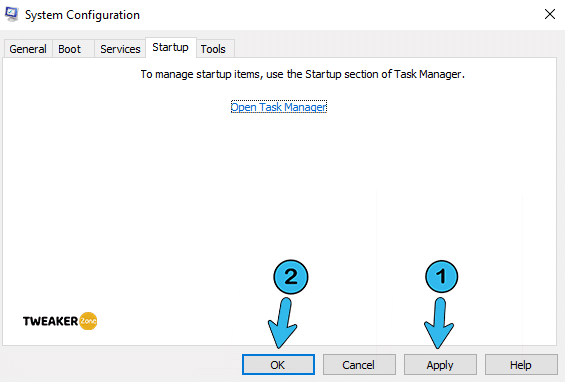
- Step 5: Now back to System configuration, click on Apply & Ok.
- Step 6: Reboot your system once you disable the options from both “Startups” and “Services.”
- Step 7: Enable a single process at a time from “Startups” and “Services” to find the buggy program.
- Step 8: Permanently disable the problem-causing program and reboot your system again.
| ⚠️ Beware: Don’t close the hardware services like Nvidia and Realtek while disabling the services on startup. Disabling these programs can cause screen flickering, low resolution, and even no-sound issues. |
4. Restart Your Router
You should always restart your router or modem at least once a week – and not just while you are getting any error – to clear the internal cache. It will not only enhance clean data transfer but will also rectify connection issues in the Windows system.
- Step 1: Hold the “Power” button on the backside of your router and hold it for approximately 10 to 15 seconds until the light goes off completely.
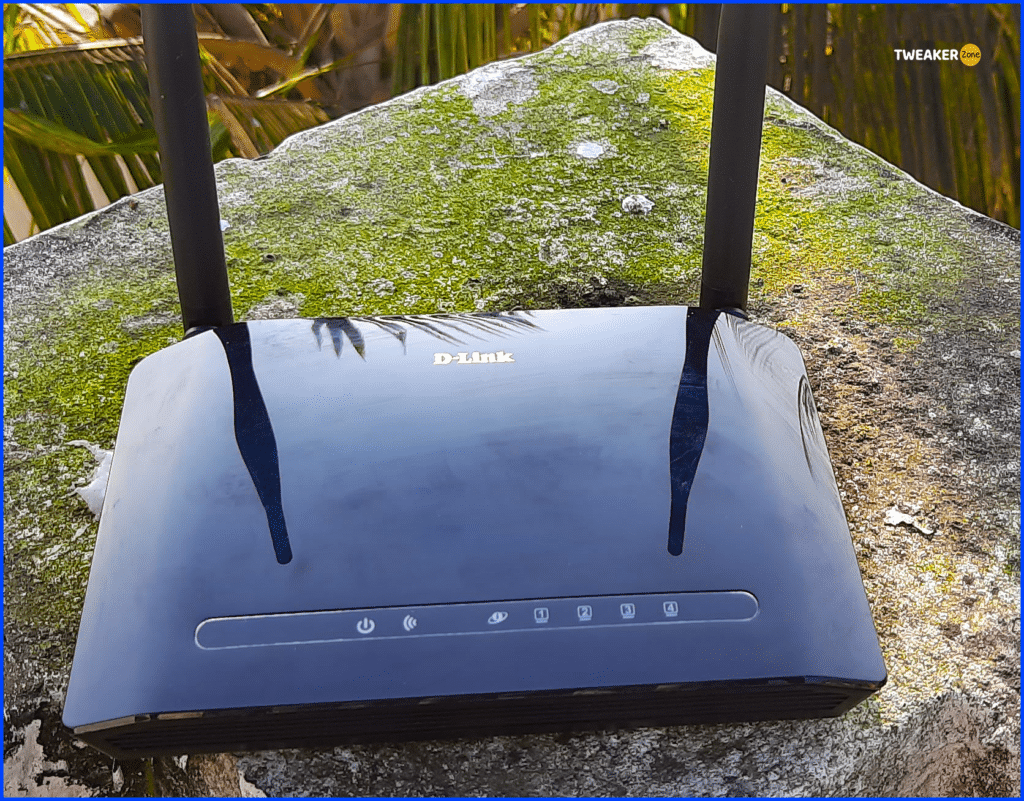
- Step 2: Unplug the router and keep it without power for 5 to 10 minutes.
- Step 3: Plug the router into the power socket and start it.
9 Advanced Methods To Fix The Error
If the four general fixes we mentioned above can’t solve the “Minecraft Internal Exception: Java.IO.IOException” error on your system, you should resort to advanced methods to solve this issue.
5. Disable Server Resource Pack
Although it will not create issues in single-player mode, a faulty server resource pack is bound to create bugs and errors in multiplayer mode. So, you need to disable it to check if the game is working properly without it.
- Step 1: Click on the Minecraft launcher to open the game and navigate to the “Multiplayer” option.
- Step 2: Identify the problem-causing server from where you are getting the error and navigate to the “Edit” option just beside the name of the server.
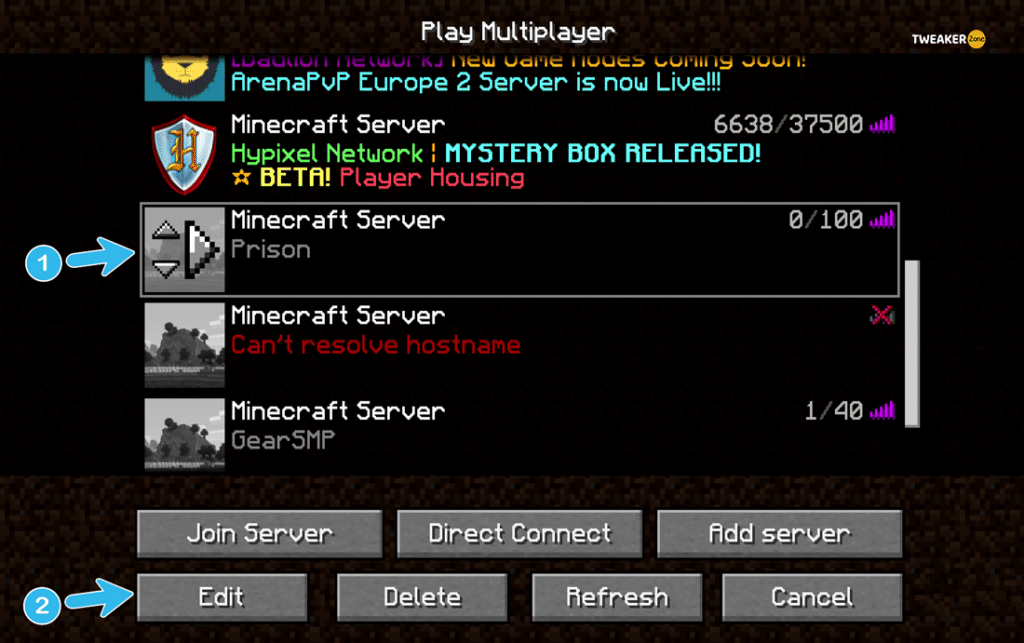
- Step 3: Navigate to “Server Resource Packs” and click on the “Disable” option.
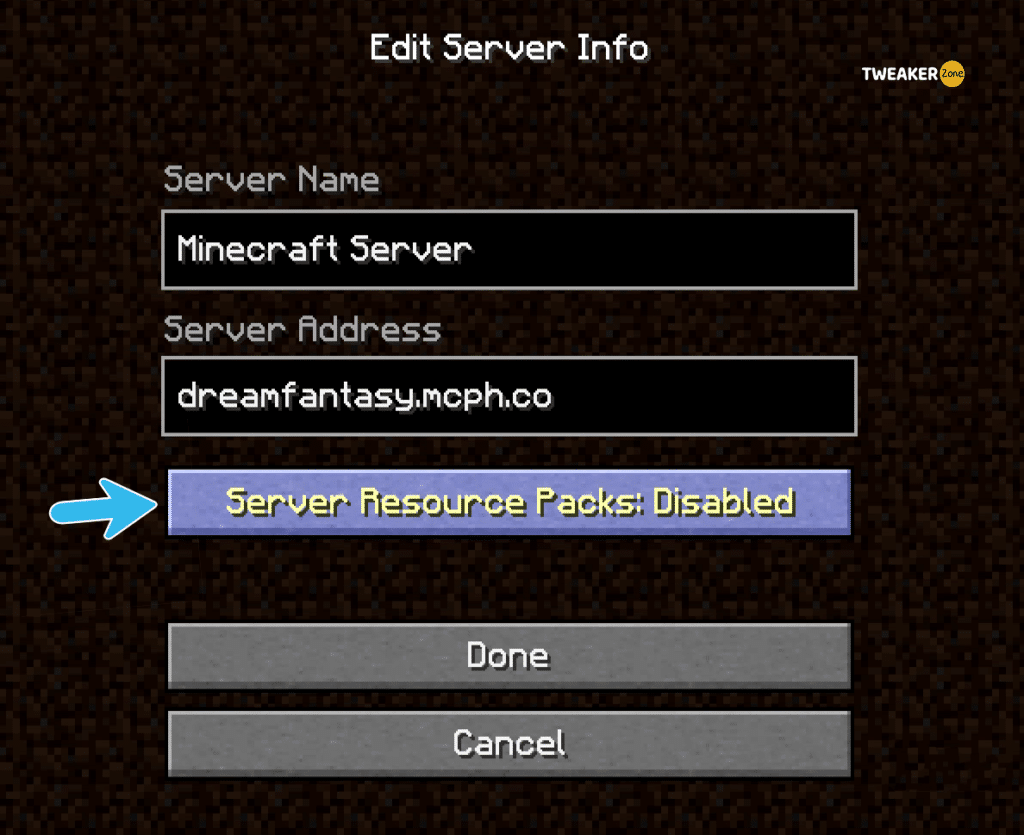
- Step 4: Click “Done” once prompted and relaunch the game.
- Step 5: Go to the multiplayer option and connect to the server again.
It is better to ignore a server completely if that particular one is creating this issue frequently. Most gamers also prefer to connect to servers with low ping rates to avoid these issues.
6. Disable Hardware Acceleration
While older routers have Hardware acceleration, modern-day routers have NAT, which is almost the same. And if you are frequently getting this issue, you should try disabling it.
- Step 1: Open either “Edge” or “Chrome” and hit your router IP (It will be either 192.168.0.0 or 192.168.0.1 in most cases).
- Step 2: Once the “Admin Control Page” is opened, navigate to the “LAN” option.
- Step 3: Find the “Hardware Acceleration” option and disable or uncheck it.
- Step 4: “Save” and apply the new setting.
- Step 5: Reconnect your router manually to your ISP to start it without hardware acceleration.
If you can’t find “Hardware Acceleration” inside the “LAN” menu, look for “NAT Acceleration,” “Flow Acceleration,” or “Cut-Through Forwarding” to disable it.
7. Decrease Render Distance
If you have a low-end graphics card, rendering not only takes time and feels buggy, but it creates other issues, as well. So, it would help if you tried to increase the render distance from the in-game video settings to rectify the error.
- Step 1: Double-click on the Minecraft launcher to open the game.
- Step 2: Click on “Options” and navigate to “Video Settings.”
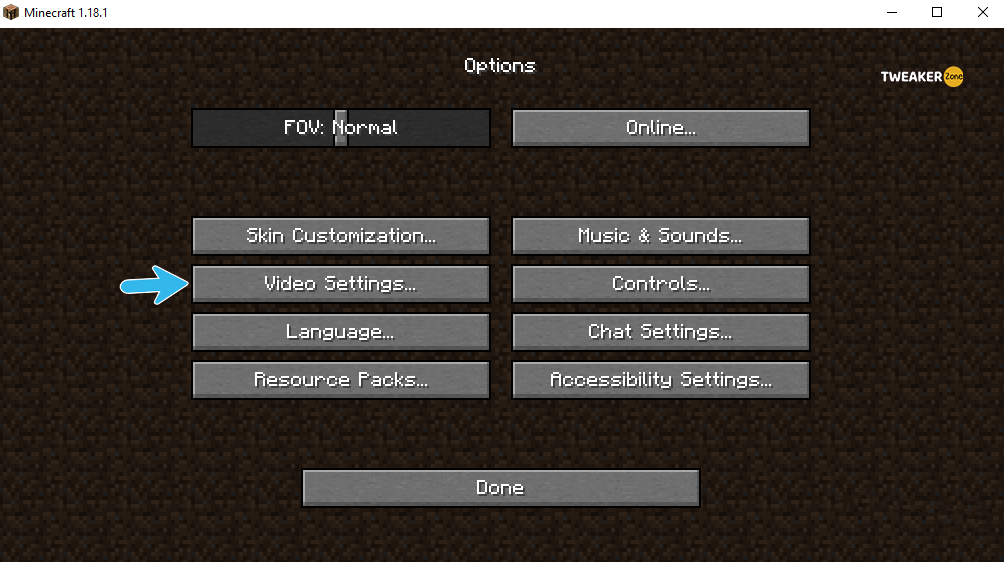
- Step 3: Scroll down and look for a slider beside the “Redner Distance” option.
- Step 4: Reduce the distance by adjusting the slider until you feel a smooth transition.
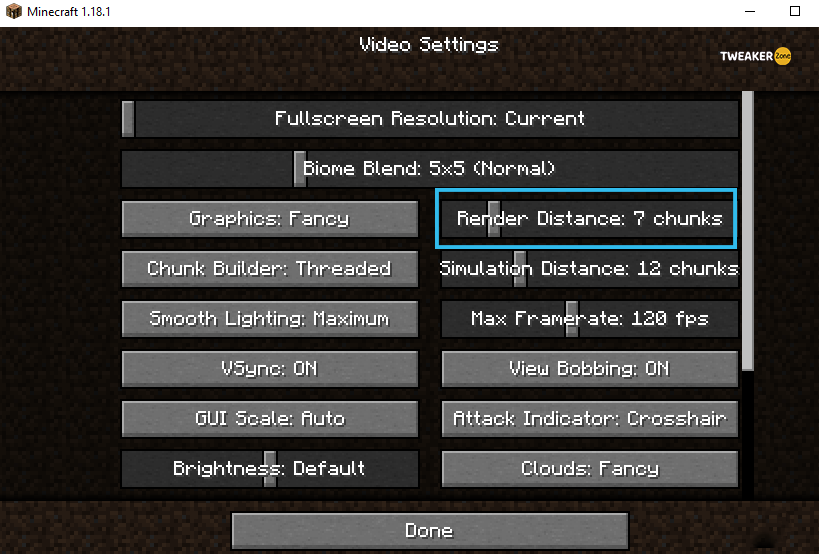
- Step 5: Relaunch your game and reconnect to the server again.
If you are getting a numerical value besides “Render Distance” rather than a slider, edit the value (the default value is 10) and keep it on the lower side between 4 to 6.
8. Clear DNS Cache
DNS or the domain name system is the service that connects a particular IP to a specific website or host server. So, it is better to clear the DNS cache if you are getting the “connection lost Internal Exception: Java.IO.IOException” error.
- Step 1: Click on the “Magnifying Glass” icon at the bottom-left corner of the taskbar.
- Step 2: Type “CMD” or “Command Prompt” and hit Enter.
- Step 3: Right-click on the “CMD” icon and select the “Run As Administrator” option.
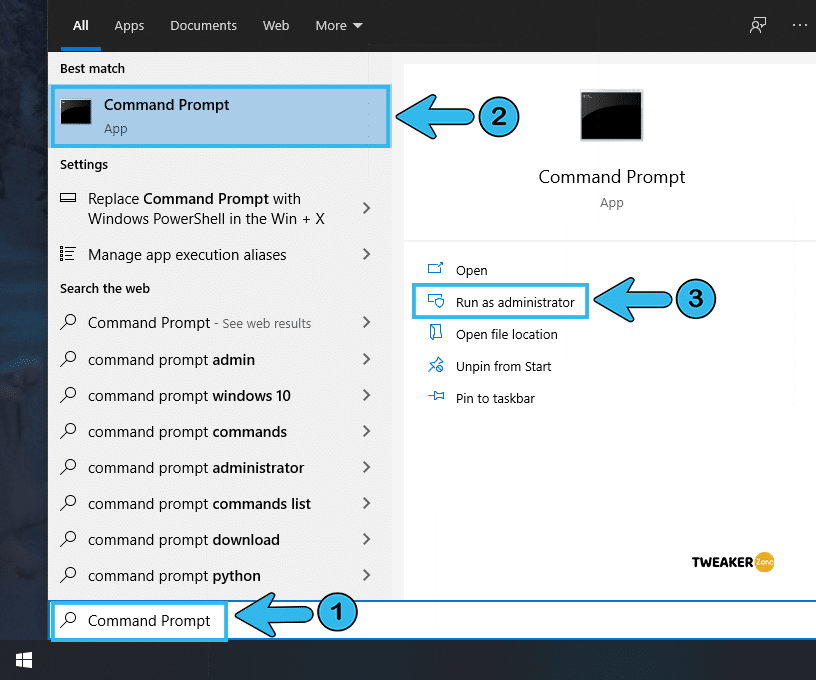
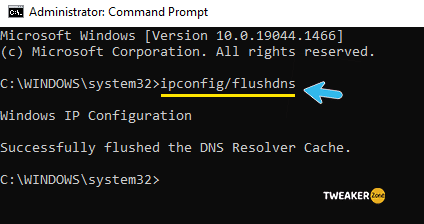
- Step 4: Once the command prompt window opens up, type “
ipconfig/flushdns” and hit Enter.
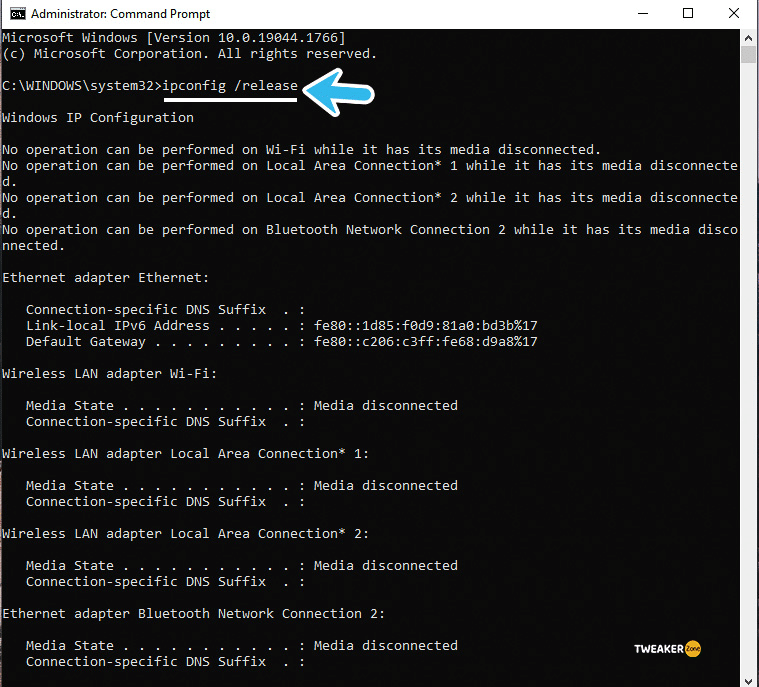
- Step 5: Type “
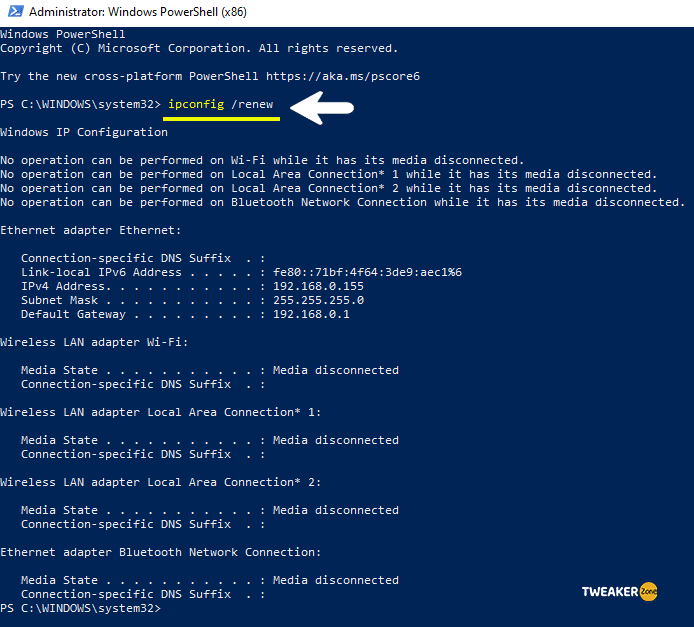
ipconfig/release” and hit Enter, and then type “ipconfig/renew” and hit Enter again.
- Step 6: Type “exit” to close the CMD and reconnect to your router.
Flushing your DNS will automatically reset the DNS value to the default value. So, you need to manually enter the DNS again in the LAN settings if your ISP uses a particular DNS IP.
9. Change Router DNS
Your DNS can create an issue with the Minecraft server DNS for various reasons. If the problem persists after flushing the DNS, you should change the DNS completely.
- Step 1: Open the “Control Panel” and find the “Network And Internet” option.
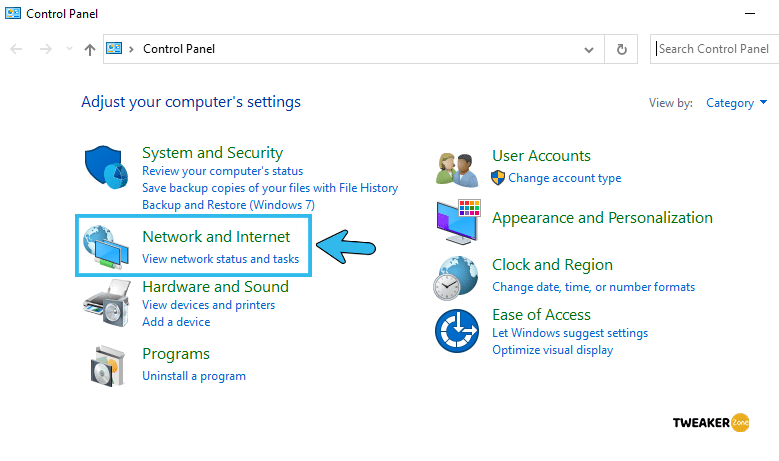
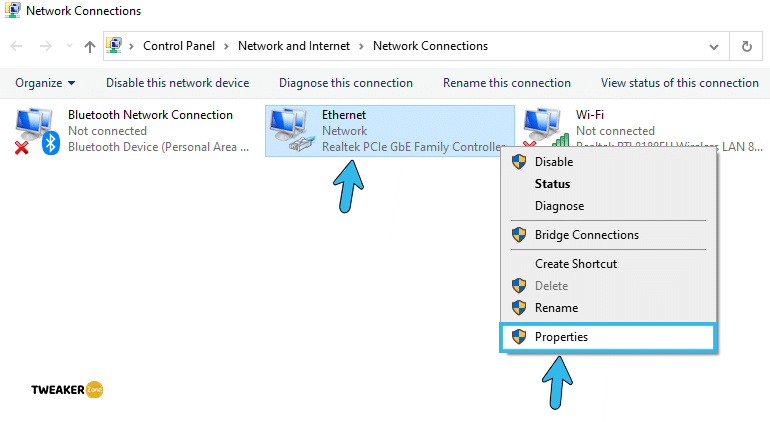
- Step 2: Head Over to Network And Sharing Center > Change Adapter Settings Right-click on your active internet connection (it can be either Ethernet or Wi-Fi).
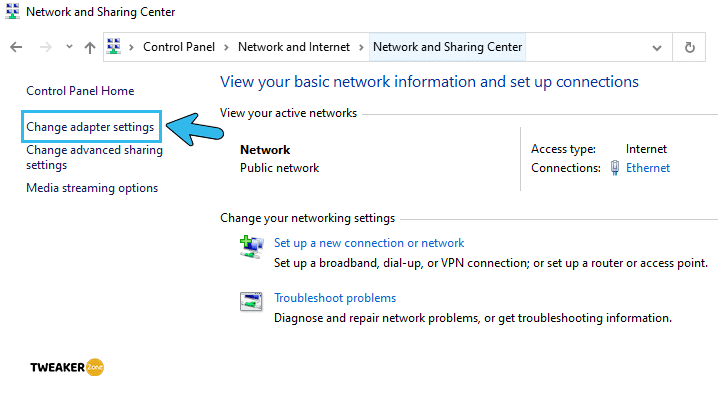
- Step 3: Click on “Properties” and navigate to the “Networking” tab.
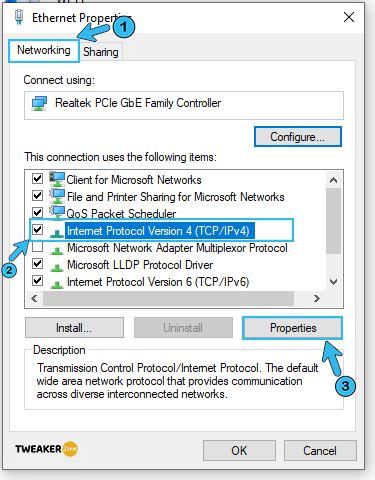
- Step 4: Navigate to “Internet Protocol Version 4 (TCP/IPv4)” and right-click to open the “Properties” tab.
- Step 5: Click on the “Use The Following DNS Server Address” to enable manual DNS.
- Step 6: Write “
8.8.8.8” in the “Primary DNS” field and “8.8.4.4” in the “Secondary DNS” box.
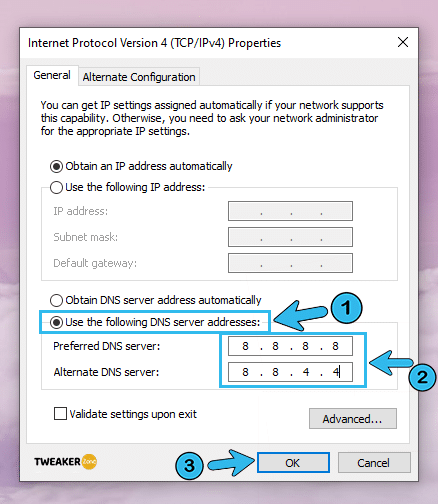
- Step 7: Click “Ok” to change the settings and save it.
While most ISP will give you their custom DNS address, you can definitely edit that and use any public DNS. However, public DNS can create an issue in a few ISPs. So, it is better to note down your existing DNS before changing it.
10. Change Firewall Settings
A firewall is a gateway that restricts unknown and potentially harmful connections to make contact with your system. But, whenever you are getting a “Java.IO.IOException: An established connection was aborted by the software” error message, you should try to change your firewall settings.
- Step 1: Press “Windows Key + R” to open the run command and type “control firewall.cpl” in the command line.
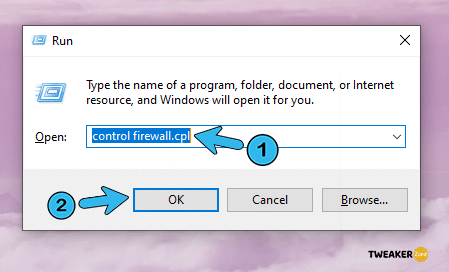
- Step 2: Hit Enter to open the “Windows Firewall” option.
- Step 3: Navigate to the “Allow an app or feature through Windows Defender Firewall” option and click it.
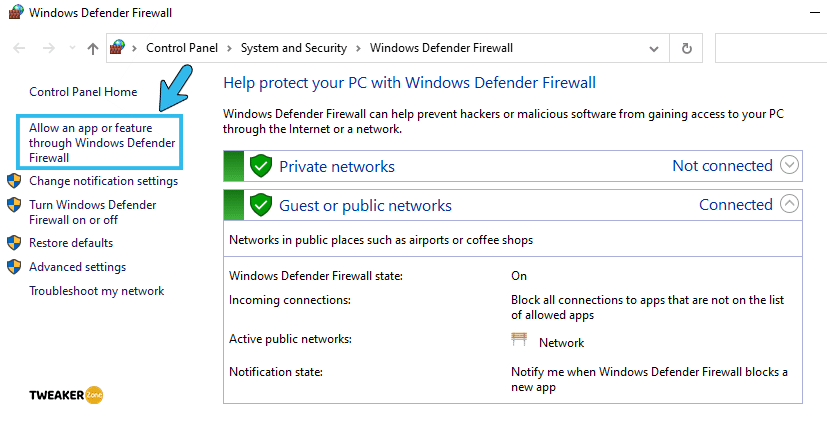
- Step 4: Click and expand the “Change Settings” and navigate to both the “Public” and “Private” tabs.
- Step 5: Find “Minecraft” or “Java Platform SE Binary” or “javaw.exe” and tick on the adjacent checkbox.
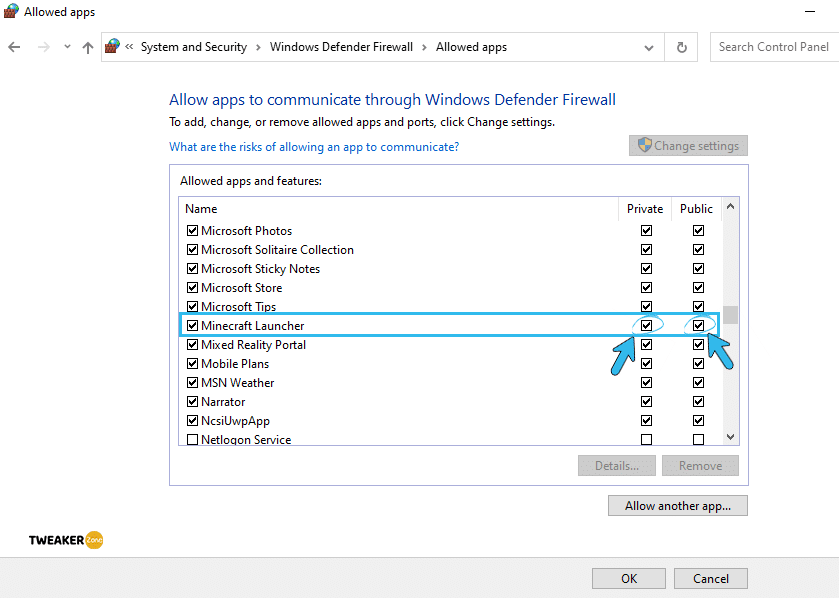
- Step 6: Click “OK” to save settings and relaunch the game.
11. Whitelist Minecraft In Windows Defender
Although it is not the best antivirus out there, Windows Defender can often do the job if you talk about day-to-day security. It can often block Minecraft to establish an unsecured connection. And to solve it, you need to whitelist Minecraft from its directory.
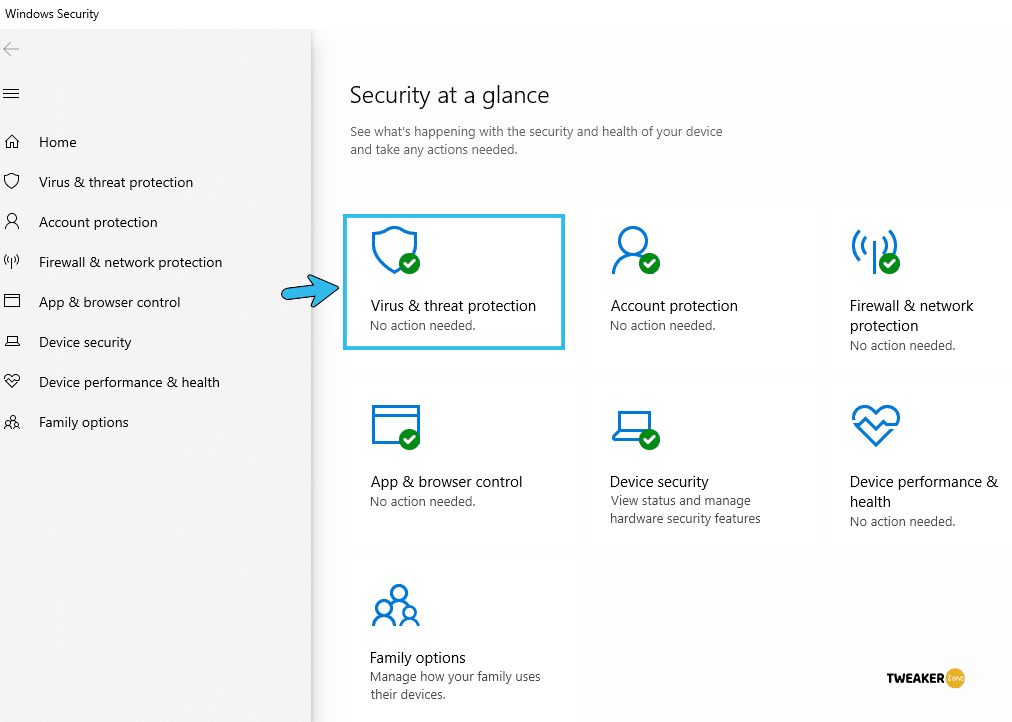
- Step 1: Click on the “Magnifying Glass” icon on the taskbar to write “Windows Security“ and hit Enter.
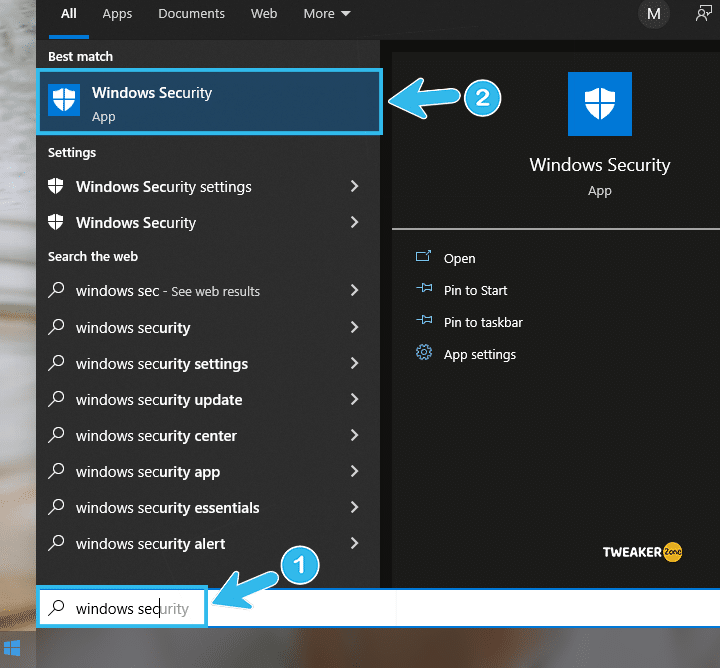
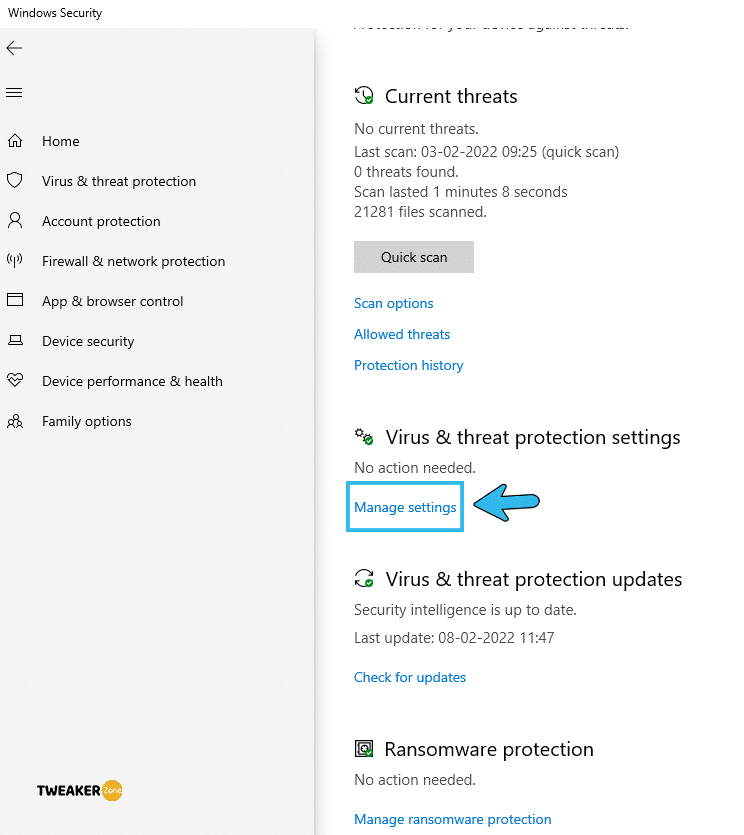
- Step 2: Navigate to “Virus & Threat Protection Settings” and find “Manage Settings” from the menu.
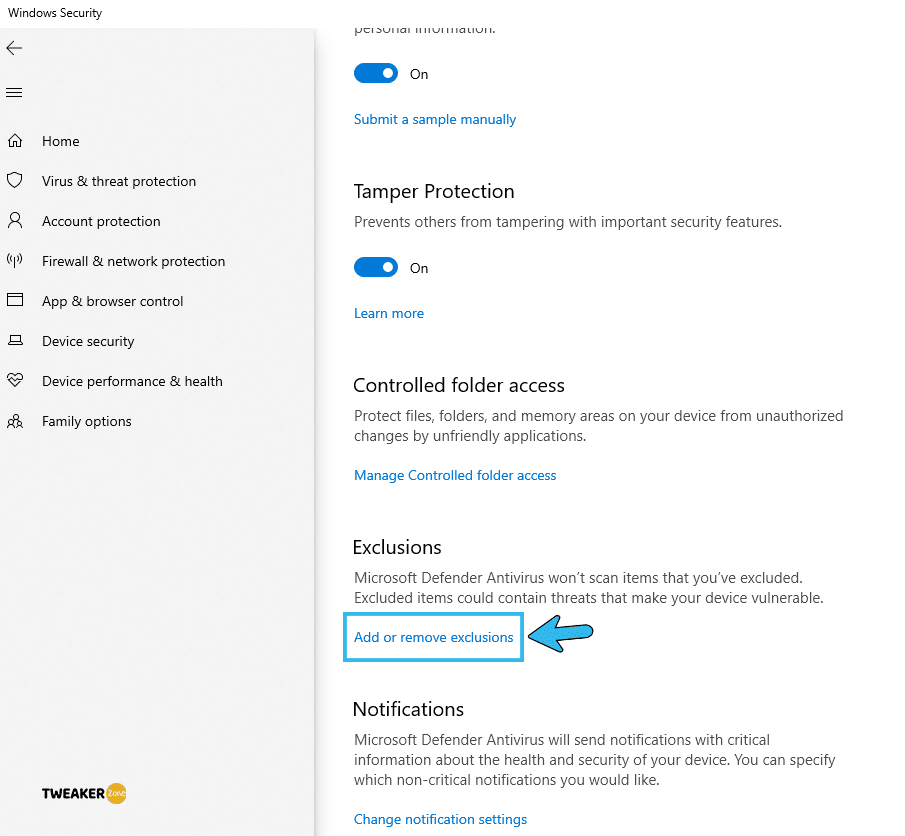
- Step 3: Navigate to the “Exclusions” section and click on the “Add or Remove Exclusions” button.
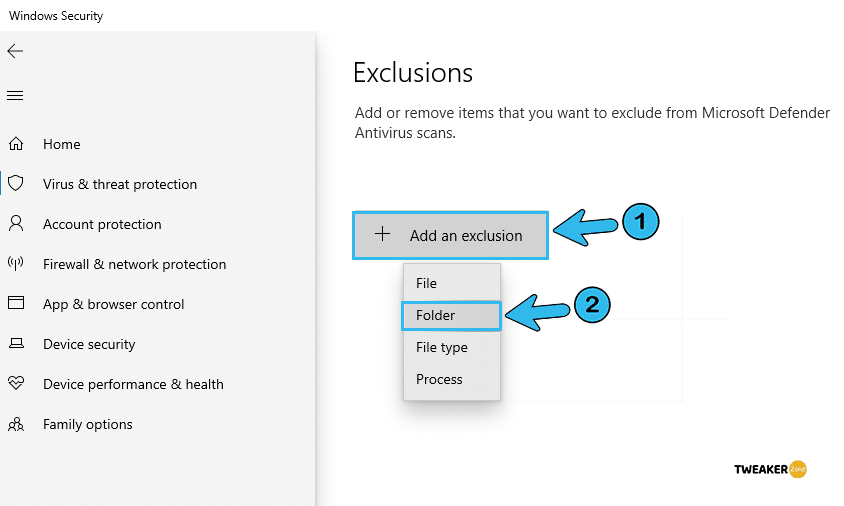
- Step 4: Click on the “Add an exclusion” option and select the “Folder” icon after that.
- Step 5: Navigate to the “.minecraft” folder and choose the “Select Folder” option.
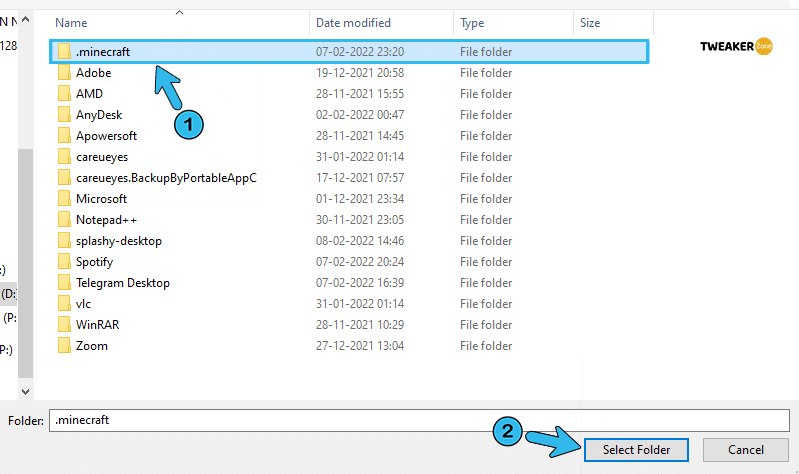
- Step 6: Click “Apply” to save the settings and restart your system.
12. Enable Java Native Sandbox
Java native sandbox is an application that enables a program to run in a restricted environment without interfering with other apps. If you are getting the error message too frequently, you can try enabling Java Native sandbox.
- Step 1: Click on the “Magnifying Glass” button on the taskbar and type “Control Panel” to open the app.

- Step 2: Navigate to the “Programs” option and click to expand it.
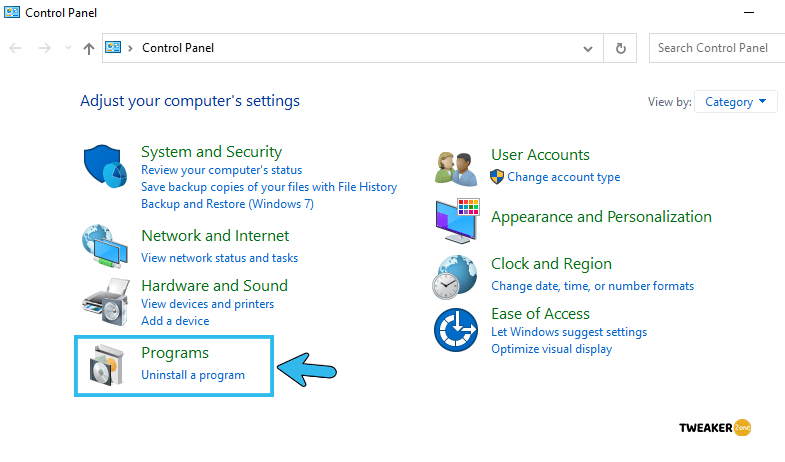
- Step 3: Click on the “Java” option to open a new pop-up window.
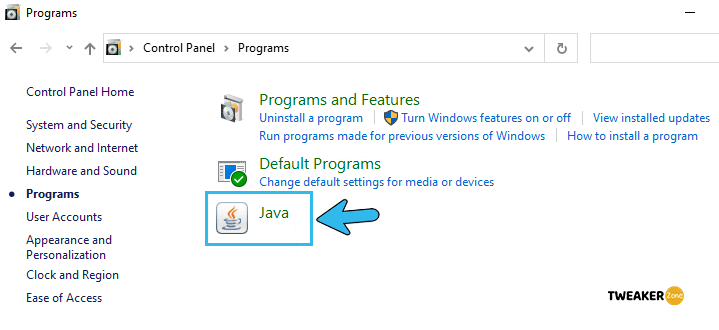
- Step 4: Navigate to “Java Control Panel” and select the “Advanced” tab.
- Step 5: Scroll down and click on the “Advanced Security Settings” tab to expand it.
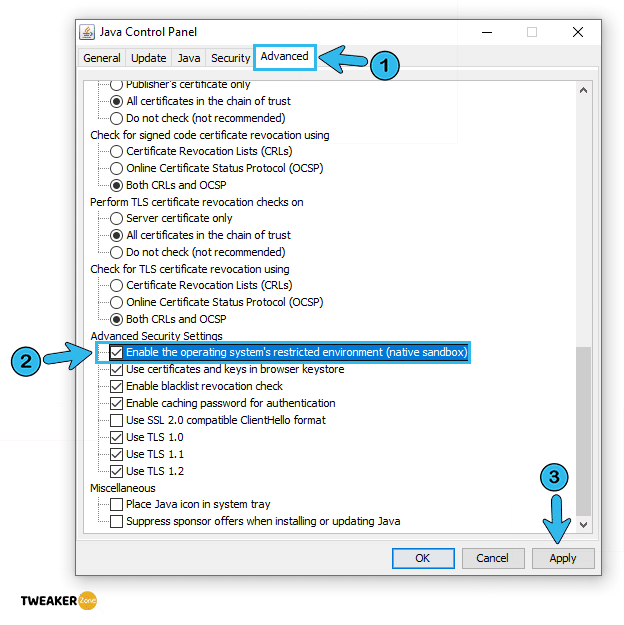
- Step 6: Tick the “Enable the operating system’s restricted environment (native sandbox)” option and click “Apply” to save it.
- Step 7: Press “OK” to exit from the Control Panel app and then reboot your system.
Suppose you can’t find “Java” under the “Programs” option. In that case, you can manually edit the “deployment.properties” file and change the “deployment.security.use.native.sandbox” to “True” to solve this issue.
13. Manually Edit Java Path
Many users reported that they are getting a wrong Java path on the Minecraft launcher that is primarily causing the “Internal Exception: Java.IO.IOException” error. Follow these steps to rectify the Java path.
- Step 1: Type “C:\Program Files (x86)” on the search bar and hit Enter to open file explorer.
- Step 2: Navigate to the “Java” folder and click on the latest installation (if you have multiple versions of Java).
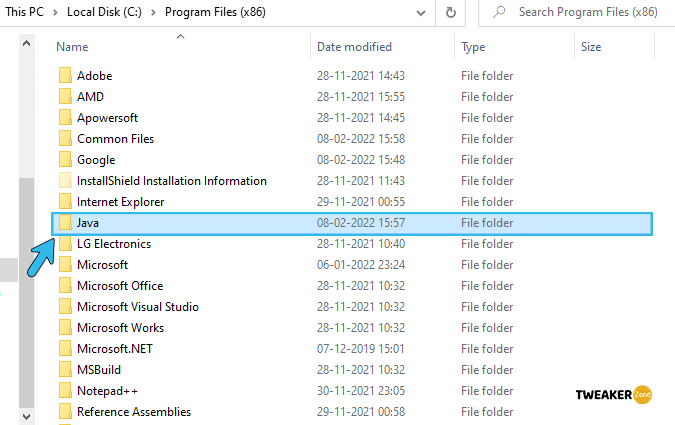
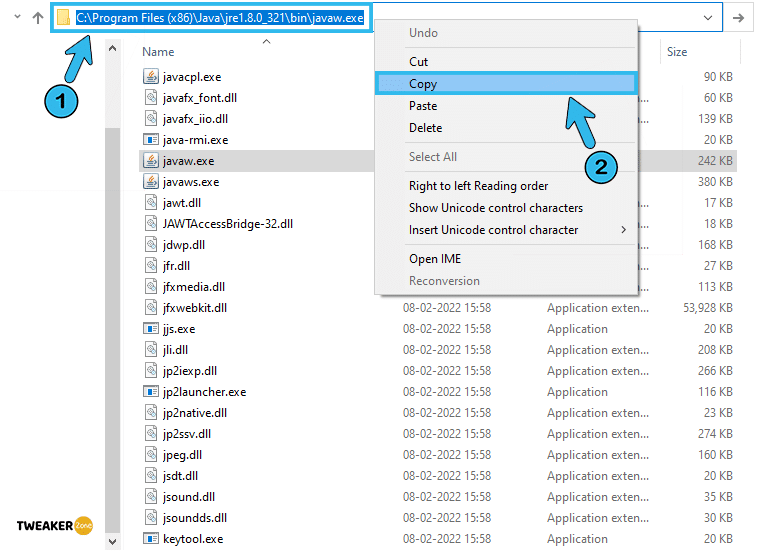
- Step 3: Locate the “Bin” Folder and there find javaw.exe, after copy the full address of that folder from the address bar.
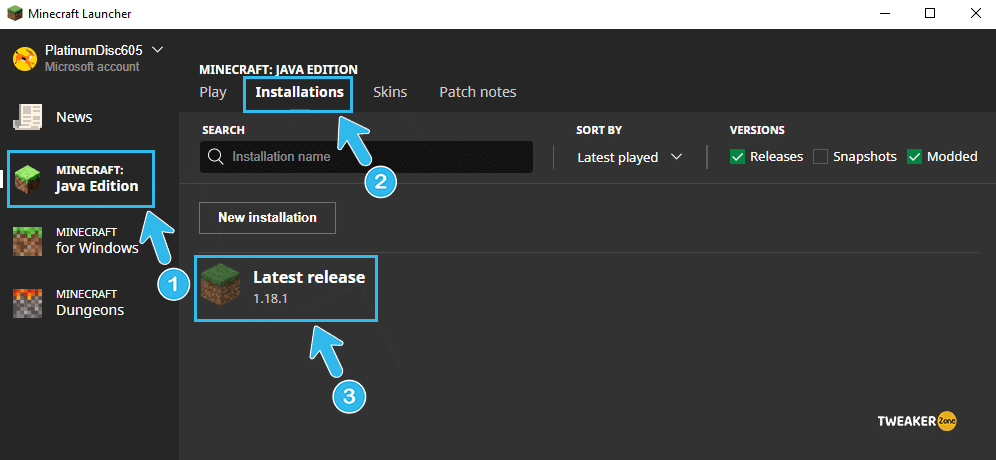
- Step 4: Now Double-click on the “Minecraft Launcher” to start the game and select Minecraft:Java Edition, in there head over to “Installaions“.
- Step 5: Navigate to latest installed Minecraft and click on it.
- Wile oprning Edit Installtion, you need to click on “More Options”, in there you will find the “Java Executable” option.
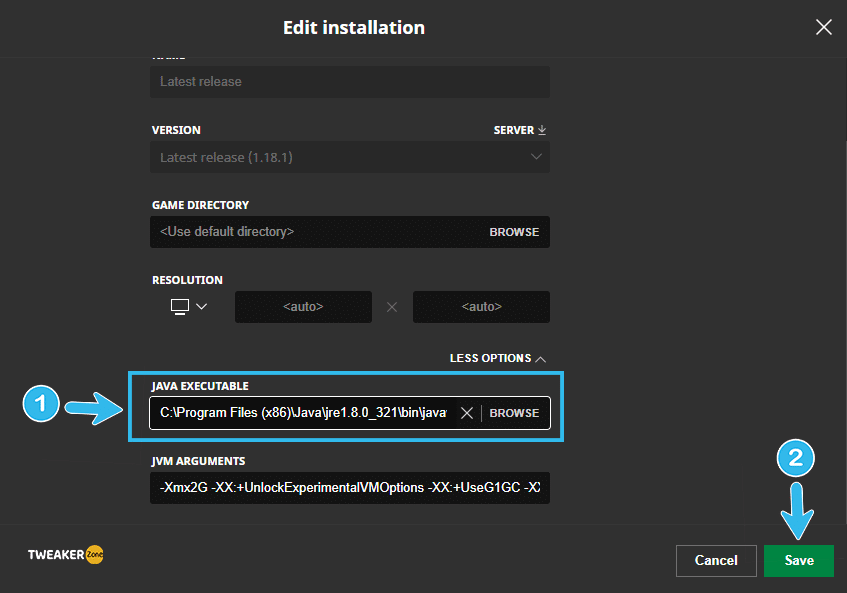
- Step 6: Paste the copied address of the bin folder and click save.
- Step 7: Relaunch your game with the proper Java path.
If you can’t find the “Java” folder under “Program Files,” the latest Java application may not be properly installed on your system. In that case, download and install the latest Java on your system.
FAQs
Q. What is the “Internal Exception: Java.IO.IOException” error?
It is a typical error in Minecraft, triggered by an unsecured and unstable network connection between your system and the Minecraft game servers. This error also occurs when your system and the game server can’t communicate without any interruption or interference by third-party applications.
Q. How do I fix the Internal Exception: Java.IO.IOException connection reset?
There are numerous ways to fix this error. You should start by reinstalling the game, restarting the router, and rebooting your device. You should also update your Windows and the game launcher to eliminate bugs and interference issues. Besides, you can whitelist the game on Windows Security app.
Q. How to Fix Internal Exception: Java.IO.IOException in Minecraft?
It would be best if you started by updating the Java or completely reinstalling it. Besides, you can also configure the Java settings and enable the Java native sandbox to resolve this issue. You may also need to manually enter the correct Java path in your in-game network settings.
Q. What is the internal exception Java Lang NullPointerException?
In Java, a null pointer exception error only triggers when there is an undefined variable. If you use any wrongly-coded mod, this error can also get triggered. And to solve it, you should first look into the class files in the package to rectify any coding or variable errors.
Conclusion
If the problem persists, you can seek help in the Minecraft forum. For their professional team’s assistance, you can shoot an email to their support team. It’s possible that the members on the team or the forum are already working on fixing the problem – and someone might be able to help.
But first, you should try to follow the guidelines that we have provided. Chances are, the solutions we have provided will resolve the Internal Exception: Java.IO.IOException error.

Leave a Reply
View Comments