Minecraft is a popular game because it combines adventure and storytelling. But one of the most frustrating things is running into an error while playing. One such error is “io.netty.channel.abstractchannel$annotatedconnectexception”.
The three most common methods of fixing this error are restarting the router, updating network adapter drivers, and resetting network configurations. You can also try to update Java, reinstall the game, or force-update it when you face this issue.
Whether the problem can be resolved with the help of simple steps or need advanced solutions depends on the root of the issue. So, we are going to know more about this error.
Table of Contents
Why does it say “IO Netty channel AbstractChannelAnnotatedConnectException” in Minecraft?
While playing Minecraft, you must have already noticed that you frequently get this error. It is actually an annotated error that is triggered when there is an unstable connection between the Minecraft server and the host PC.
Most of the routers we install on our home use a NAT (network address translation) protocol that separates our home network from the public internet. This protocol can also trigger this error.
But yes, this annotated error is not the only issue you may face on Minecraft. Many people often encounter graphical problems as well, such as a broken bow. In that case, you can follow our step-by-step guide to repair the bow in Minecraft.
What Are The Primary Causes Of This Error?
There can be several reasons why the “io.netty.channel.abstractchannel$annotatedconnectexception connection refused” error triggers on your Windows PC while playing Minecraft. But in broad-spectrum, it has five primary causes.
- Your IP or the network port is conflicting with the game server or fails to make a secure connection with the host.
- Windows Firewall is blocking the connection or the program altogether in the background.
- The Minecraft or Java installed on your system may be outdated and needs an update.
- The driver of your network adapter or router, or modem is outdated.
- There is a bug in the installation file, or any file is missing from the installation directory.
This error can also trigger if you haven’t restarted your router or modem for a long time. You also need to clear your cache and cookies at frequent intervals.
3 Common Fixes For The Connection Error
Before you try any pro methods or advance fixes to solve this error, you should first try these three general methods to fix it.
1. Restart Your Router
If you want to know how to fix the io.netty.channel.abstractchannel$annotatedconnectexception error, you should start by trying some general fixes that typically solve most of the problem. Restarting your router should be your top priority as it can solve the router cache errors that can trigger this issue.
- Step 1: Locate the “Power” button at the back of your router and turn it off.
- Step 2: Unplug the router and modem and keep it like that for 2 minutes.
- Step 3: Plug in your router or modem in the power socket and wait for 60 more seconds.
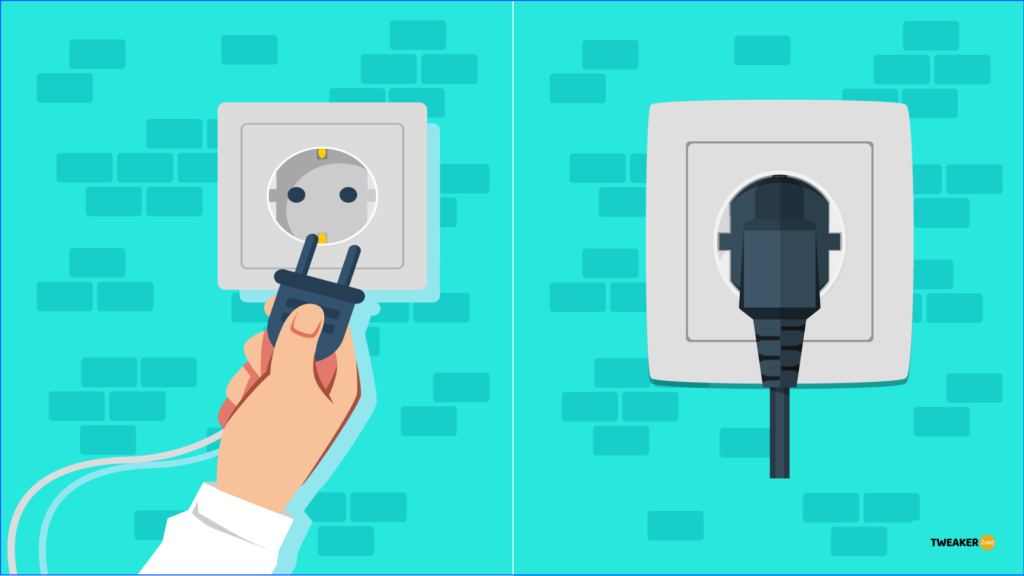
- Step 4: Switch on the “Power” button again and let all the lights stabilize and stop flickering.
- Step 5: Restart your computer and connect to the router again.
Even if you don’t face any issues, you should restart your modem and router at least once a week. Restarting your router at frequent intervals can improve the performance and power cycle.
2. Update The Network Adapter Drivers
Not just your router but an absolute or outdated network driver can also cause this error. So, you need to update your drivers regularly to avoid these issues.
- Step 1: Click on the “Magnifying Glass” icon at the bottom-left corner of your Windows taskbar.
- Step 2: Type “Device Manager” and hit enter.
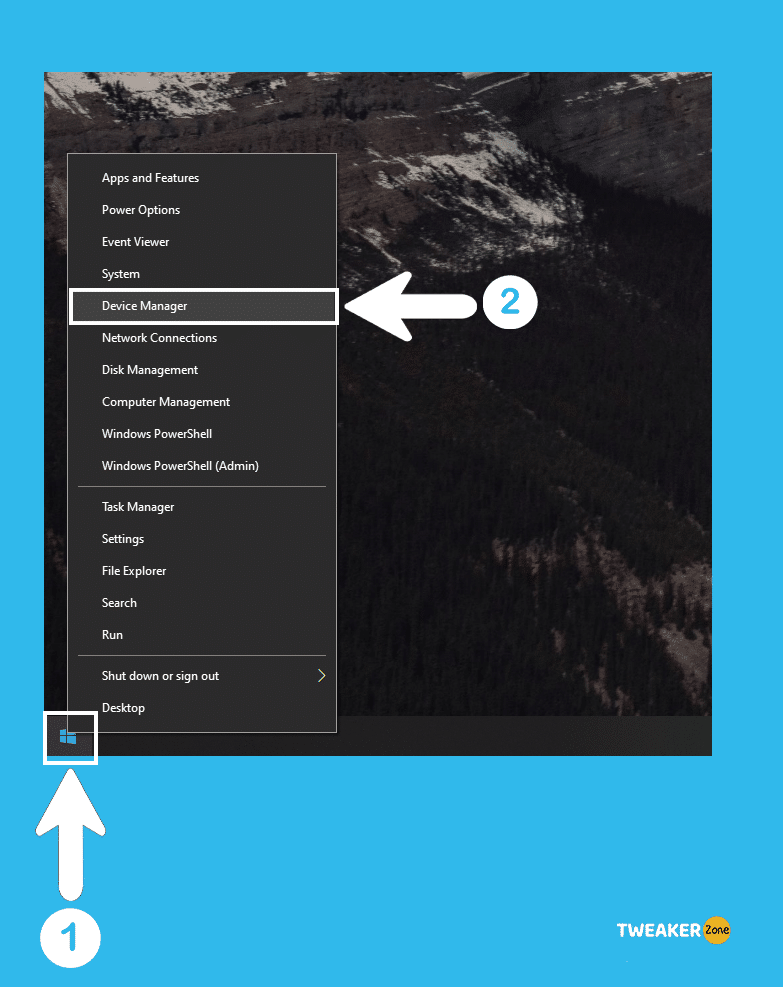
- Step 3: Locate “Network Adapter” from the newly opened window and expand it.
- Step 4: Right-click on each header to select “Update Driver” and follow the on-screen instructions.
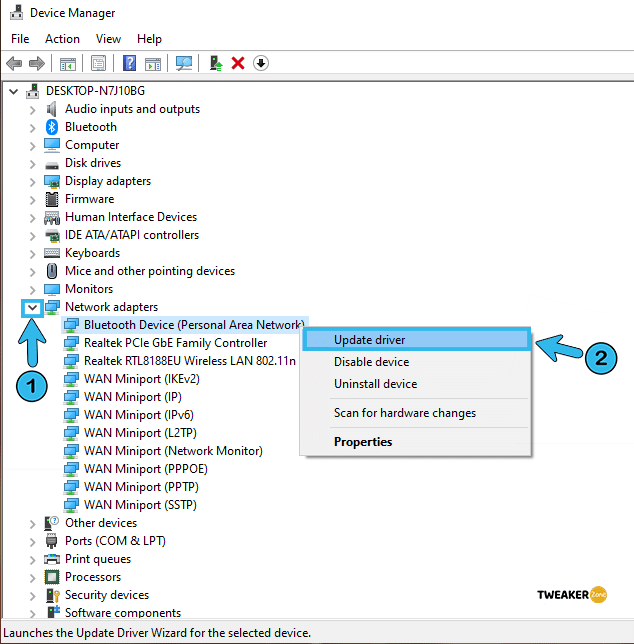
- Step 5: Update each network driver and reboot your system.
You will most probably get the “Realtek” or “TAP-Windows” option in the “Network Adapter” section. Updating these two will most likely solve the problem, although it is better to update each available option.
3. Reset Network Configurations
If you haven’t flushed your DNS for too long or haven’t reset your IP, you may encounter the issue of getting a netty channel error while playing Minecraft. Follow these steps to resolve it.
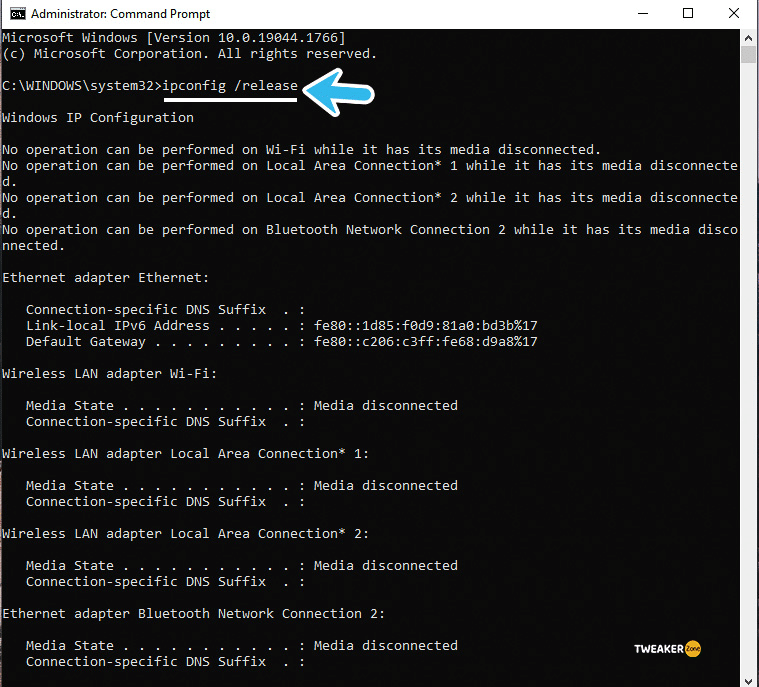
- Step 1: Type “Command Prompt” or “CMD” in the windows search option and hit enter.
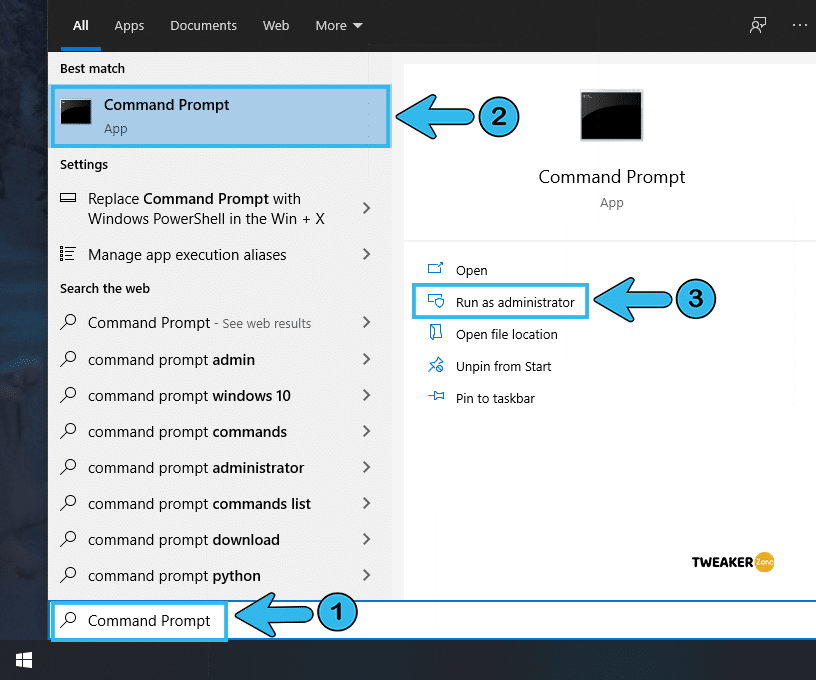
- Step 2: Select the top option from the result and click on “run as administrator” to open the command prompt.
- Step 3: Type “
ipconfig /flushdns,” “ipconfig /release,” “ipconfig /renew,” “netshwinsock reset,” and “netsh int ip reset” one after another and hit enter.
- Step 4: Reboot your computer and reconnect to your router.
7 Advanced Fixes For This Error
If you are still getting the “Minecraft io.netty.channel.abstractchannel$annotatedconnectexception connection refused” error after trying the common fixes, you need to resort to advanced fixes to rectify this issue. And there are seven ways to do it.
4. Update Java
An outdated Java version on your system can also cause this error. Besides, older versions of Java may also have non-compliance issues and can often trigger runtime errors as well.
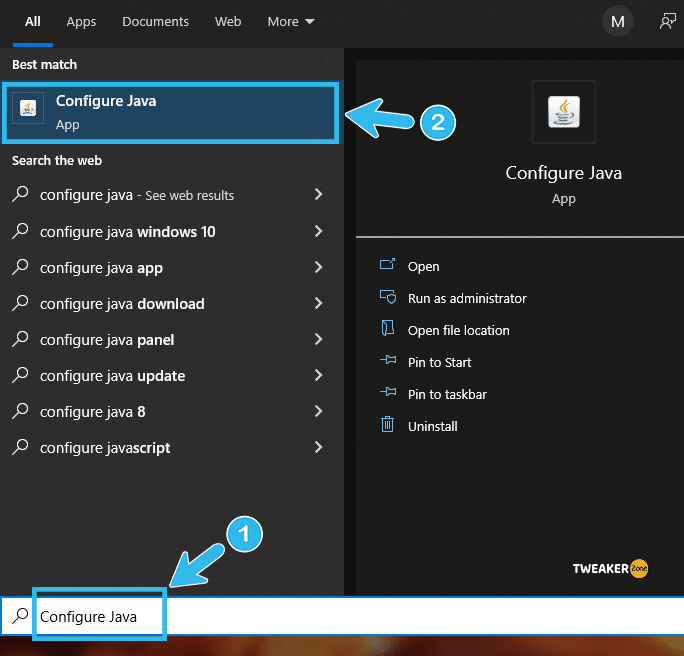
- Step 1: Click on the “Magnifying Glass” icon at the taskbar and type “Configure Java,” and hit enter.
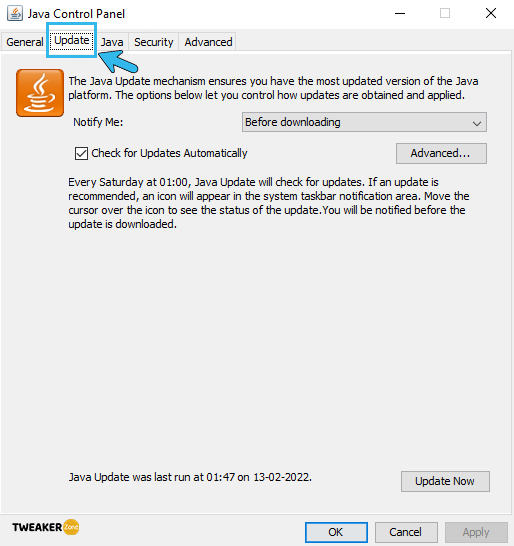
- Step 2: Navigate to the “Java Control Panel” option and locate the “Update” tab.
- Step 3: Select and tick the “Check for Updates Automatically” option.
- Step 4: Navigate to the “Notify Me” drop-down panel and select the “Before Downloading” option.
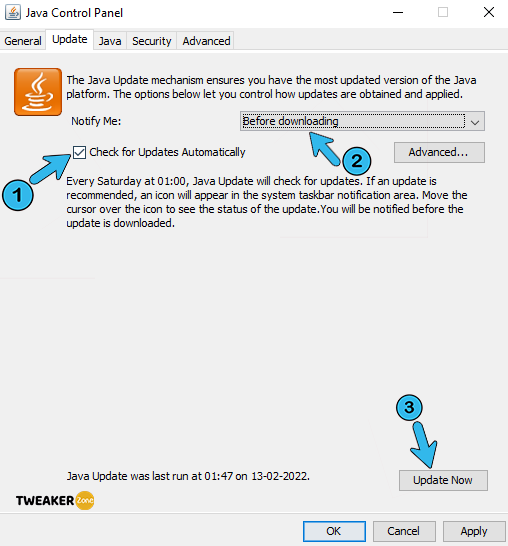
- Step 5: Click on the “Update Now” button and follow the on-screen instruction.
- Step 6: Once the Java is updated, reboot your system and relaunch Minecraft.
You need to stay connected to the internet every time Java asks for an update to install. A slow network connection can also create issues, and it is recommended to use a broadband connection for any updating process.
5. Force Update Minecraft
You may not know, but Minecraft also frequently rolls out new updates and bug fixes to ensure a smooth game-playing experience. If you are still using an old version of this game, this IO Netty Channel error can frequently trigger.
- Step 1: Double-click on the “Minecraft Launcher” to initiate the game.
- Step 2: Navigate to the “Options” tab (located near the “Username” textbox) and click on it.
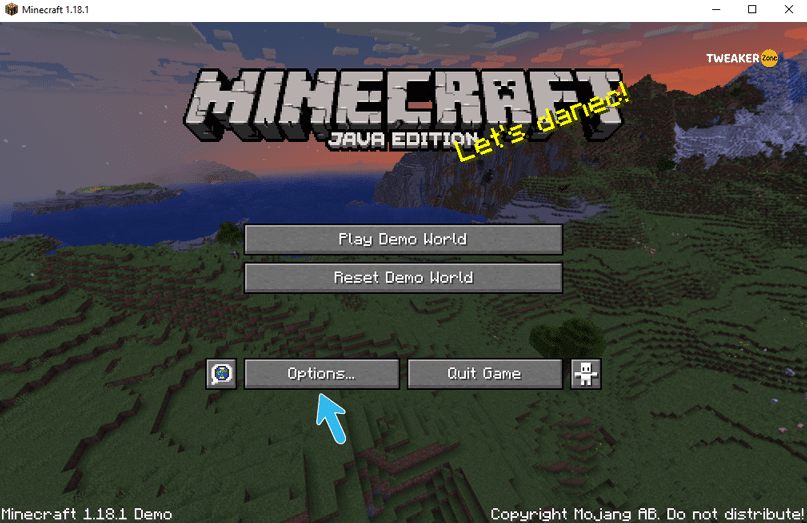
- Step 3: Locate the “Force Update” option to initiate the process.
- Step 4: Once the new update is installed, relaunch Minecraft.
If you are using any MOD pack, it is better to save that file as a backup in some other drives before you update Minecraft.
6. Reinstall Minecraft
If you are still getting the same error even after updating the game, you need to delete and reinstall it completely. And the steps are as follows.
- Step 1: Press “Windows Key + R” to open the “Run” command and type “%AppData%,” and hit enter.
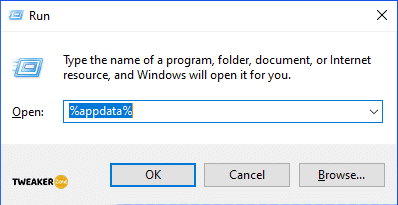
- Step 2: Navigate to the “.minecraft” folder from the “Roaming” directory.
- Step 3: Locate the “Saves” folder and copy it to a new location (preferably in another drive partition).
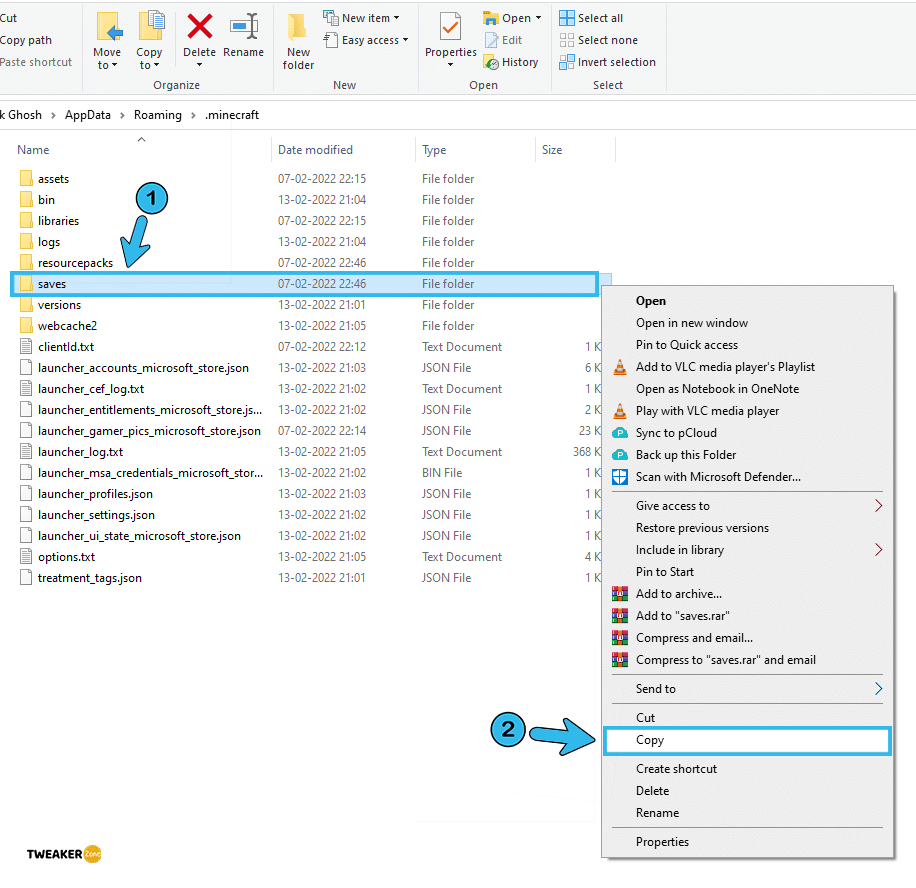
- Step 4: Come back to the “Roaming” directory and select the “.minecraft” folder again.
- Step 5: Press “Shift + Delete” to completely erase the folder from your system.
- Step 6: Double-click on the “Minecraft Launcher,” and it will prompt the “Download Minecraft” option.
- Step 7: Follow the on-screen instruction and reboot your system after it is downloaded and installed.
- Step 8: Copy the “Saves” folder again and paste it to the newly-creates “Minecraft” folder under the “Roaming” directory.
It is also better to create a new “Restore Point” from the Windows recovery and restore option to safeguard all your valuable data before trying this method.
7. Turn off Windows Defender Firewall
Windows Firewall is a robust security gateway that monitors and restricts any unknown connection to contact your system. And often, this program counts Minecraft server as suspicious. So, it is better to disable the firewall temporarily.
- Step 1: Click on the “Start” button and navigate to the “Control Panel” option.

- Step 2: Click on the “System and Security” option from the newly opened window.
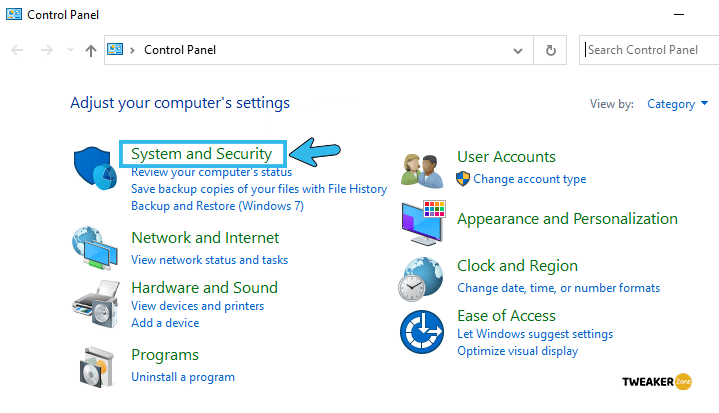
- Step 3: Navigate to “Windows Defender Firewall” and click on it.
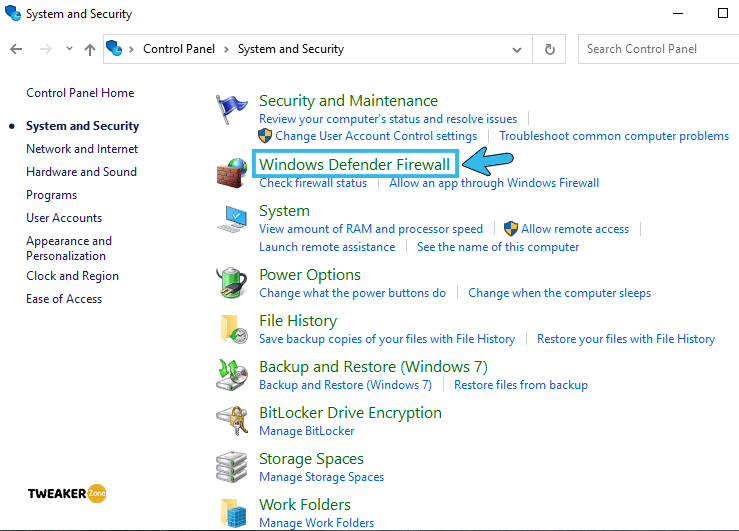
- Step 4: Locate the “Turn Windows Defender Firewall on or off” option at the left-hand column and click on it.
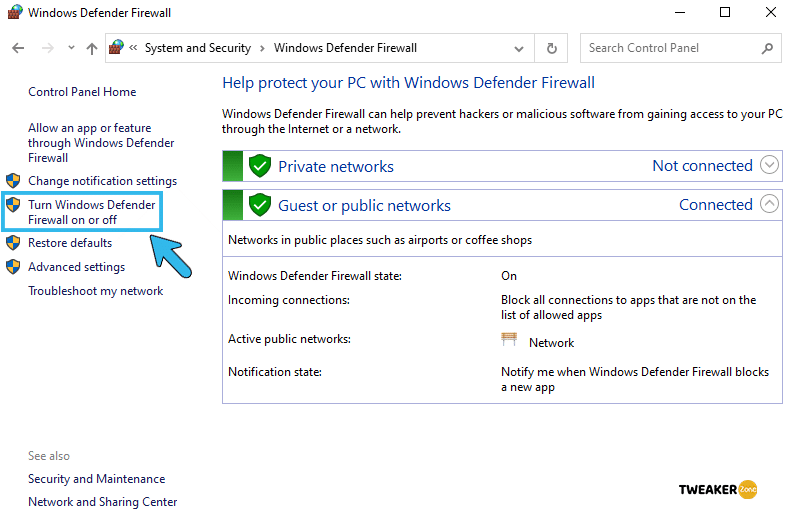
- Step 5: Tick the checkbox before the “Turn off Windows Firewall (not recommended)” option.
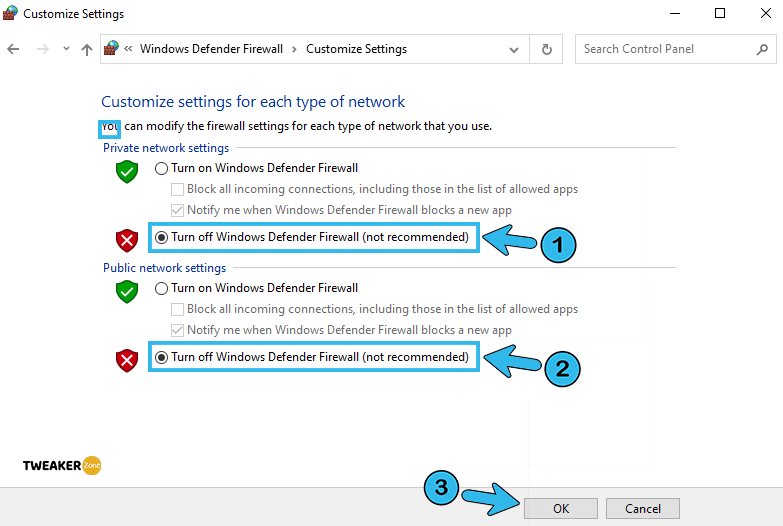
- Step 6: Click on “OK” to save the settings and relaunch your game.
8. Enable Firewall Permissions
Completely disabling Windows Firewall can trigger other security threats, especially if you use your system on a public network. So, it is better to whitelist Minecraft from the firewall and create an exception to solve the “io.netty.channel.abstractchannel$annotatedconnectexception on LAN” error.
- Step 1: Click on the “Start” menu and locate the “Settings” option to launch the app.
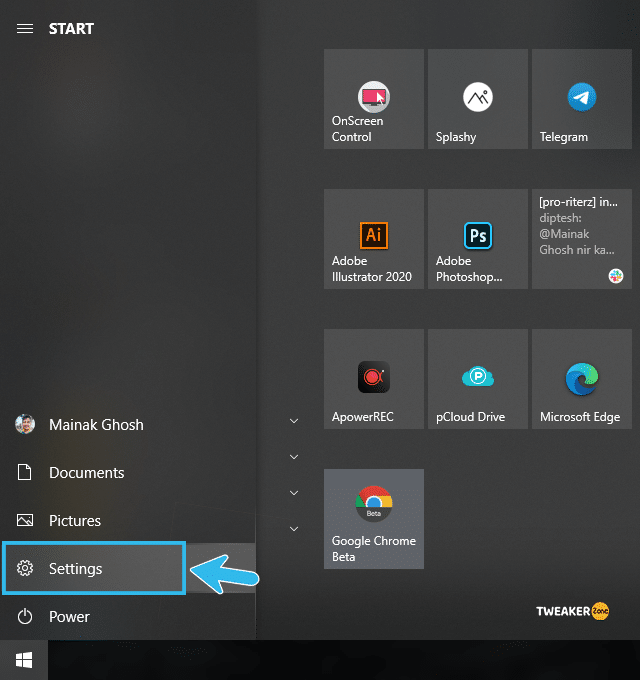
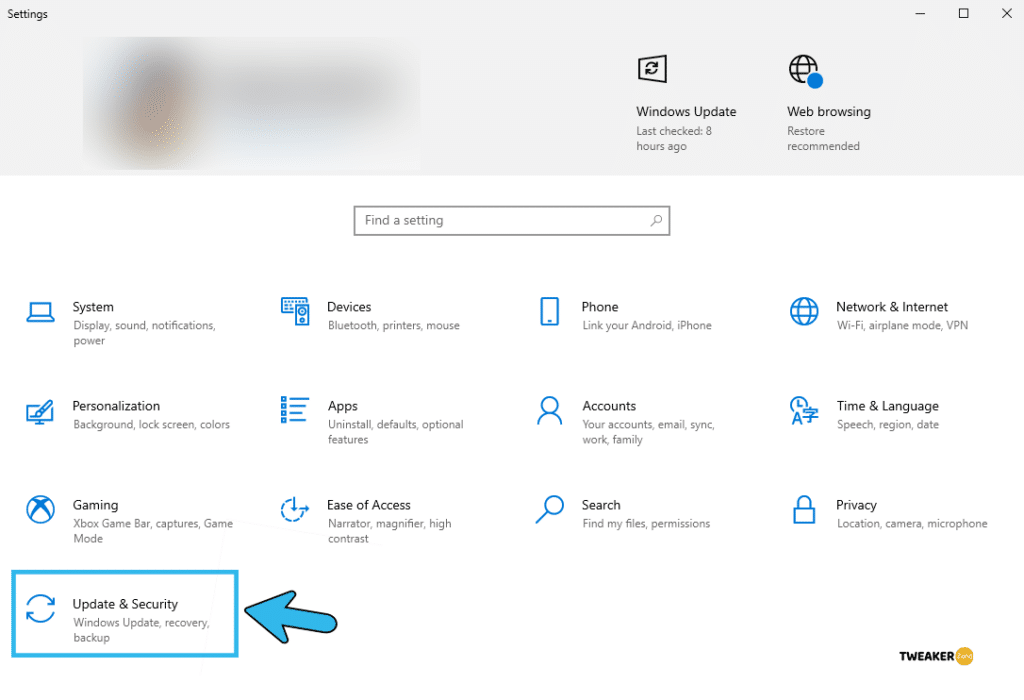
- Step 2: Scroll down and click on the “Updates & Security” option.
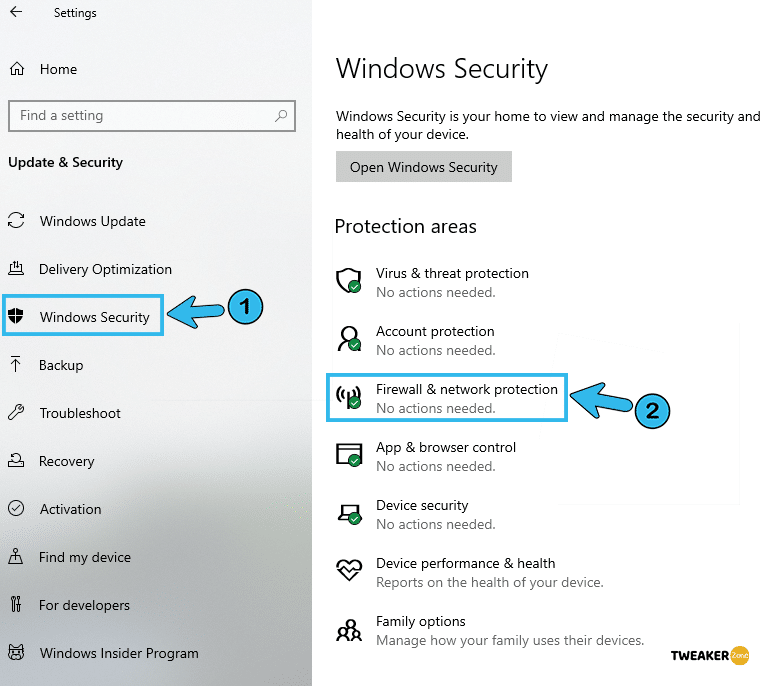
- Step 3: Navigate to the “Windows Security” option from the left column and click on the “Firewall & Network Protection” option.
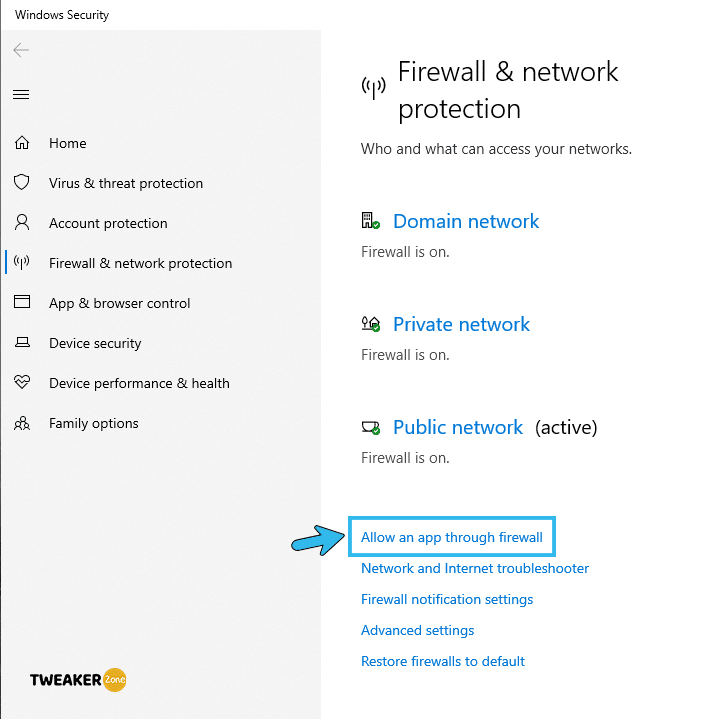
- Step 4: Once a new window pops up, scroll down, and click on the “Allow an App through Firewall” option.
- Step 5: Click on the “Change Settings” option and click “Yes” if any popup appears.
- Step 6: Navigate to “Allow apps” and “Browse”.
- Step 7: Navigate to the “Minecraft” installation directory and select the executable file of the launcher.
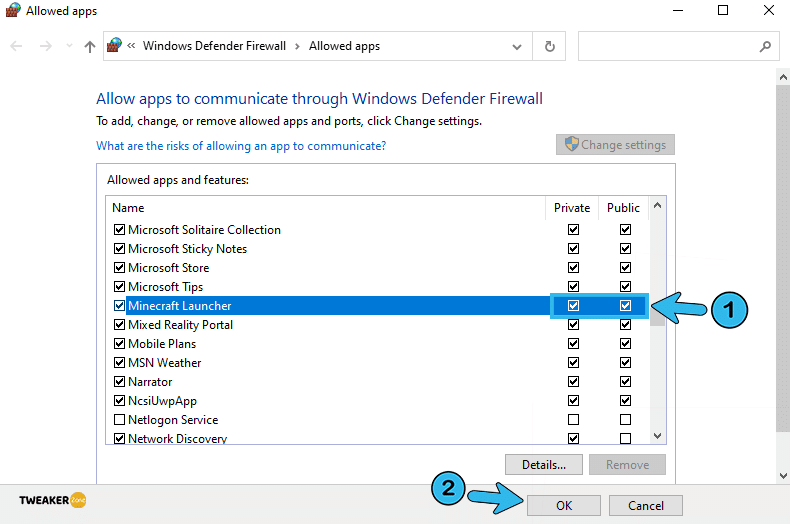
- Step 8: Follow the same process and allow “MinecraftServer” and “Java Platform SE Binary” from both the “Public” and “Private” folders.
- Step 9: Reboot your system and relaunch your game.
9. Add IP To Minecraft Server
You may also get the “io.netty.channel.abstractchannel$annotatedconnectexception” error if you haven’t listed your IP and port number on the Minecraft public server. Follow the below-mentioned steps to add it manually.
- Step 1: Search “Command Prompt” from the taskbar and select the “Run as administrator” option.

- Step 2: Type “ipconfig” and hit enter to display your network stats and note down the “IPV4 Address” of your system. (You can alternatively get your IP from the WhatIsMyIP website)

- Step 3: Click on the “Magnifying glass” icon on the taskbar, type “Minecraft Servers,” and hit enter.
- Step 4: Locate the “Maxwell <random number>” folder and navigate to the “MinecraftServer” folder within it.
- Step 5: Navigate to the “Server Properties” text file and note down the “Server Port” number after opening it. (The default is 25565/19132 or similar)
- Step 6: Launch the “Minecraft” game and click on the “Play Multiplayer” option.
- Step 7: Select your preferred server and click on the “Edit” option.
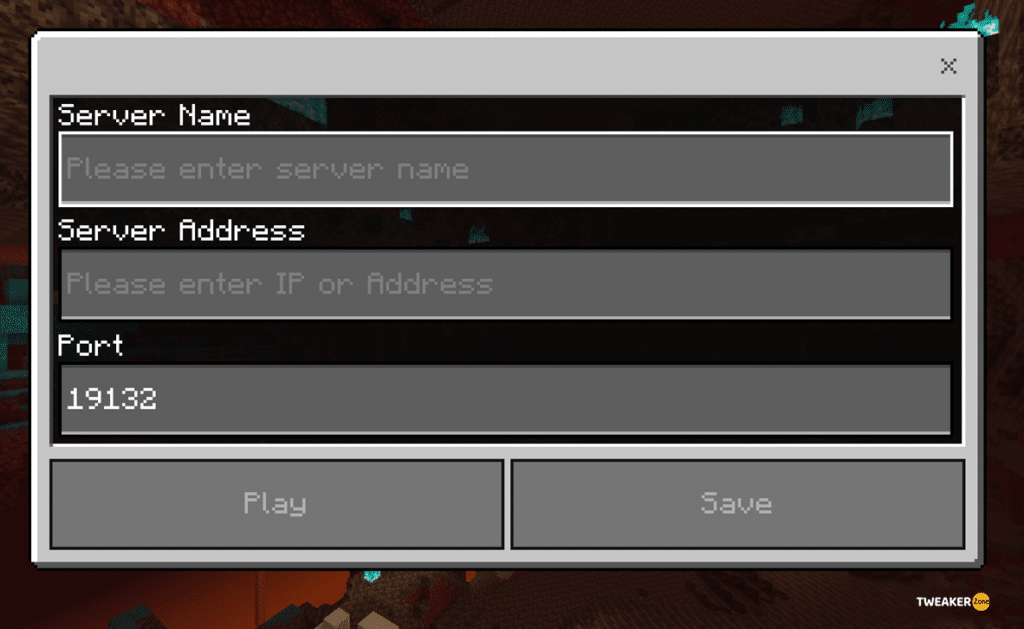
- Step 8: Paste the IPV4 address and the port number in “XXX.XXX.X.X:XXXX” format, which you have previously noted down. (E.g., 192.168.0.1:25565)
- Step 9: Click “Done” and then click on the “Refresh” option before reconnecting to that server.
If you are using any VPN, you should disable it to expose your actual public IP. Don’t paste your VPN IP, or it can create further conflicts.
10. Portforward Your Network
Port forwarding your network to bypass any security protocol in-between is your final resort if none of the above methods is working to solve this error.
- Step 1: Open “Chrome” or “Edge” and hit your router access IP. (The default one is 192.168.0.1)
- Step 2: Log in with your ID and password and navigate to the “Advanced” option from the main window.
- Step 3: Locate the “Port Forwarding” option and click it. (It may be displayed as “Virtual Server” in a few routers)
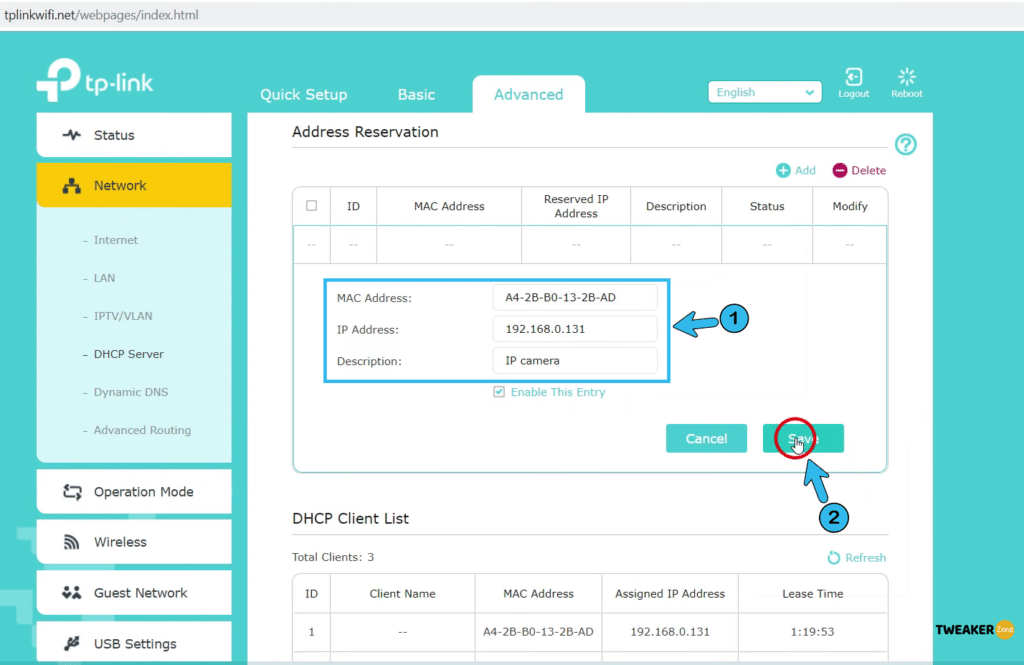
- Step 4: Enter device name, port number, IP address, and protocol (TCP/UDP or Both) on the newly opened window.
- Step 5: Click on the “Apply” option and “Save” to exit the page.
- Step 6: Reboot your system and relaunch Minecraft.
You need to create a system restore point before modifying your router config. Besides, you should also note down all the parameters given by your ISP if you are using any static IP connection or leased line.
FAQs
Q. What does “IO Netty channel AbstractChannelAnnotatedConnectException” mean?
It is typically an annotated error that triggers mainly while the host PC (your system) fails to make a secured connection to the game server of Minecraft. High ping, unstable internet connectivity, and even using a VPN can trigger this error. Besides, you may have cache or cookies issues as well.
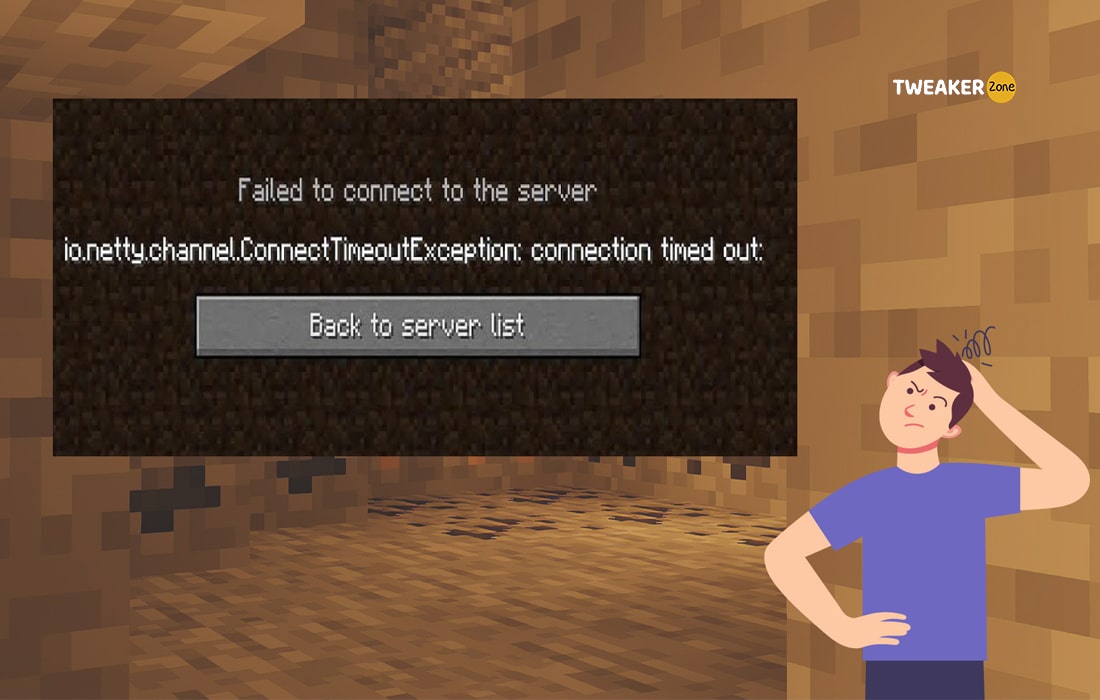
Q. What does “IO Netty channel ConnectTimeoutException connection timed out” mean in Minecraft?
Whenever a false positive is triggered by Windows Defender or any other antivirus or firewall, it will block the Java Runtime Environment (JRE) from communicating with any external server. And this interrupted JRE connection is the main reason you are getting this netty.channel error in Minecraft.
Q. How do I fix an IO Netty server?
You should start by restarting your Windows PC, rebooting the router, and power-cycle your modem. Besides, you should relaunch your game too. You may also resort to advance fixes like port forwarding, whitelisting Minecraft from your Windows Firewall, and manually adding IP to the Minecraft server as well.
Q. How do you update Netty in Minecraft?
First, extract the “Server” jar file from your game directory and navigate to the “minecraft_server.1.12.2.jar\io\netty\” file. Second, download any latest netty package and copy the “netty-all-4.1.9.Final.jar\io\netty\” folder. Third, go back to the server file, delete all the six folders, and paste the new folders you have already copied. Once the replacement is done, repack the folder into a new jar file and relaunch the game.
Conclusion
Connection problem can often interrupt with your Minecraft experience. So, make sure that your connection is intact. If you continue to face the “io.netty.channel.abstractchannel$annotatedconnectexception” error, you can discuss it on the Minecraft forum.
However, before you do so, we recommend that you try the steps given above. Hopefully, one of our solutions will help you get back to your game soon. And don’t forget to let us know if you have discovered some other method of solving this problem.

Leave a Reply
View Comments