The visual appeal is not all in Minecraft as the sound effects and the theme music itself can uplift our moods in no time. And the thrilling background sounds also increase the overall excitement. But it truly annoys us if the Minecraft sound is not working, isn’t it?
You can simply update the sound driver or reinstall it completely to fix the sound errors in Minecraft. Besides, you should also check if you have accidentally muted the system or the in-game sounds. You can also decrease the mipmap level and disable audio enhancements to solve it.
Besides, you can also try a few other advanced tweaks if nothing is working. But before we reveal all those possible solutions to fix it, let’s understand why this sound issue frequently arises in Minecraft.
Table of Contents
What Are The Primary Reasons If The Sound Is Not Working In Minecraft?
Mojang developers frequently roll out updates to make Minecraft error-free, although it is still not flawless. Not just a buggy sound, but you can even face a complete loss of sounds while playing it. And there could be seven primary causes if the sound is not working in Minecraft.
- The current Windows sound configuration is conflicting with the in-game sound settings.
- You may have accidentally muted your system sound or have decreased it.
- You may have disabled the in-game sound or may have reduced it below a certain level.
- The mipmap level on the in-game settings is interfering with the overall sound output.
- You have enabled a few audio enhancements that are not supported by Minecraft.
- The root installation file is corrupted or has any error coding in it.
- Your audio driver is outdated and needs a fresh driver installation.
If any of the above reasons are triggering the sound issues in Minecart, that particular bug can further interfere with other related programs, such as Discord. If you are also facing such issues, follow our step-by-step solution if you can’t hear anyone on Discord in Windows systems.
4 Easy Fixes If Minecraft Sound Is Not Working
If you are facing any Minecraft sound issues while playing the game, there are some general fixes that can solve it in no time. So, before you try any of the advanced methods that require greater tweaks, you should try these general methods first!
1. Unmute Or Increase The System Sound
If the music is not playing in Minecraft, the high chances are you may have accidentally muted your system sound or may have decreased it beyond a certain level. So, before you try anything, you should check and increase the overall system volume.
- Step 1: Click on the volume button located in the bottom-right corner of your taskbar.
- Step 2: Once the slider opens, click on the volume button located on the left side of the slider to unmute it.
- Step 3: Right-click on the volume button again and select the “Open Volume Mixer” option.
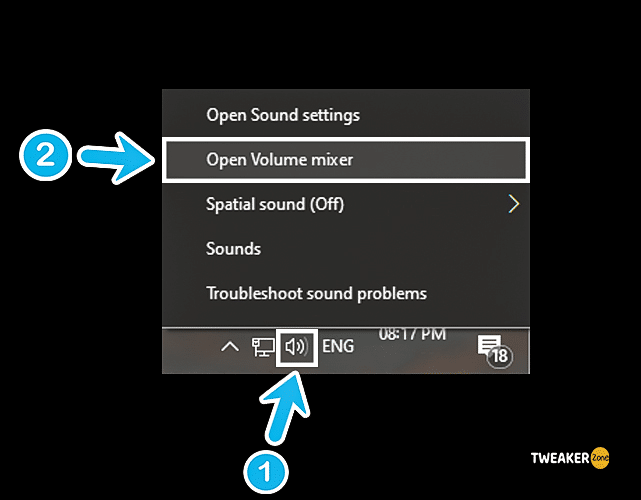
- Step 4: If your Minecraft is already running in the background, you’ll see three options as sliders; Device, Applications, and Minecraft.
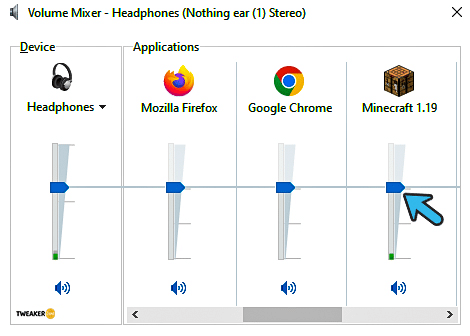
- Step 5: Drag the slider under the “Minecraft” header in the upward direction to increase the sound.
- Step 6: Exit from the volume mixer and relaunch your game.
You may witness a nonresponsive taskbar while dragging the slider of your volume button for various reasons.
2. Modify The Sound Settings
If the sound is still not working even after unmuting the system volume or increasing the game sound, you may have disabled the settings sound. So, you should modify the sound parameters from the system settings to fix this issue.
- Step 1: Right-click on the volume button located at the bottom-right corner of your taskbar.
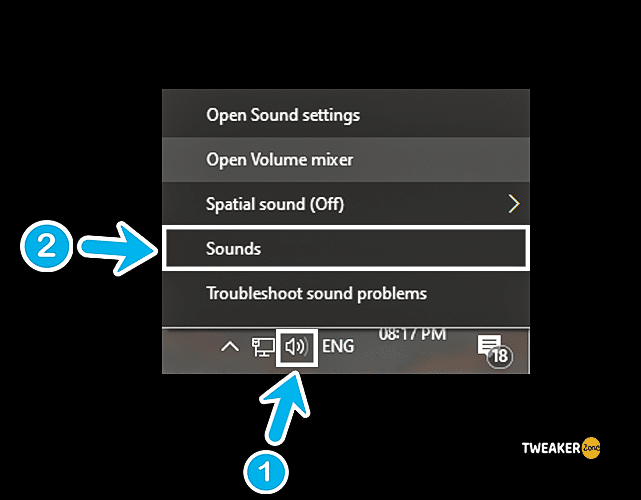
- Step 2: Once the options menu appears, select the “Sound” option from it.
- Step 3: After a new window launches, navigate to the “Playback” tab from the header.
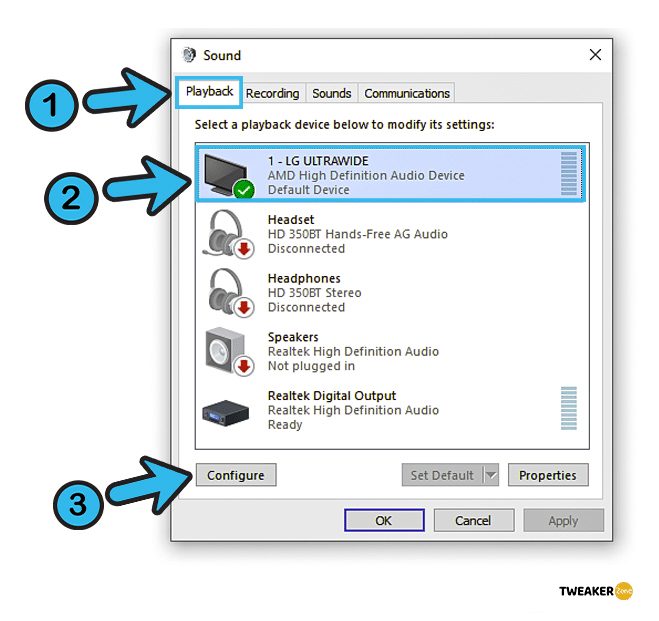
- Step 4: Navigate to your default playback device (speaker or headphone), select it, and click on the “Configure” button.
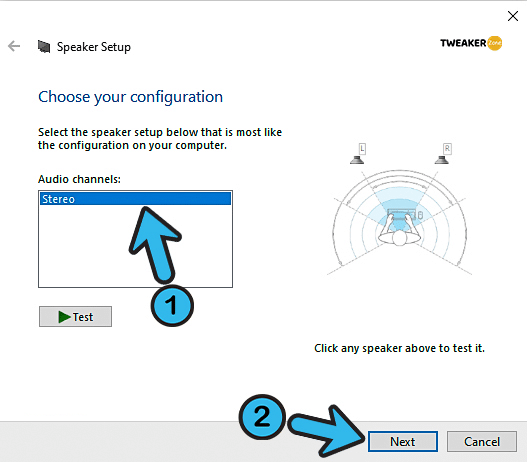
- Step 5: Once a new window pops up, select “Stereo” inside the “Audio Channels” box and click on the “Next” button.
- Step 6: Click on the checkbox in front of the “Front left and right” to tick it.
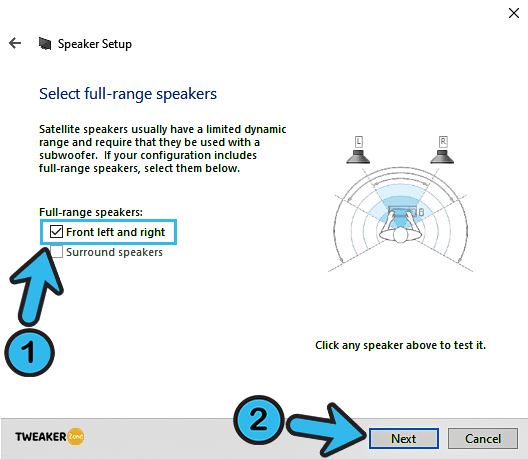
- Step 7: Click “Next” again and further click on “Finish” to save the settings.
- Step 8: Relaunch your game and check if the sound issue still persists.
3. Increase Sound From In-Game Settings
If you are still facing the sound issues in Minecraft even after tweaking your system sound, you may have disabled the in-game sound accidentally. So, you should check and modify the game sound to rectify this error.
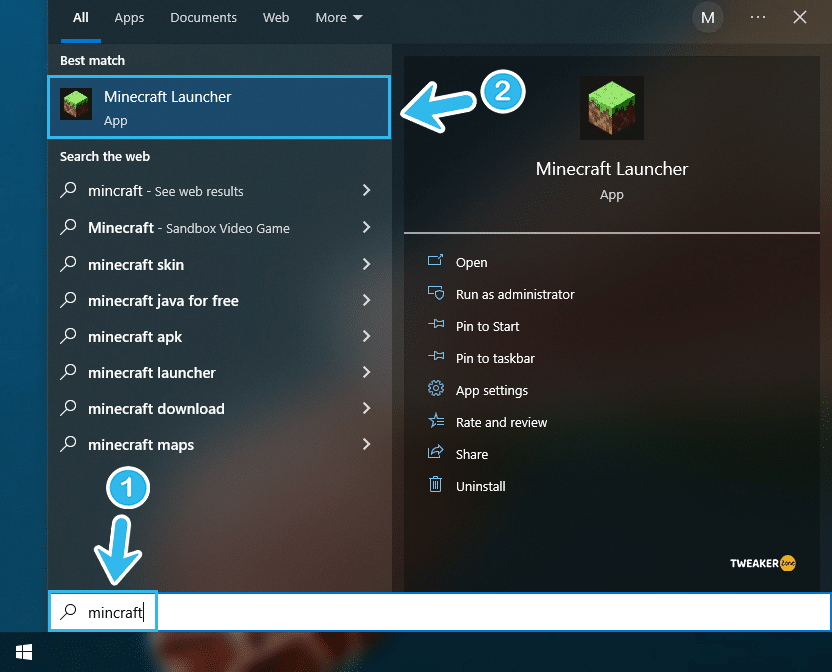
- Step 1: Double-click on the “Minecraft Launcher” icon on your desktop to initiate the game.
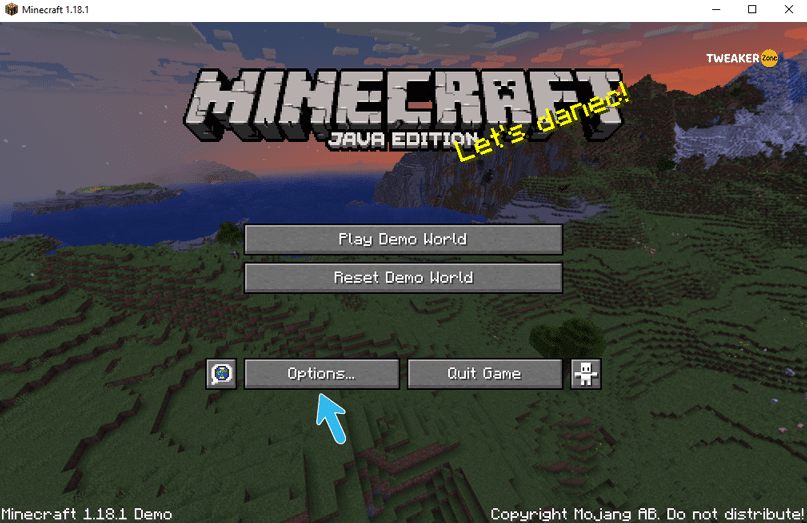
- Step 2: Click on the “Options” button (or “Settings” button, depending on your Minecraft version) on the welcome screen.
- Step 3: Once the settings window appears, click on the “Music & Sound” button. (It may be “Audio” in a few versions)
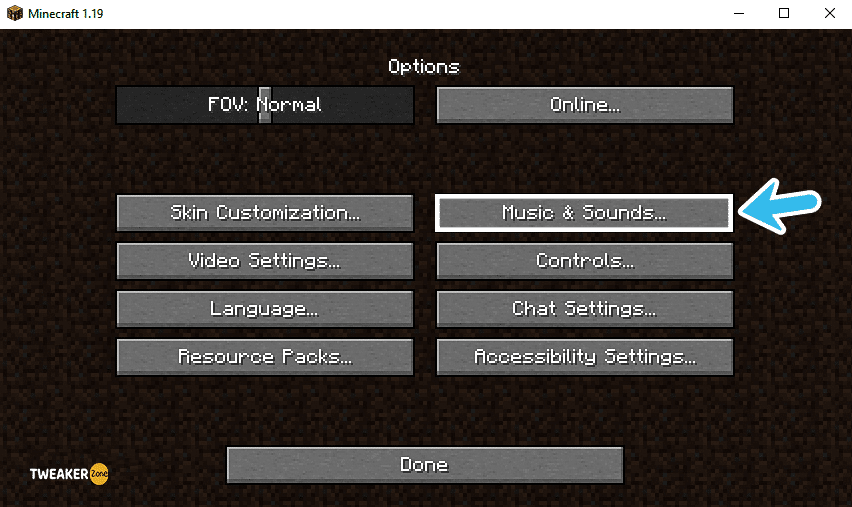
- Step 4: Check each header under the audio tab, unmute them, or increase them.
- Step 5: You set all the Music settings at “100%,” click on the “Done” button to save the settings.
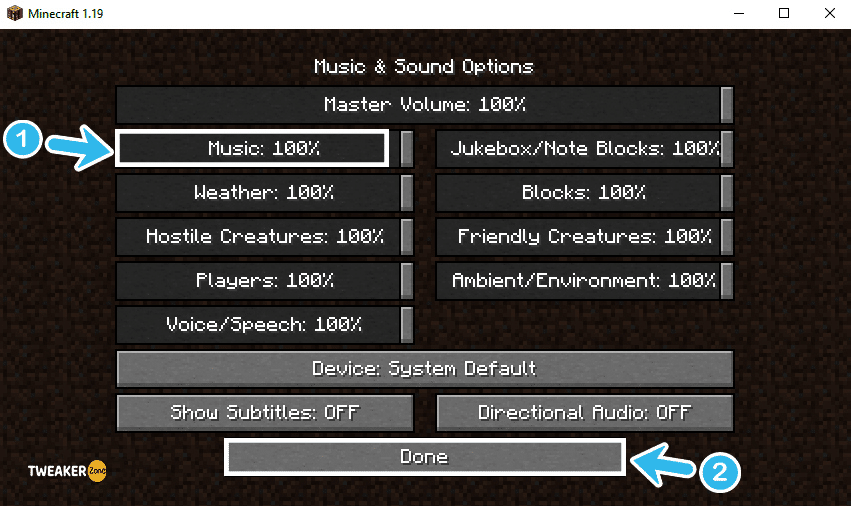
- Step 6: Relaunch your game and initiate a game in either “Single Player” or “Multiplayer” mode to check the sound.
If you are using any external soundcard to deliver stereo sound while playing any game, you should also check the settings of that audio card. Besides, it is also necessary to identify if that particular card is compatible with your Windows version.
4. Restart Minecraft
Although it sounds too basic to be true, restarting your PC and the game itself can solve most of the minor errors. It sometimes happens that an unexpected bug triggers while playing the game that further attracts the sound errors. Restarting Minecraft can quickly solve it!
- Step 1: While playing the game, hit the “Esc” button to go to the title screen.
- Step 2: Select the “Quit” button and wait until the game completely shuts off.
- Step 3: Press the “Ctrl + Shift + Esc” buttons together to initiate the “Task Manager” window.
- Step 4: Navigate to the “Process” tab from the header.
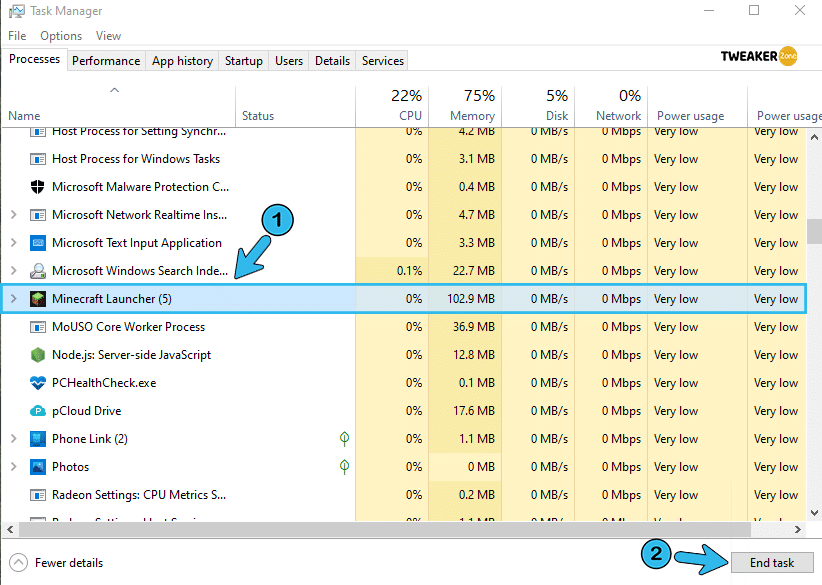
- Step 5: Select all the applications related to Minecraft from that list and press the “End Task” button.
- Step 6: Exit to the desktop and relaunch your game.
If you are still getting the same sound-related issues even after relaunching your game, you should restart your system once. It is also better to open your OS in “safe mode” to check if any third-party application is interfering with the audio application or not. Also, if any case you can follow solution of OpenGL Error 1282 In Minecraft.
6+ Advanced Fixes If Minecraft Sound Is Not Working
If your Minecraft sound has stopped working and you can’t solve it while using the general methods mentioned above, your problem may be way more deep-rooted than you think. In such cases, there are several advanced tweaks you can try to solve this error.
5. Update Audio Driver
If you are using an obsolete version of your audio driver or haven’t updated the driver for a long time, it may create sound-related issues, especially while playing games. So, you should always check whether any update is available for your drivers to stay on the safer side.
- Step 1: Press the “Windows Key + R” buttons together to initiate the “Run” command.
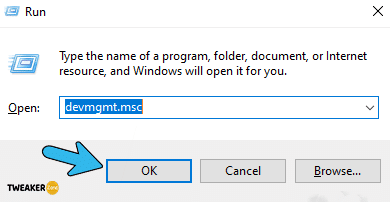
- Step 2: Once the commend box appears, type “devmgmt.msc,” and hit “Enter” to launch the “Device Manager” window.
- Step 3: Click on the “Sound, video, and game controllers” option to expand it.
- Step 4: Navigate to your sound driver and right-click to launch the additional options.
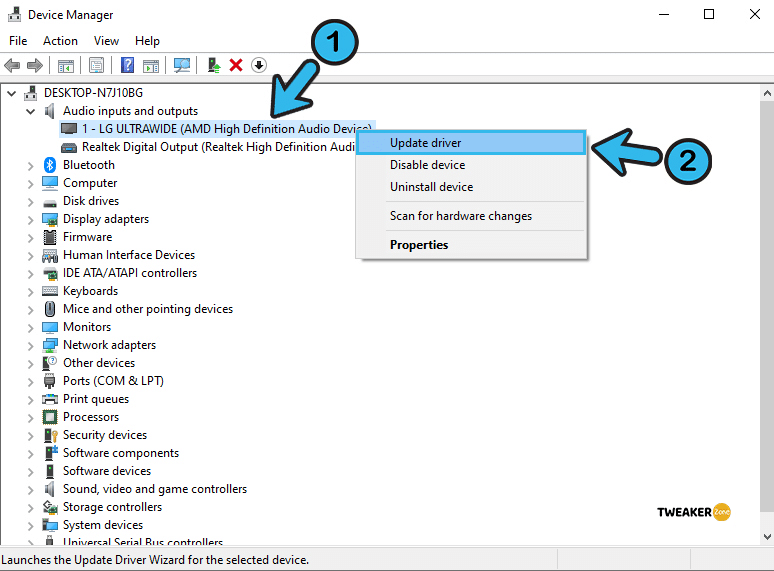
- Step 5: Select “Update Driver” and further click on the “Search automatically for drivers” option.
- Step 6: Let windows search for available drivers over the internet and follow the on-screen instruction to install them.
- Step 7: Update all the audio drivers and restart your system.
6. Changing The Sound To Stereo
You may witness that your Minecraft sound is not working if you have the audio channels in “Mono” or “Surround” mode while using a stereo headset or even a home theater. In that case, you should toggle that to the “Stereo” mode to get the best possible sound for that particular audio equipment.
- Step 1: Press the “Magnifying Glass” icon at the bottom-left corner of your taskbar to initiate the “Search” window.
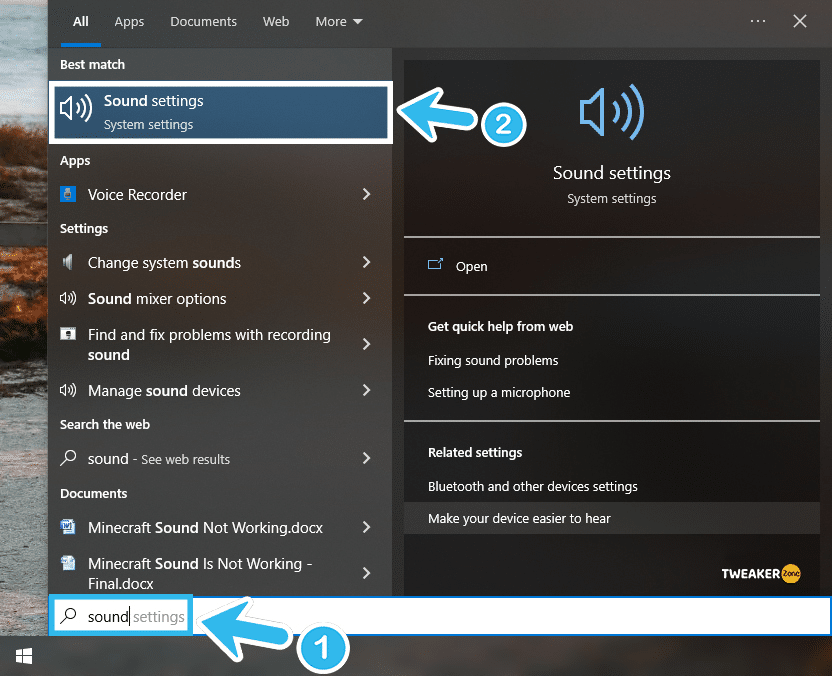
- Step 2: Type “Sound” and click on the first option from the displayed result.
- Step 3: Once the “Sound Settings” app launches, click on the “Sound” option again from the left column.
- Step 4: From the main window, click on your output speaker and then click on the “Configure” button located at the bottom-left corner.
- Step 5: Select “Stereo” from the drop-down list once the configuration window pops up.
- Step 6: Click “Next” and then “Finish” to save the sound settings.
- Step 7: Restart your system and relaunch Minecraft.
If you have multiple audio devices installed on your system, you will get a drop-down list under the “Chose your output device” header in the “Sound Setting” menu. You should choose only the right output device to proceed with that you are using for Minecraft.
7. Reinstall Minecraft
It is possible that the sound issue is triggering too frequently due to a buggy installation of the game itself. Besides, you may also get sound issues if you have any corrupted files in the root directory of Minecraft. In such cases, reinstalling a fresh copy of Minecraft will be your sole option.
- Step 1: Press the “Windows Key + R” buttons together to launch the “Run” command.
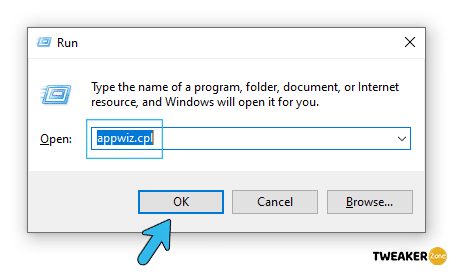
- Step 2: Type “appwiz.cpl” inside the run command box and hit “Enter” to initiate the “Programs and Features” menu.
- Step 3: Navigate to “Minecraft” and right-click to launch the additional menu.
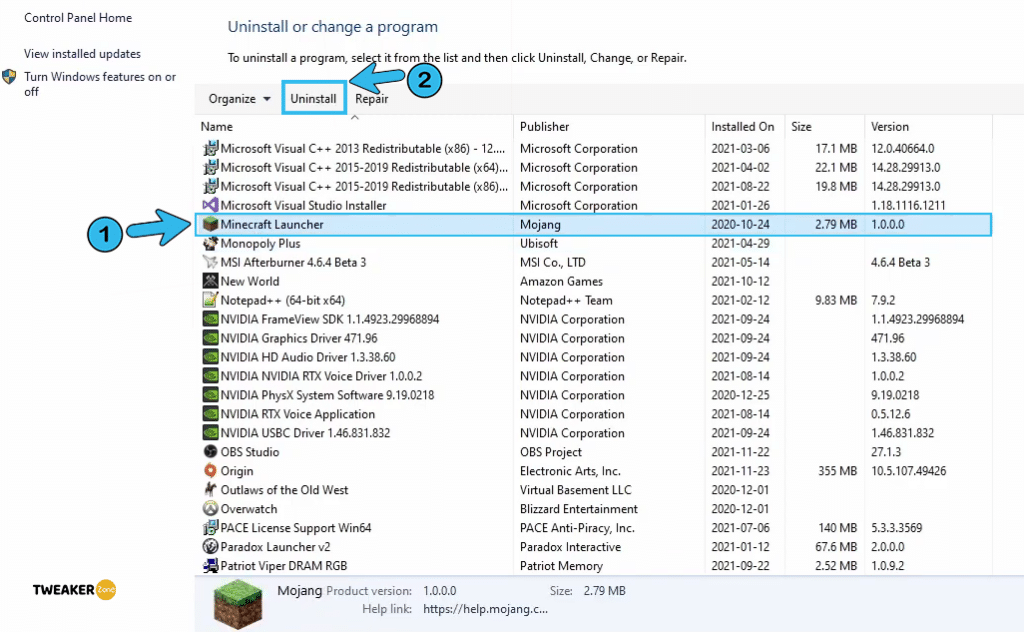
- Step 4: Click on the “Uninstall” option from that list and follow the on-screen instructions.
- Step 5: Once it is completely uninstalled, return to your desktop, and initiate the “Run” command again.
- Step 6: Type “%appdata%” and press “Enter” to launch the “Roaming” folder.
- Step 7: Navigate to the “.minecraft” folder, click to select it, and press “Shift Key + Delete” together to remove it from your system.
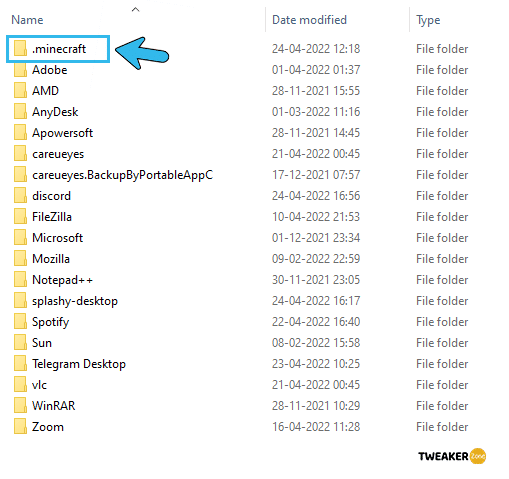
- Step 8: Reboot your Windows device and install a fresh copy of the mage from the official page of Minecraft.
You can keep the “Saves” folder inside the root directory to somewhere else before uninstalling the game from your system. You can include the folder again in the exact location once you install the fresh copy to revive your saved games and old in-game settings.
8. Reinstall The Audio Driver
Updating the audio driver itself will not solve the issue if you have a buggy file in the installation directory itself. In such cases, you should manually uninstall all the available audio drivers on your system and then install them afresh to rectify this error.
- Step 1: Right-click on the “Windows” icon or “Start” button (depending on your OS version) located at the bottom-left corner of your taskbar.

- Step 2: Click on the “Device Manager” option to launch the app.
- Step 3: Click on the “Audio inputs and outputs” option to expand it.
- Step 4: Right-click on the “Speakers” option and click on the “Uninstall Device” option from the menu.
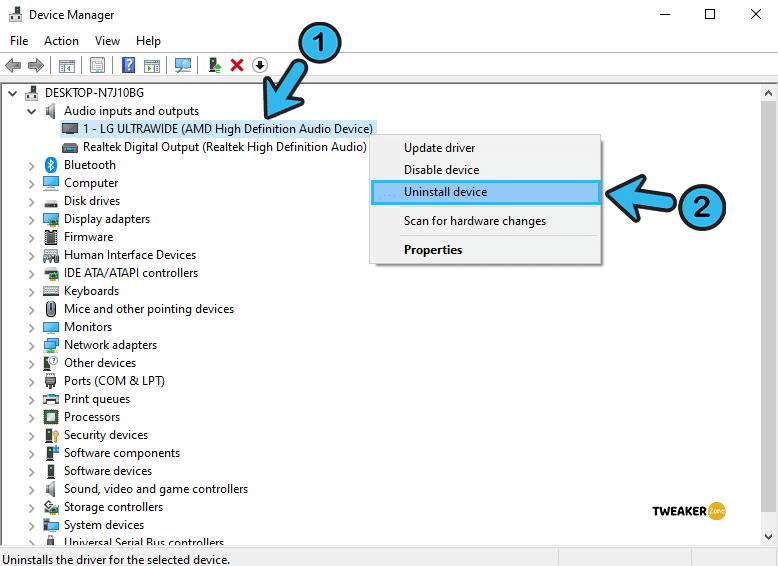
- Step 5: Once the new popup window appears, click on the “Uninstall” option again to remove the driver.
- Step 6: Select the “Action” tab from the header menu of the “Device Manager” window.
- Step 7: Click on the “Scan for hardware changes” option and follow the on-screen instruction to install the fresh version of the audio driver.
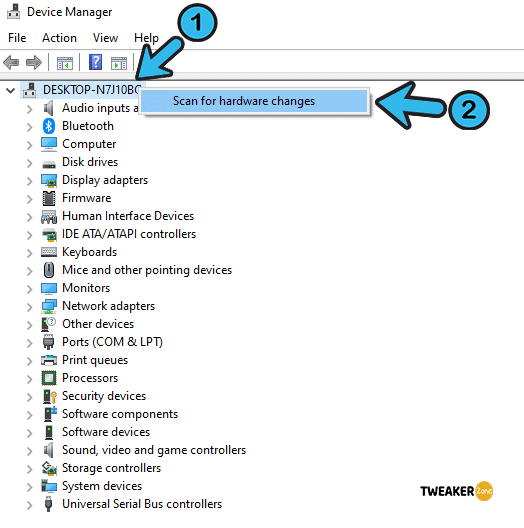
- Step 8: Once the new driver is installed, restart your system, and launch Minecraft.
If you are using any external sound card, you should also delete and reinstall the driver for that sound card too. Otherwise, the driver of the sound card itself can create further conflict with the buggy audio drivers on your system.
9. Change Mipmap Levels
If you are using the Java edition of Minecraft, the mipmap level in the in-game settings can trigger sound issues. So, you should manually change the levels to check whether the problem is still persisting.
- Step 1: Launch the game by double-clicking on the “Minecraft Launcher” icon on your desktop.
- Step 2: Click on the “Options” button on the welcome screen to initiate the settings menu.

- Step 3: Click on the “Video Settings” option once the new menu launches.
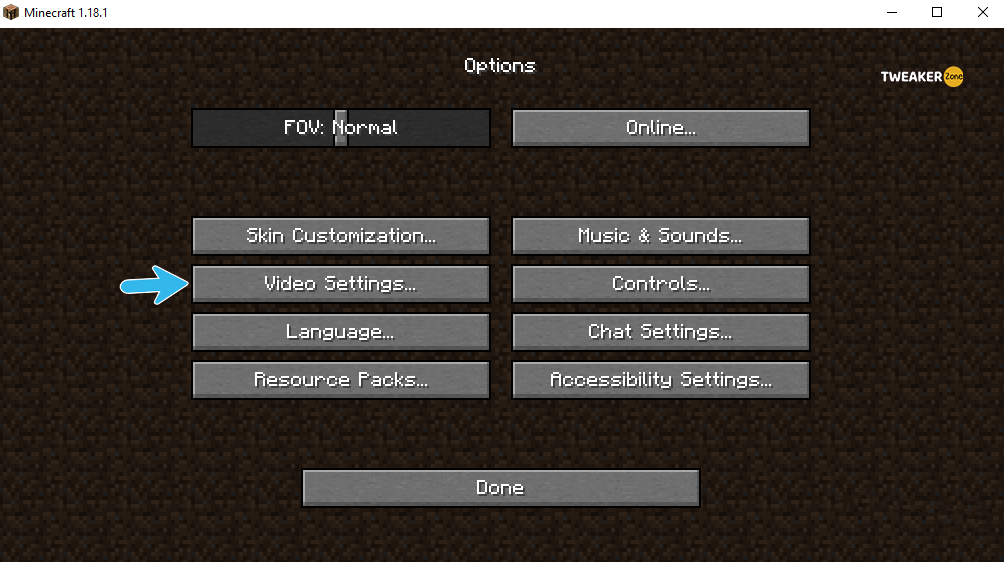
- Step 4: Locate the slider beside the “Mipmap Levels” option and drag it to increase.
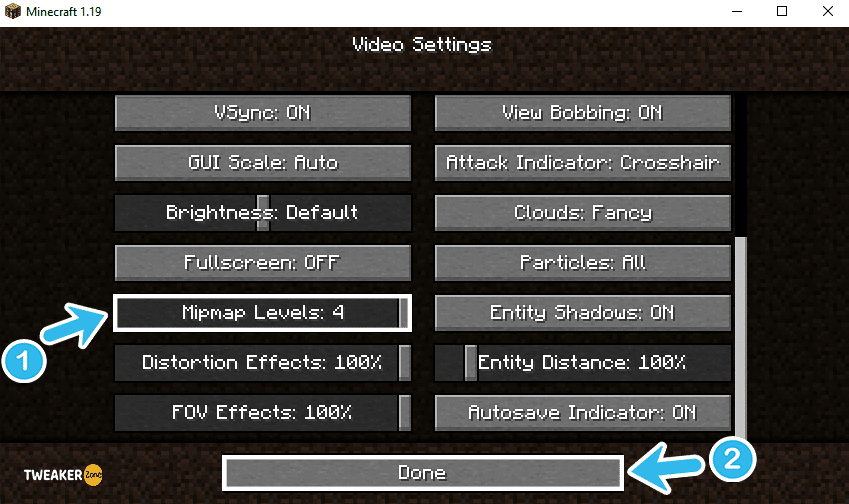
- Step 5: Click “Done” to save the settings and return to the main game window.
- Step 6: Relaunch Minecraft to check if the sound is still triggering.
10. Disable Audio Enhancements
If you are using any audio enhancements in the sound settings, it can interfere with the game sound, triggering various issues. So, it is better to disable all the audio enhancements from the control panel and then check whether the issue is still triggering.
- Step 1: Click on the “Magnifying Glass” icon on your taskbar and type “Sound” inside the search box.
- Step 2: Select the “Change system sounds” option from the result.
- Step 3: Once the “Sound Control Panel” opens up, click on the “Playback” tab from the header menu.
- Step 4: Select your default audio device and right-click to bring the additional menu.
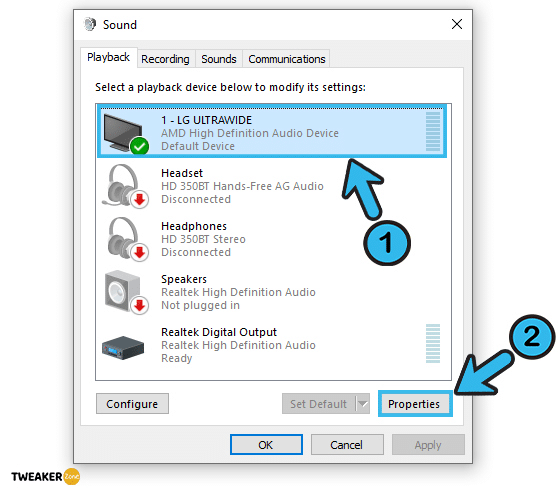
- Step 5: Click “Properties,” and once the new window launches, navigate to the “Enhancement” tab.
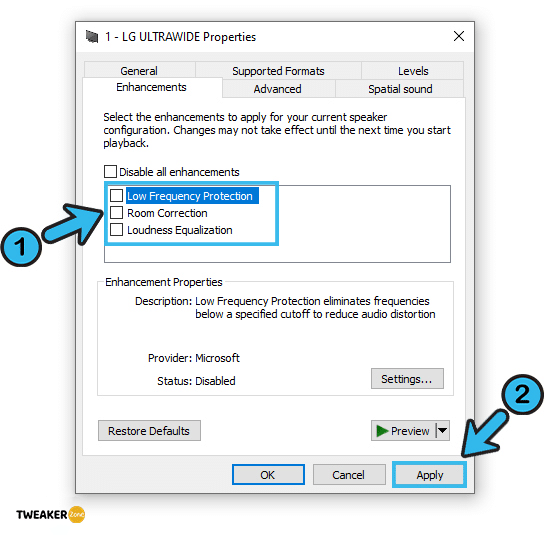
- Step 6: Uncheck all the enhancement options to disable them and click the “Apply” button to save the settings.
- Step 7: Click on the “Advanced” tab from the header menu and tick the box besides the “Allow applications to take exclusive control of this device” option.
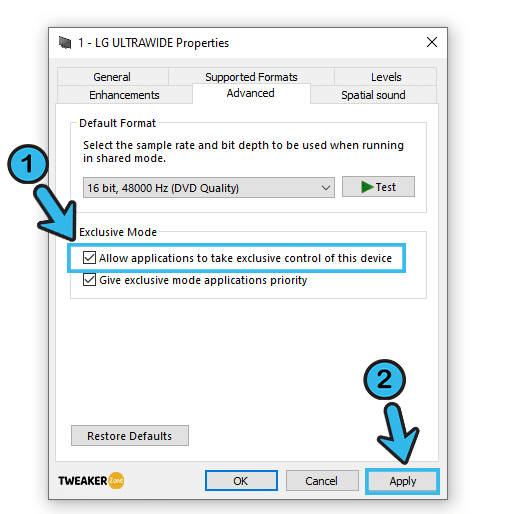
- Step 8: Click the “Apply” button again and then click on “OK” to save the audio settings.
- Step 9: Restart your system and relaunch Minecraft without any audio enhancements.
If you are using any hardware enhancements, like an external audio card, you should remove it from your PC and directly plug in your headphone or speaker jack right into your CPU. Besides, you can also disable all the enhancements from that particular audio card itself.
Conclusion
You should stick to the general fixes first to solve the sound errors in Minecraft. And you should only resort to advanced methods that need further tweaks only if the generic fixes are not working. But before you try any pro methods, create a “System Restore Point” first!
So, here are all the possible methods to solve if your Minecraft sound is not working properly. If you think we have missed any solution, feel free to let us know about that in the comment box below. GG, folks!
FAQs
Q. How to fix it if the sound is not working in Minecraft?
First, you should check if you have accidentally muted or decreased the system or game sound. If not, you should update your sound driver and the game itself. You can also modify the mipmap levels and disable the audio enhancements altogether to rectify this error.
Q. Why is my Minecraft sound not working?
From an obsolete audio driver to an outdated version of Minecraft, there can be several reasons. However, you can simply disable all the audio enhancements from the audio control panel in Windows to check if it is interfering with the game sound.
Q. How do you turn on the sound in Minecraft?
Right-click on the volume symbol in your taskbar and select the “Open Volume Mixer” option. Once the new window launches, hold the slider under Minecraft and drag it upwards to increase the game sound.
Q. How Do I Reset My Minecraft Sound?
While playing the game, press the “F3 Key + S” together to force-reload the game itself with all the mods. Besides, you can also press the “F3 Key + T” together to reload all textures and sounds. Moreover, you can manually disable and reenable the in-game sound as well.


Leave a Reply
View Comments