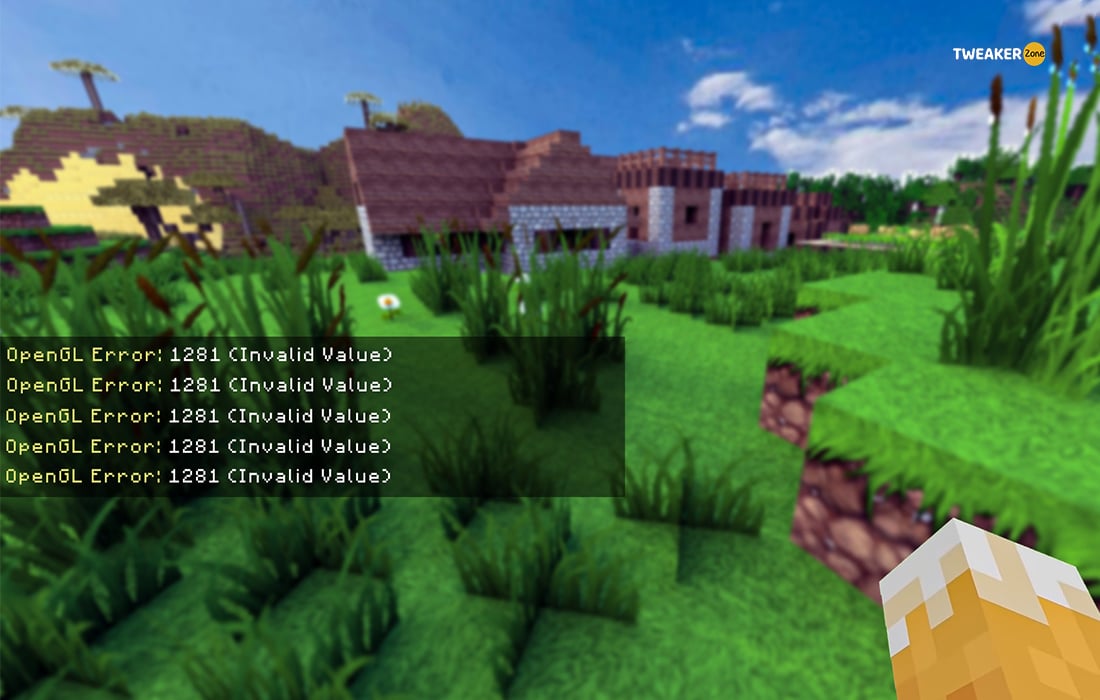
Who doesn’t love to play Minecraft in HD settings to experience the real gameplay? But it does annoy us when the game triggers OpenGL error 1281, isn’t it? However, this issue can be way more deep-rooted than you can possibly imagine.
Updating Java, the GPU driver and the game itself can solve the OpenGL 1281 error in Windows systems. Besides, you can also disable all the third-party mods, shaders, and available render regions. You can manually include the Opengl32.Dll file in your game’s root directory as well.
Using an obsolete version of Java, the GPU driver and the game itself can trigger the OpenGL 1281 error. Besides, third-party mods and shaders can also create this issue. Many gamers also reported getting this error while completely missing the Opengl32.Dll file from the root directory.
However, not just this one but almost all the OpenGL errors can be easily fixed as there are several basic and advanced methods available. But before we reveal those, let’s understand what it is and how it is triggered!
Table of Contents
What Are The Primary Causes Of OpenGL Error 1281 In Minecraft?
Most gamers using fully-modded Minecraft reported getting the OpenGL error code 1281 too frequently. Although this issue can be deep-rooted than you can think, OpenGL bugs typically trigger for five primary reasons.
- You are using an obsolete GPU driver or an outdated OS version.
- Anyone or all of your shaders in the game are corrupted and create additional interference.
- You are using an outdated version of OptiFine to force-render your game in HD.
- Not all your forge and shader files sync with each other and create cross-interference.
- The java package on your system is outdated and needs an update.
Besides, this issue can trigger if you use an old version of the game itself. You can also face similar problems if you are using buggy mods on your Minecraft.
4 Quick Fixes For Error Code 1281 In Minecraft
Although most gamers resort to advance tweaks and other methods to solve this OpenGL error, there are four general fixes that you can also try. And in almost 80% of the cases, these four general fixes will do wonders.
1. Update Minecraft
Mojang developers frequently release new updates to fix the bugs and to close the security loops. And you can experience OpenGL error 1281 (invalid value) in Minecraft if you are still using an obsolete version of the game. So, it is best to update the game whenever a new version rolls out.
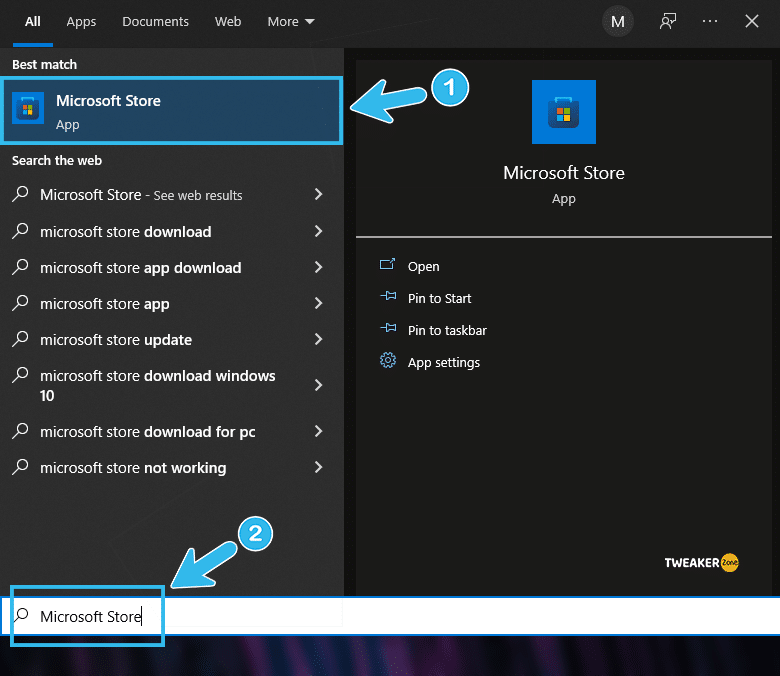
- Step 1: Click on the “Shopping Bag” icon on your taskbar to open the “Microsoft Store.” (You can alternatively click on the “Magnifying Glass” icon, type “Microsoft Store,” and hit “Enter” to open it)
- Step 2: Click on the “Library” icon on the left side to expand the menu.

- Step 3: Scroll down the new window and click on the “Download and updates” button.
- Step 4: Further click on the “Updates” option from the newly launched window.
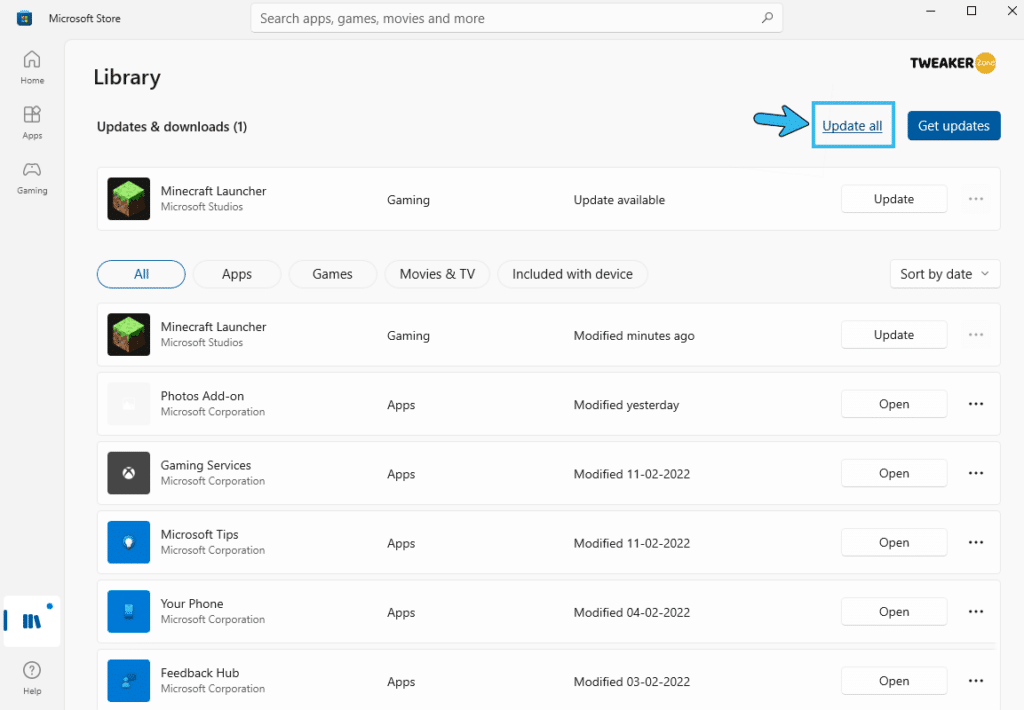
- Step 5: Wait until it automatically fetches the available update from the internet and installs those.
- Step 6: Once the “Your apps and games are up to date” option appears, restart your system, and launch Minecraft.
Alternatively, you can also update the game from the in-game settings, especially if you are using an older version of Windows. You can also get all the latest update reports on the official forum of Minecraft.
2. Reinstall Minecraft
It may sometimes happen that your root installation files get corrupted during the installation or the updating process. In such cases, you should manually remove the entire game and reinstall a fresh copy to resolve this issue.
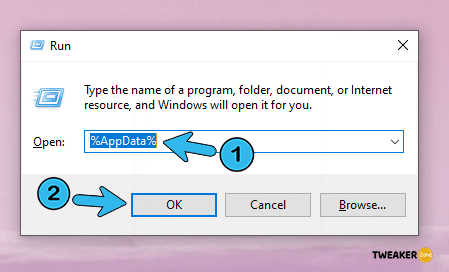
- Step 1: Press the “Windows Key + R” button together to launch the “Run” dialog box, type “%AppData%” inside the box, and hit enter.
- Step 2: Once the “Roaming” folder launches, navigate to the.minecraft” folder.
- Step 3: Copy the “Saves” folder (if you don’t want to lose your resources) to a different location.
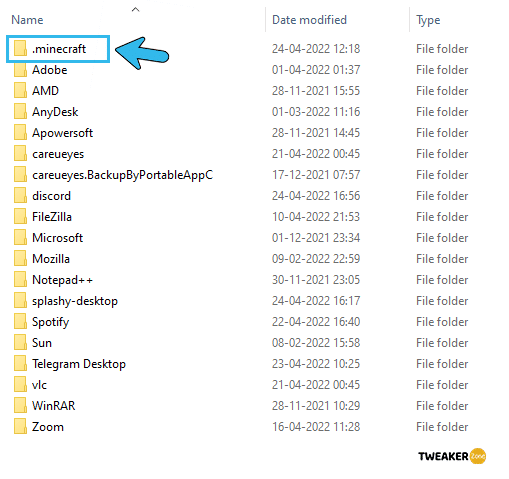
- Step 4: Go back to the root “Roaming” directory and select the “Minecraft” folder.
- Step 5: To completely remove the folder, simply press the “Shift Key + Delete” buttons together.
- Step 6: Exit from the folder, return to your desktop, and double-click on the “Minecraft Launcher” icon.
- Step 7: Once you get the “Download Minecraft” prompt, follow the on-screen instruction, and install the game again.
- Step 8: Copy the “Saves” folder which you have relocated and paste that to the newly created “Minecraft” folder inside the “Roaming” directory.
- Step 9: Restart the system and launch your game.
If you don’t want to keep your resources, such as your saved games, mods, and other packs, you don’t even need to copy the “Saves” files. In that case, you can simply delete the entire “Minecraft” folder from the “Roaming” directory.
3. Disable All Mods Temporarily
Many mods, especially if you download it from a suspicious third-party website, may create various networks and graphics-related issues on Minecraft. So, it is better to disable all the mods temporarily to check if any among those are triggering the OpenGL issues.
- Step 1: Launch Minecraft and click on the “Profile Editor” tab on the welcome screen.
- Step 2: Select the profile where you have installed all your mods and click on the “Delete profile” option.
- Step 3: Once you get a popup, click on the “Confirm” button to delete the profile completely.
- Step 4: Exit the game and launch the “Run” window by pressing “Windows Key + R” together.
- Step 5: Once the “Run” dialog box appears, type “%appdata%” and hit enter.

- Step 6: Once the “Roaming” folder opens up, navigate to the “Minecraft” folder, and select the “versions” folder inside it.
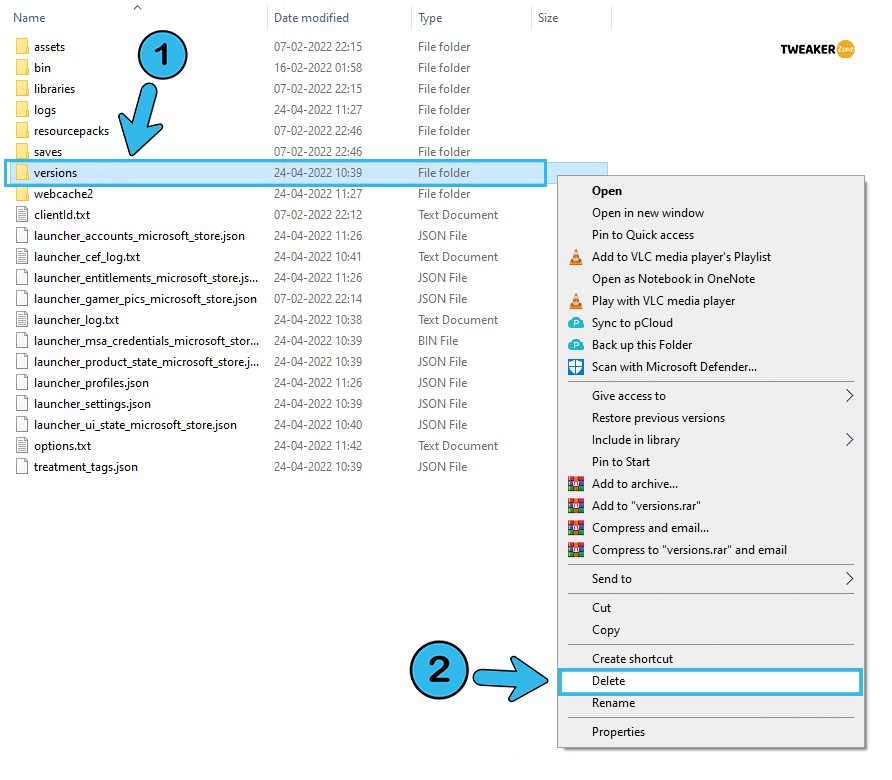
- Step 7: Hit “Shift Key + Delete” together to completely delete the mods.
- Step 8: Restart your system and launch Minecraft without any mods.
4. Update Graphics Card Driver
If you are running on an old firmware version of your GPU, it may conflict with the graphics settings of Minecraft. And it can even trigger the Minecraft OptiFine OpenGL error 1281. So, it is always better to install the available update for your GPU driver.
- Step 1: Right-click on either the “Start” button or the “Windows” icon (depending on your Windows version) to open the additional menu.
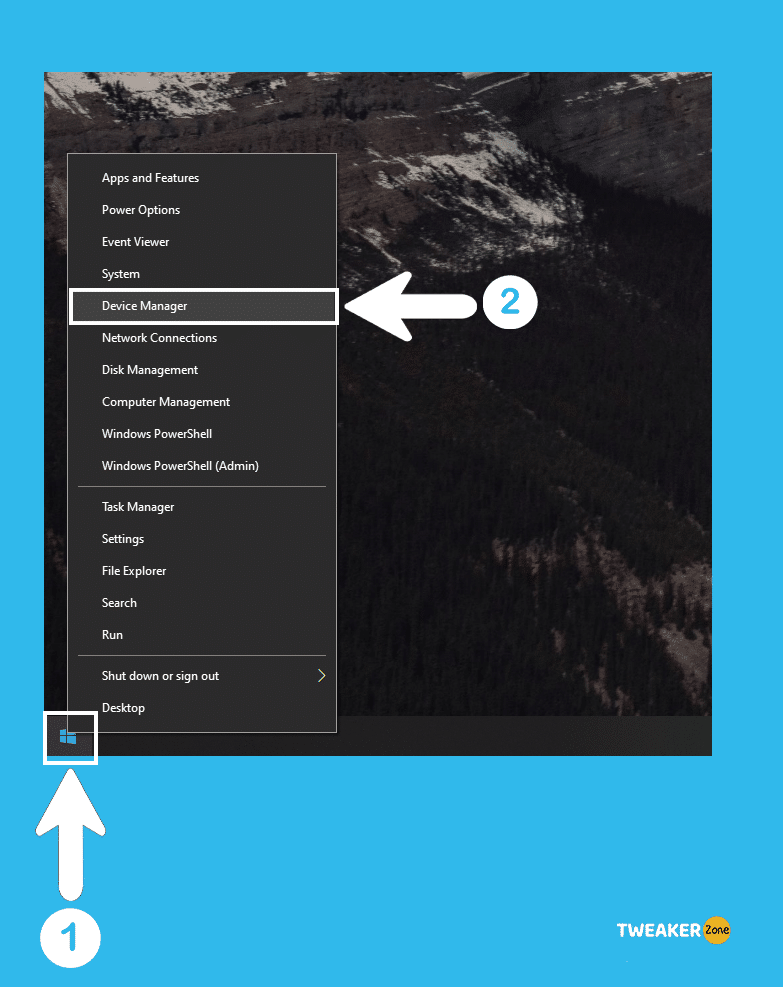
- Step 2: Click on the “Device Manager” option, and once the new window pops up, click on the “Display Adapter” option to expand it.
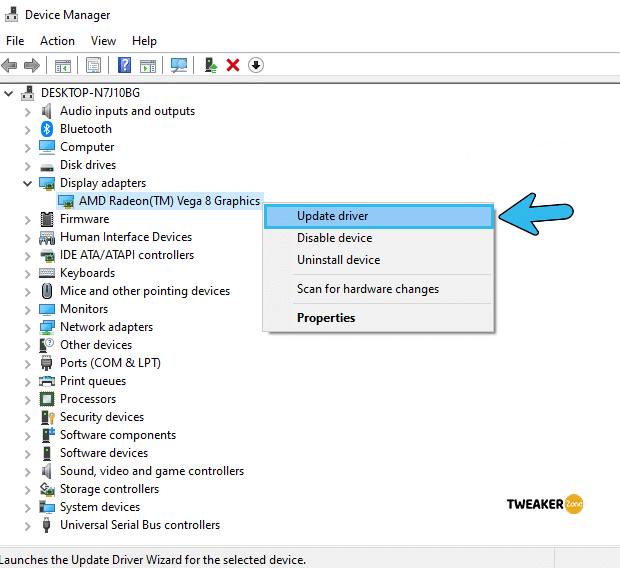
- Step 3: Right-click on your graphics card game and click on the “Update Driver” option.
- Step 4: Select the “Search automatically for drivers” option from the newly opened window and follow the on-screen instruction to update it.
- Step 5: Update all the available GPU drivers and reboot your system.
If you are using an NVidia graphics card, you may face graphical issues after installing the latest updates. In that case, you can follow our step-by-step guide to fix Friend Can’t Connect To Minecraft Server.
6 Advanced Fixes For OpenGL Error Code 1281 In Minecraft
If none of the general fixes listed above can solve your issues, it is better to try the advanced methods that give more control and customization. However, you should be extra cautious if you delete or modify any system files.
5. Disable All Shaders
If you are using a shader on Minecraft, it may trigger an OpenGL error 1281 invalid value, which can create additional issues as well. In such cases, you should manually disable all the shaders and check if the problem still persists.
- Step 1: Double-click on the “Minecraft Launcher” icon on your desktop to initiate the game.
- Step 2: Click on the “OptiFine” option from the mode selection menu on the welcome screen & Click on play.
- Step 3: Open either a “Single-Player” or a “Multiplayer” game and let the complete map appears successfully.
- Step 4: Hit the “Esc” button to pause the game and click on the “Options” button.
- Step 5: Click on the “Shaders” option.
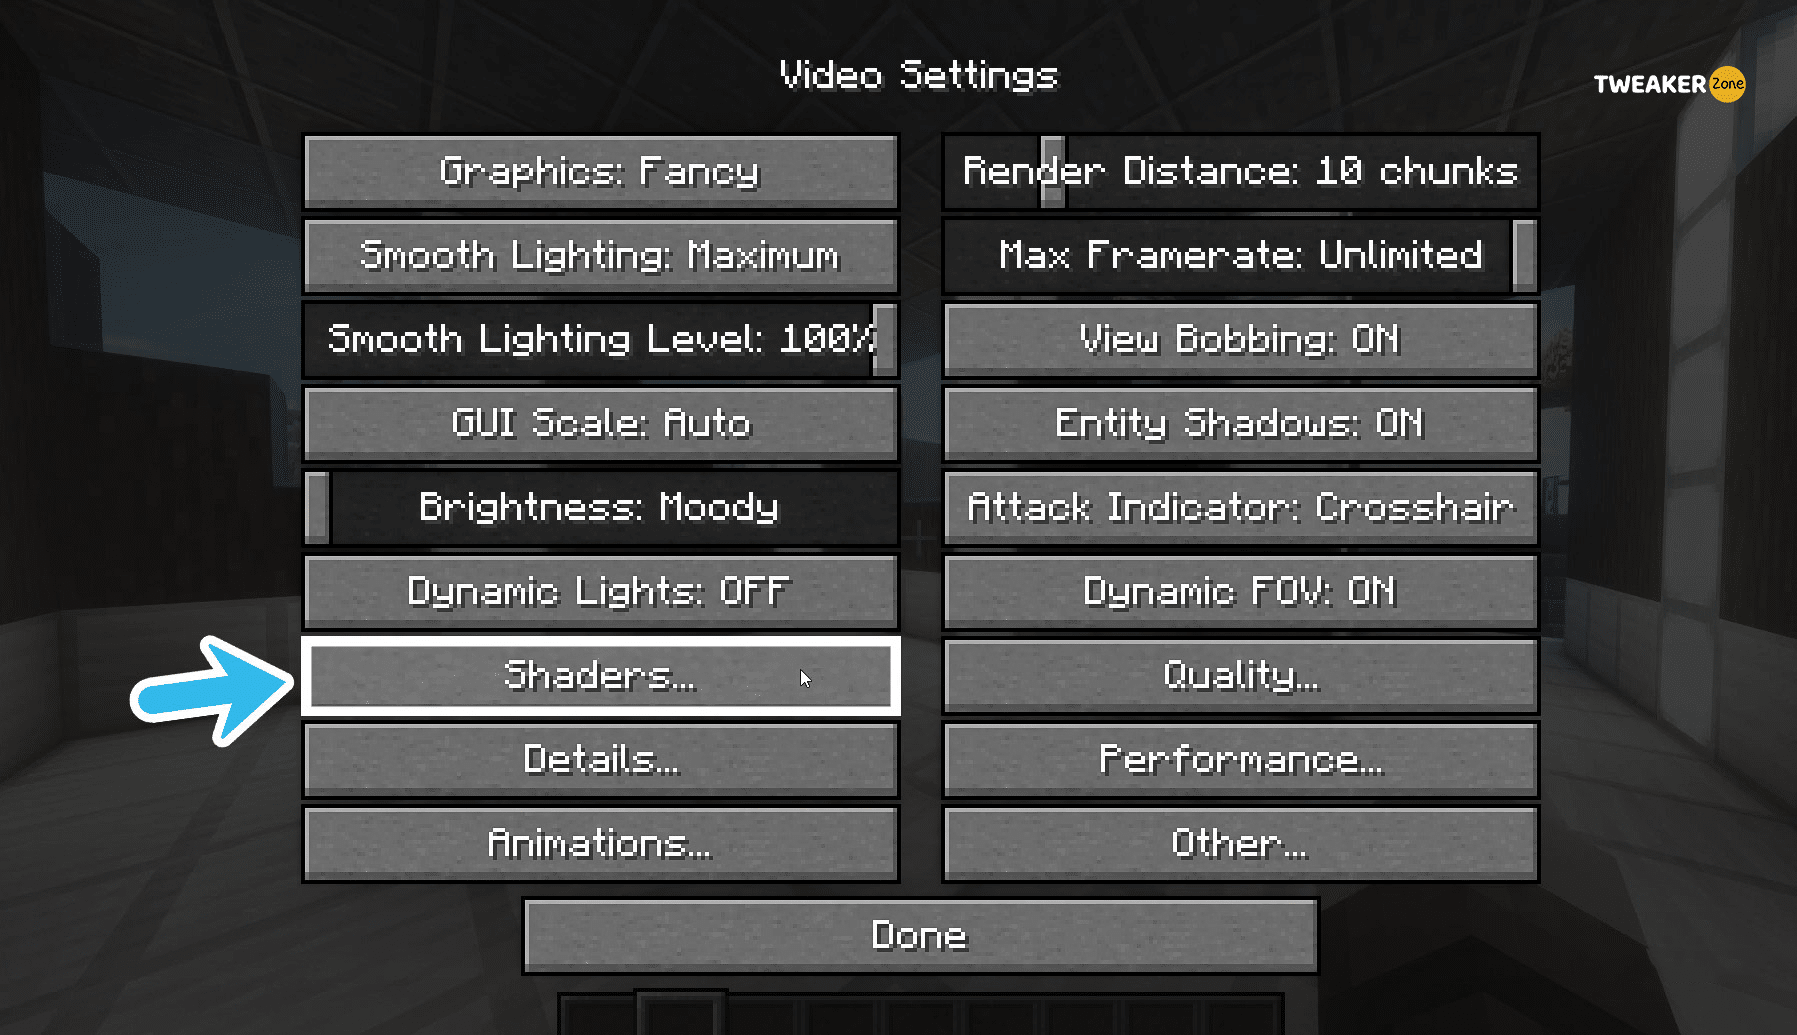
- Step 6: and further click on the “OFF” button to disable it.
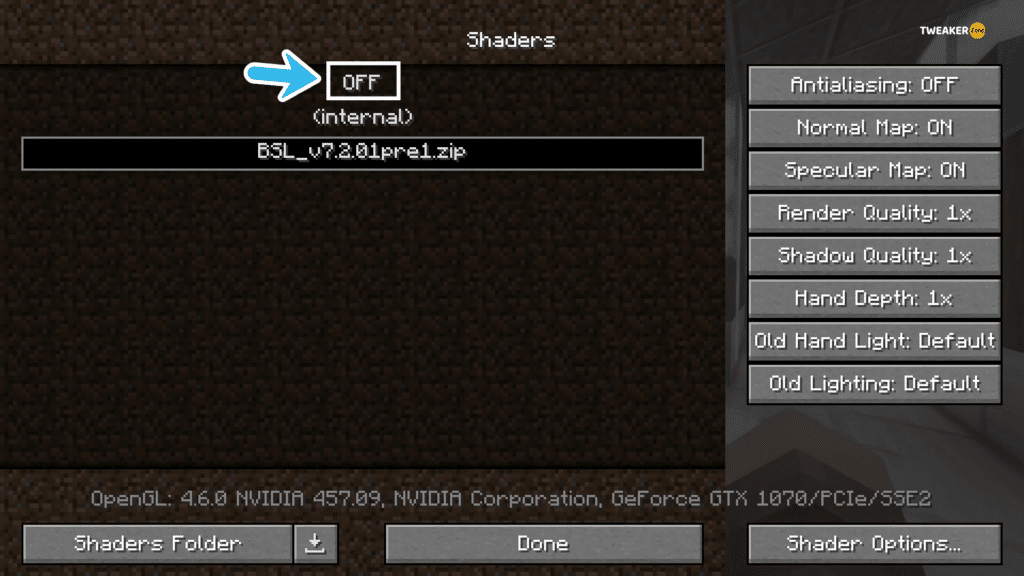
- Step 7: Click on the “Done” button to save the settings and relaunch your game.
Once you become absolutely sure that the shaders are triggering the error, it is better to keep the Shader option disabled. However, you may face a slight decrease in graphical performance.
6. Disable All Render Regions
If you are running all the available renders on Minecraft, especially while using a low-end graphics card, the OpenGL error can definitely trigger. In that case, it is better to disable all the available render regions to rectify this bug.
- Step 1: Launch Minecraft and start any game in either “Single Player” or “Multiplayer” mode.
- Step 2: Once the game starts, press the “Esc” button to pause the game and to open the in-game menu.
- Step 3: Click on the “Options” button from the menu.
- Step 4: Select “Video Options” and further navigate to the “Performance” button.
- Step 5: Toggle the button beside the “Render Regions” option to the “Off” position.
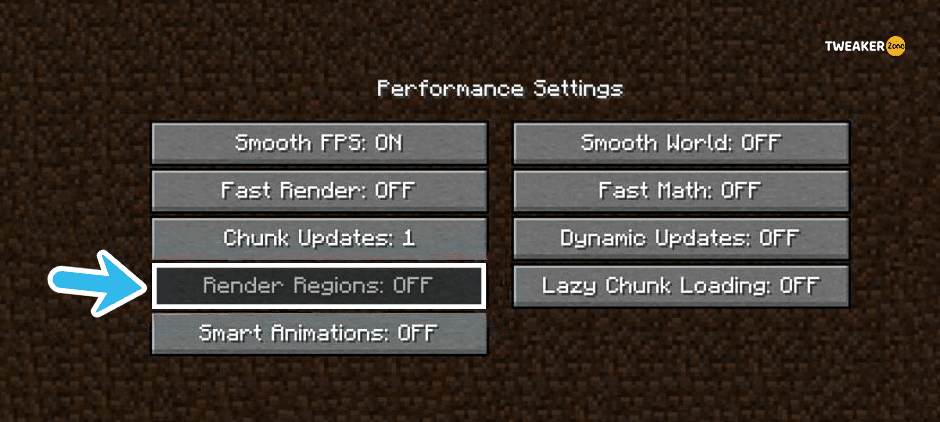
- Step 6: Click “Done” to save the settings and restart your game without any render region.
The render region option primarily pushes your GPU to render terrains from a further distance to deliver a more vivid view. But yes, it does need an intense GPU speed to comply with that setting. So, if you are using any low-end GPU, it is always better to keep the render region disabled.
7. Update OptiFine Mod
If you talk about the highest-rated and most trusted optimization mod for Minecraft, you definitely talk about OptiFine. Trusted by millions of gamers, this mod not just smoothens the overall gameplay but also fixes several performance issues. However, you need to keep it updated, or it can trigger the OptiFine OpenGL error 1281.
- Step 1: Visit the official website of OptiFine and click on the “Download” tab from the header menu.
- Step 2: Once the page opens up, click on the “Download” button located beside the latest version (located at the top of the page).
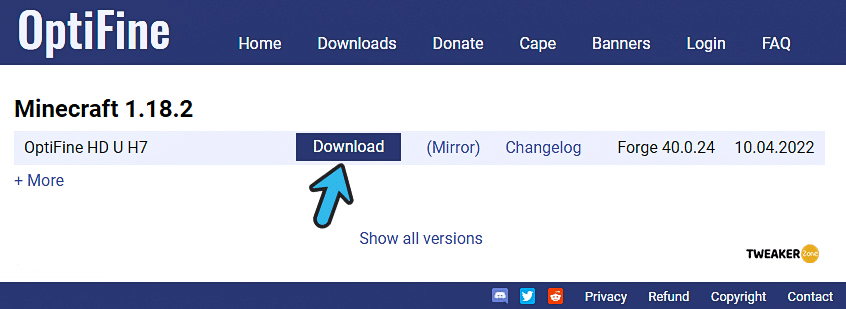
- Step 3: Once the “.jar” fine is downloaded, copy the entire file.
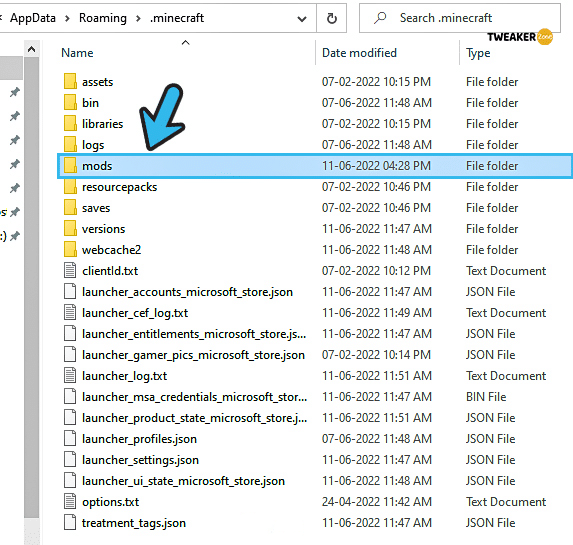
- Step 4: Now press “Windows Key + R” to launch the run window, type “%appdata%/.minecraft” in the “Run” dialog box, and hit enter to open the “Minecraft” folder.
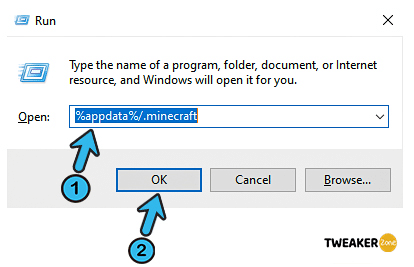
- Step 5: Open the “Mods” folder and paste the “.jar” file, which you have already copied.
- Step 6: Now, click on the “Minecraft Launcher” icon on your desktop to launch the game.
- Step 7: Click on the arrow sign located just beside the “Play” button.
- Step 8: Once all the available forges pop up, select the latest version of OptiFine.
- Step 9: Click on the “Play” button again to enable it.
It is better to exit the game once you enable the latest version of OptiFine. You can also restart your system and relaunch the game to ensure smooth gameplay and a perfect rendering of all the available textures in HD.
8. Manually Install Java Package
Java package is currently used by several applications in the Windows system, not just for Minecraft. And if you have a faulty package or an obsolete version installed on your system, you may face this OpenGL error. So, it is better to install the Java package manually to fix this issue.
- Step 1: Right-click on the “My Computer” or “This PC” icon (depending on your OS version) and select “Properties” from the menu.
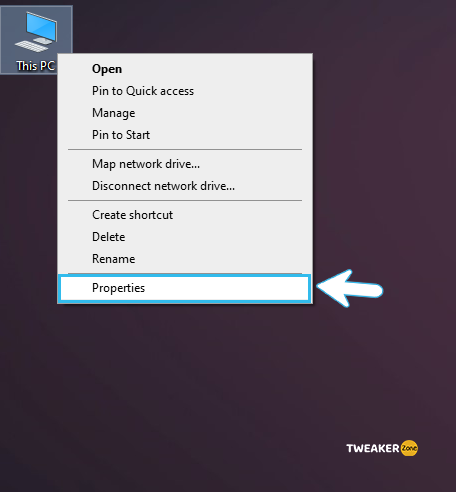
- Step 2: Note down the windows architecture variant written beside the “System Type” option. (It will be either 32-bit or 64-bit)
- Step 3: Now, go to the website of Java and download the latest package for your particular windows architecture.
- Step 4: Once the complete package is downloaded on your system, copy the entire java folder.
- Step 5: Press “Windows Key + E” together to launch the “Windows Explorer” app.
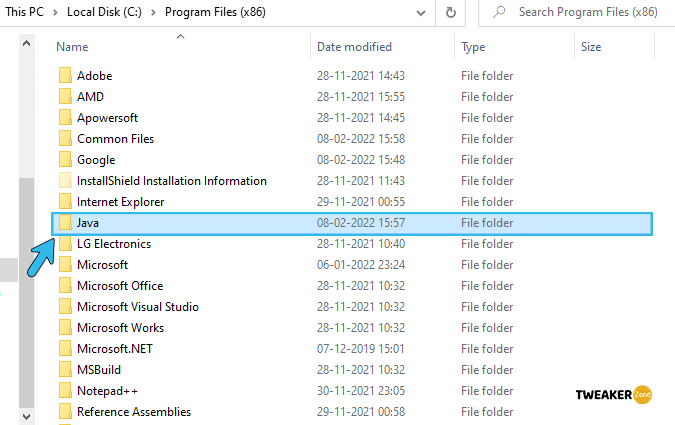
- Step 6: Navigate to “C:\Program Files\Java” (32-bit) or “C:\Program Files (x86)\Java” (64-bit) and paste the folder which you have already copied.
- Step 7: Launch the “Minecraft mod manager” and click on the “Edit Profile” option located at the bottom.
- Step 8: Select the correct Java path (which you have just pasted) under the “Java settings (Advanced)” option.
- Step 9: Save the settings and relaunch the game.
Several gamers have also reported getting network issues after manually installing the latest Java package. However, you can quickly fix this error by following our step-by-step guide to fix OpenGL Error 1282 In Minecraft similar to this problem.
9. Disable Showing OpenGL errors
If you think you are actually not encountering any graphical issues, jitters, or other related errors, and the error message itself is a bit suspicious, you can simply disable the error message popups from the in-game setting itself.
- Step 1: Launch Minecraft and start a game in either “Single Player” or “Multiplayer” mode.
- Step 2: Once the game starts, hit the “Esc” button to launch the in-game settings page.
- Step 3: Click on the “Options” button and further navigate to the “Video Settings” option.
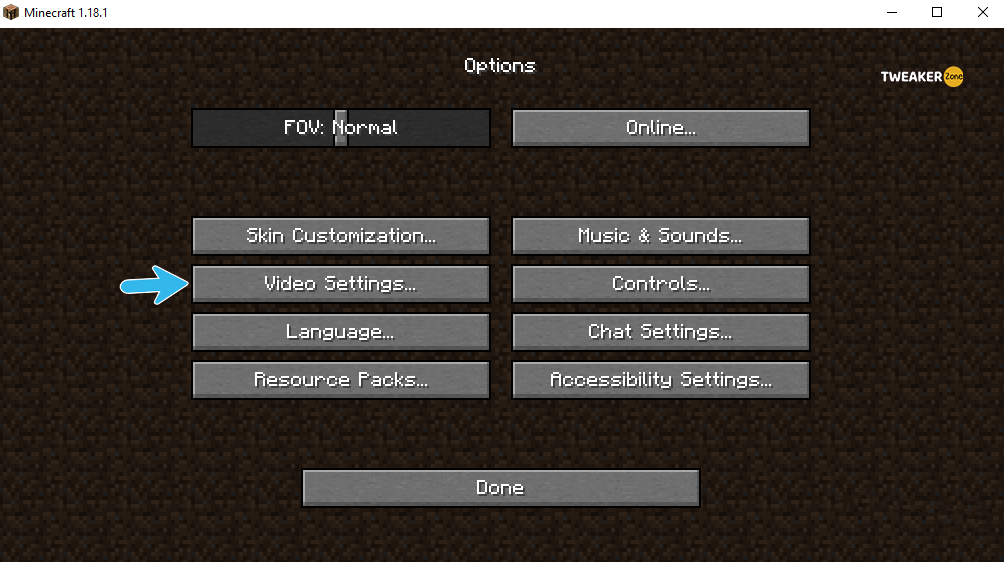
- Step 4: Click on the “Others” tab and navigate to the “Show GL errors” option.
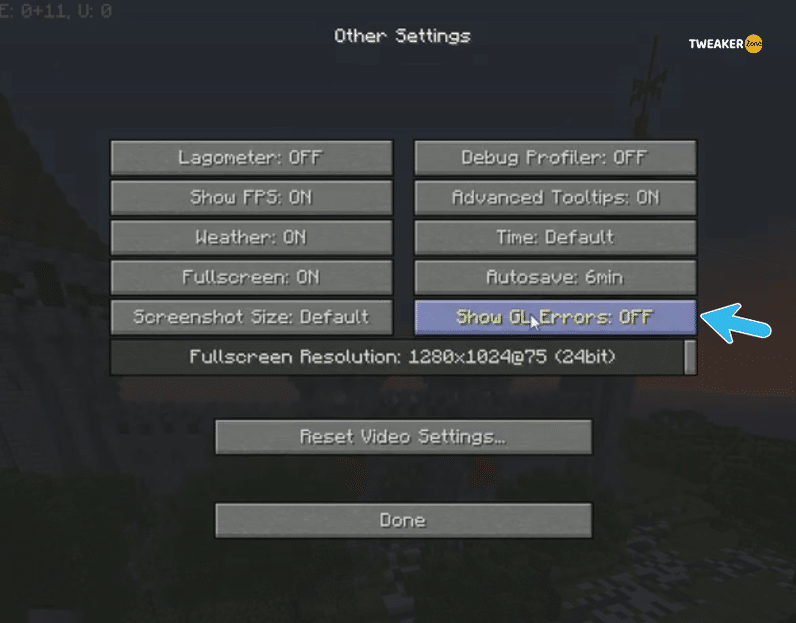
- Step 5: Click on the “OFF” button to disable it and save the settings.
- Step 6: Relaunch the game and see if the error message still pops up.
It is not advisable to permanently disable showing OpenGL errors as it can create further bugs if you are not rectifying it on time. So, once you identify the root cause of this error, you should manually enable the error popups again.
10. Manually Download Opengl32.Dll
Most white-hat coders often reported that their root directory is missing the crucial OpenGL32.dll files. And if you also don’t have that file in your root directory, the Minecraft 1.12.2 OpenGL error 1281 may trigger.
- Step 1: Right-click on the “My Computer” icon on your desktop and select “Properties” from the menu.
- Step 2: Note down the architecture variant of your OS displayed beside the “System Type” option. (Either 32-bit or 64-bit)
- Step 3: Open a web browser and search “dll 32-bit” or “opengl32.dll 64-bit,” depending on your OS architecture.
- Step 4: Download the DLL file from a trusted website.
- Step 5: Go to “C:\Program Files\Java\<Your JRE Version>\bin”.
- Step 6: Once you in“bin” folder inside and click to open it.
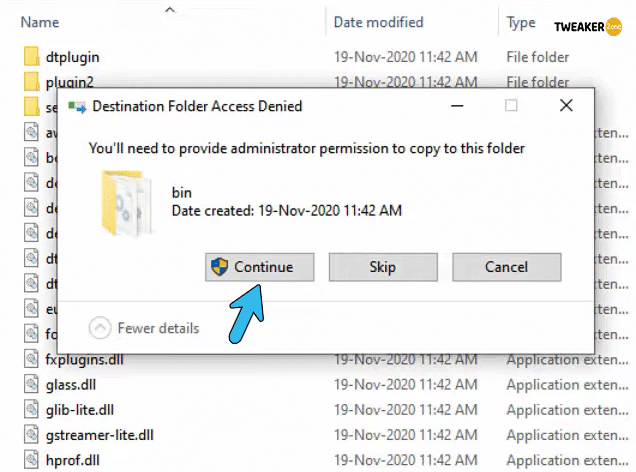
- Step 7: Copy the opengl32.dll file that you have downloaded and paste it into this “bin” folder & Grant admin permission.
- Step 9: Restart your system and relaunch Minecraft.
What Is OpenGL?
OpenGL is actually an application interface that optimizes the graphical performance of a game. It not just reduces the overall rendering strings to offload your GPU but also increases the overall gaming performance.
So, if you want a faster, smoother, and more vivid rendering of Minecraft, OpenGL is your best bet! Besides, it is now mandatory to install and use OpenGL if you are using a high-end graphics card.
And not just jitters and fuzzy screens, misconfigured or buggy OpenGL can also cause additional issues, especially the graphics-related ones such as a broken bow. In that case, you should follow the complete guide to repair bows in Minecraft on the Windows system.
How To Avoid OpenGL Error 1281 In Minecraft?
You should always keep your hardware updated to match the optimum specification required by Minecraft. And although OpenGL errors are pretty common in Minecraft, there are three things you can do to avoid getting these errors too frequently on your Windows system.
- Use A Dedicated GPU: If you are running Minecraft in high graphical settings, a shared GPU may feel underpowered! So, it is better to use a dedicated GPU to avoid this issue.
- Keep An Eye On New OpenGL Releases: You should always check the official site of OpenGL in timely intervals to know about available updates. And once it is there, you shouldn’t waste time installing that.
- Use Driver Update Software: There are several third-party software available that automatically check the drivers on your system and keep those updated. Use that!
You should always try to update your GPU to enable the maximum in-game settings, especially if you want HD graphics. A new GPU is bound to give better performance than your old one while playing Minecraft.
Conclusion
Before resorting to any advanced methods listed above to solve the OpenGL error 1281, you should start with the generic fixes. Easy techniques are not only just less time-consuming but also require minimal technical skills. However, if you really need to adopt a pro method, it is better to create a system restore point.
Besides, you should also keep a copy of your “saves” folder somewhere else before trying any pro methods, as it will keep all your saved games and customizations even if any technical glitch arises. And that’s all for today! Don’t forget to drop your queries in the comment box below!
FAQs
Q. How do I fix the OpenGL error?
From updating your GPU to manually adding the opengl32.dll file, there are several methods to fix it. But, if none of these works, you can manually disable showing the OpenGL error from the “Video Settings” option in the game.
Q. How do I fix OpenGL error 1281?
Updating Java and the OptiFine mod is the best bet if you want to fix this issue. However, you can also reinstall Minecraft and remove all the mods. Besides, you can drop down your video settings, especially if you are using a low-end system.
Q. Is OpenGL error 1281 Bad?
If you want HD graphics without compromising the overall performance of your gameplay, you definitely need the OpenGL to support it. And getting this error can seriously means you can’t enable the suitable HD texture pack or even a smooth render.
Q. Why am I getting an OpenGL error?
The highest chance is that you are using an obsolete version of your GPU driver or Minecraft itself. Besides, if your root file is missing the opengl32.dll file, this issue can also trigger.
Leave a Reply
View Comments