Every Minecraft player wants to decorate their base using old armors, and that requires an armor stand. If you too love showing off your Minecraft creations, you’d wonder how to make an armor stand.
To craft an armor stand in Minecraft, you need six sticks and one smooth stone slab. Place three sticks in the three grids of the first row, 1 in the second grid of the second row, and 2 in the first as well as a third grid of the third row. Place one smooth stone in the second grid of the third row, and you will get an armor stand.
Do you want to read a complete recipe and know more about armor stands? Then, read on, and you’ll get all details regarding making an armor stand in Minecraft and using it properly.
Table of Contents
- 1 Armor Stand in Minecraft: Differences Between Java and Bedrock
- 2 How to Craft an Armor Stand in Minecraft
- 3 Ingredients Required to Make an Armor Stand in Minecraft
- 4 Steps to Make an Armor Stand in Minecraft
- 5 Commands to Make an Armor Stand in Minecraft
- 6 Can You Find an Armor Stand? If Yes, Where to Find It?
- 7 How to Use an Armor Stand in Minecraft
- 8 Frequently Asked Questions
- 9 Final Thoughts
Armor Stand in Minecraft: Differences Between Java and Bedrock
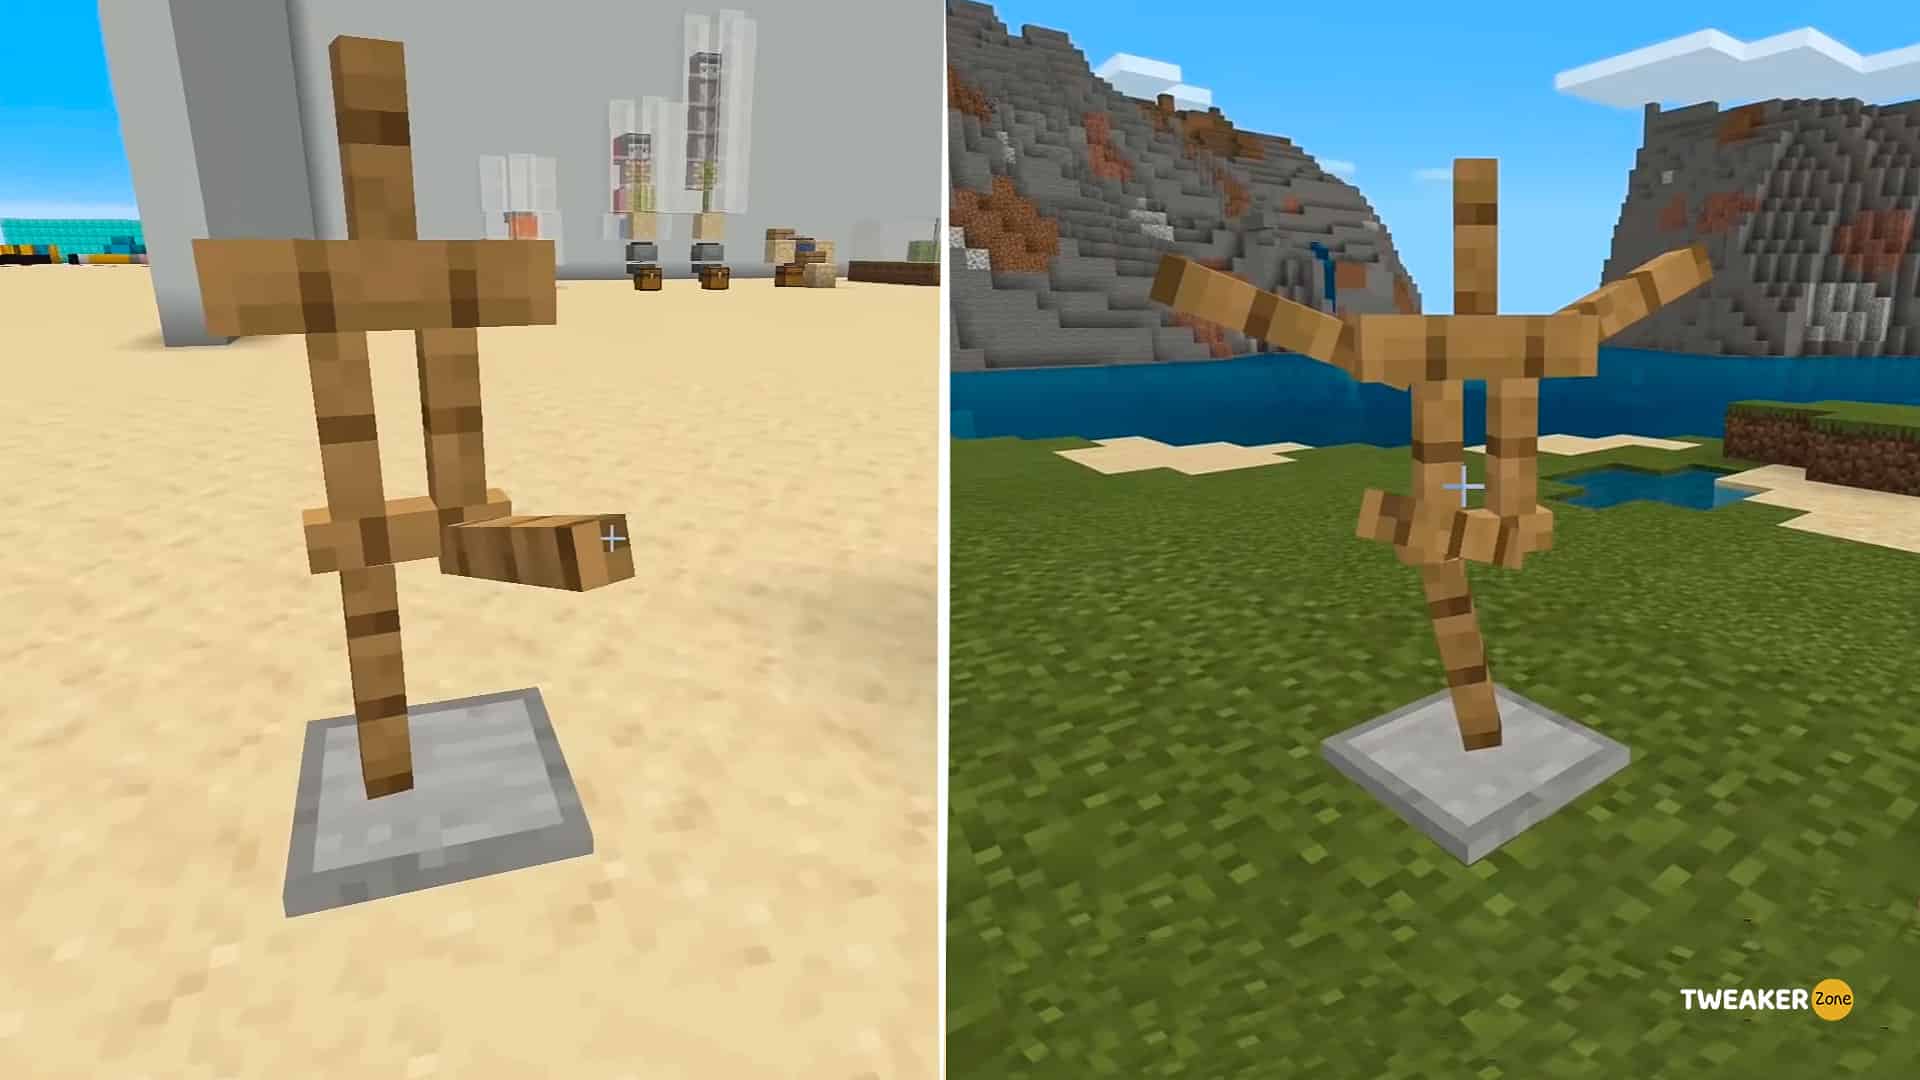
Before I go ahead and explain the steps to crafting an armor stand, you should understand the basic difference in these stands for different editions.
The Overall Design
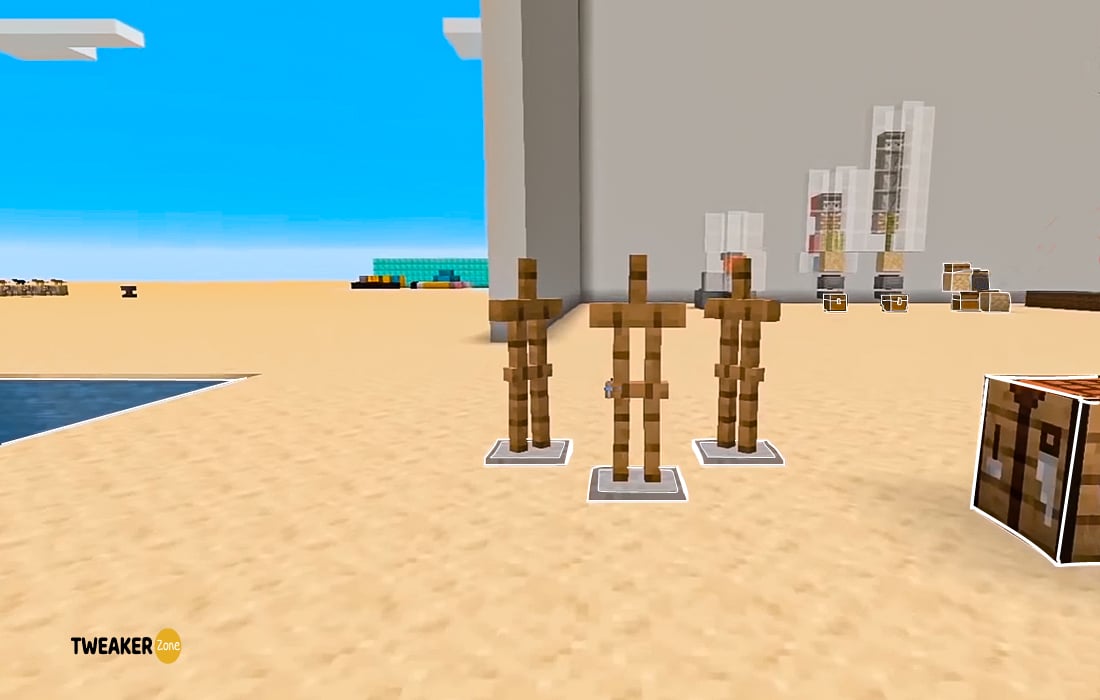
The overall design of the armor stands in the Bedrock, and Java edition is different. You’ll see arms on the stand in the Bedrock edition, while there are no arms in the Java edition.
Purpose
The purpose of an armor stand is to hang things, and you can easily hang swords on it in the Bedrock Edition. However, in Java Edition, the players need to customize the armor stand with arms in order to hang things on it.
In order to spawn an armor stand in the Java Edition, you need to run a command: /summon Minecraft:armor_stand ~ ~ ~ {ShowArms:1}. It will customize the armor stand with arms, and you can use it to hang things, including swords.
How to Craft an Armor Stand in Minecraft
In this section, I have covered a detailed recipe and supported Minecraft versions you can make armor stand in. Also, I have listed some commands players can use to make these stands quickly.
Supported Minecraft Platforms to Make an Armor Stand
You should play Minecraft on any of the following supported platforms to make an armor stand. Also, the detailed recipe will only work for these platforms.
| Platforms | Supported | Version |
| Pocket Edition (PE) | Yes | 1.2 |
| PS3 and PS4 | Yes | 1.22 |
| Java Edition (PC/Mac) | Yes | 1.8 |
| Nintendo Switch | Yes | — |
| Windows 10 Edition | Yes | 1.2 |
| Education Edition | Yes | 1.0.21 |
| Xbox 360 | Yes | TU31 |
| Xbox One | Yes | CU19 |
⚠️ Disclaimer: The list of supported platforms is subject to change, so ensure you are playing the game on a platform that supports armor stands.
Ingredients Required to Make an Armor Stand in Minecraft
Making an armor stand in Minecraft is easy and only requires two types of ingredients. You’ll need:
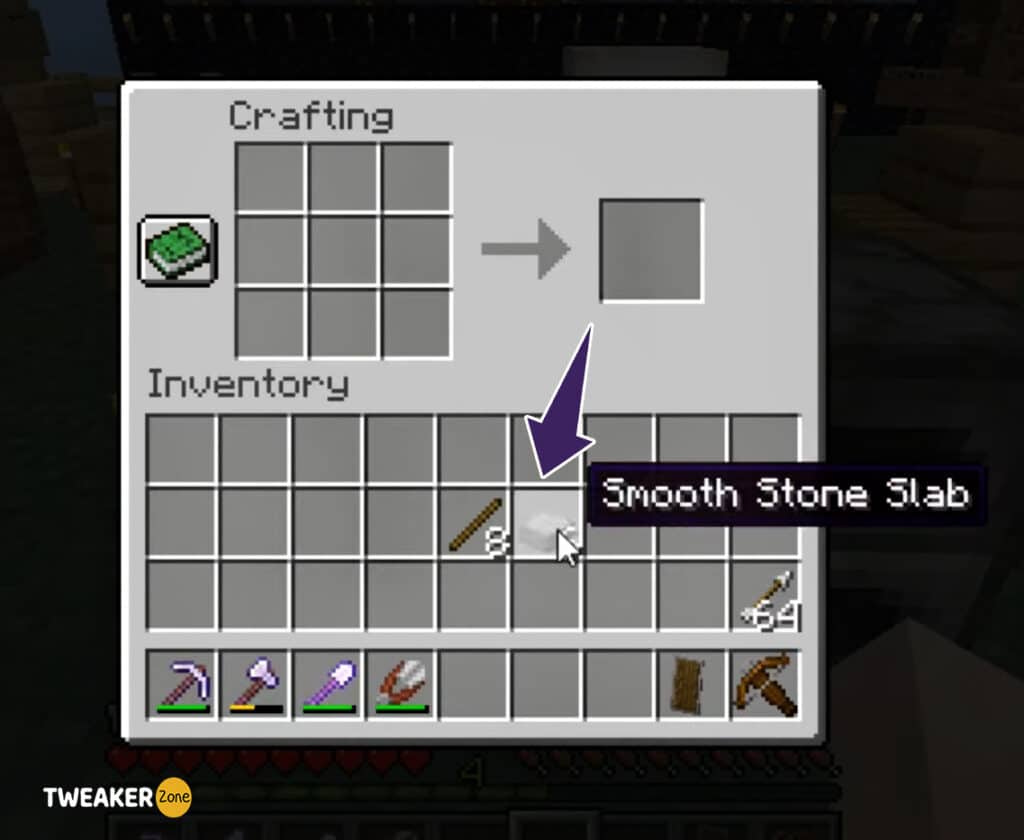
- 6 Sticks
- 1 Smooth Stone Slab
How to Make Sticks in Minecraft?
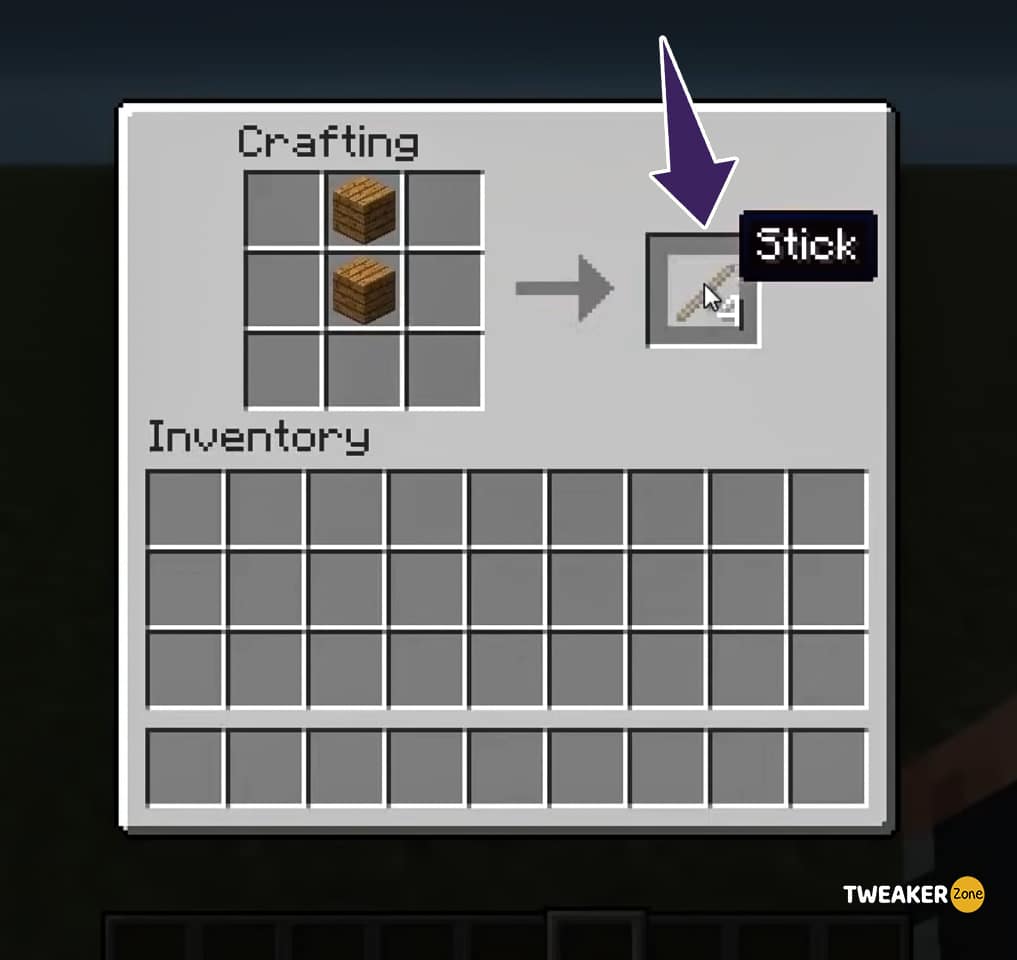
There are many methods to make sticks in Minecraft, but I prefer the one that requires two oak wooden planks. Place these planks in the crafting menu as shown in the image below, and you’ll get four sticks. Move the sticks to your Minecraft inventory and use them to make armor.
How to Make a Smooth Stone Slab in Minecraft?
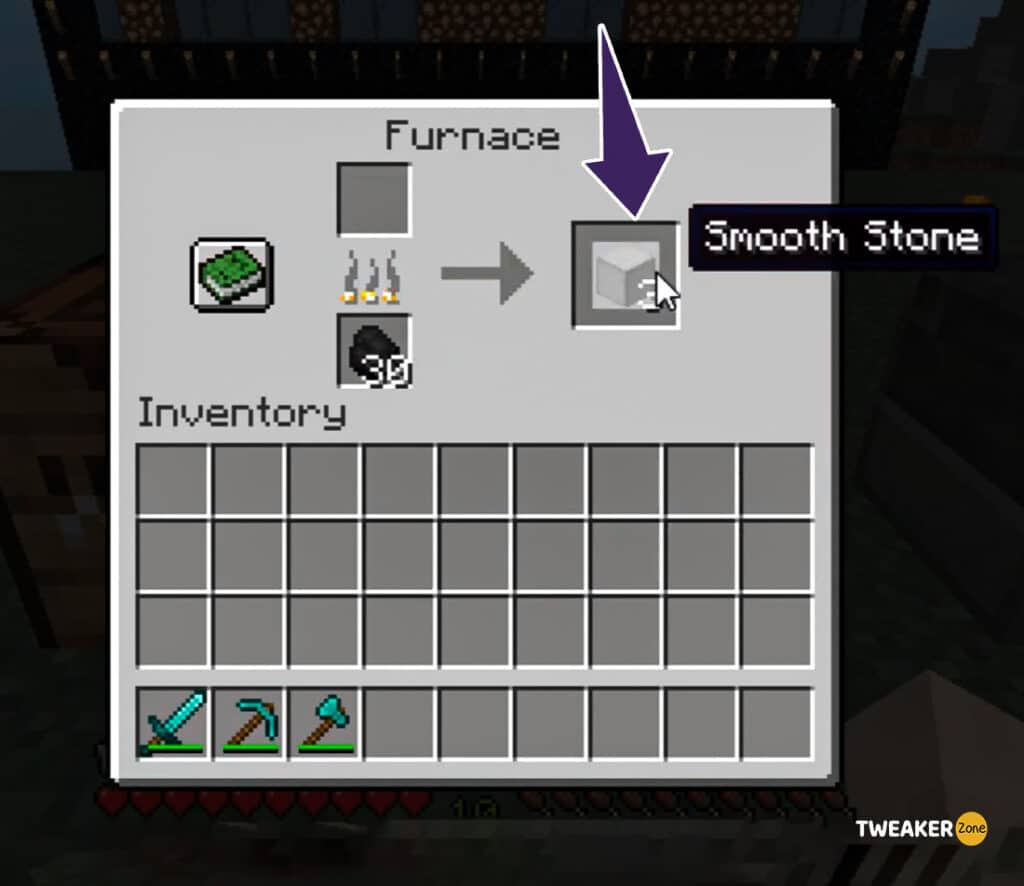
Making one smooth stone slab requires three smooth stones. Place three smooth stones in the three grids of the second row, and you’ll get six smooth stone slabs. Move the slabs to your inventory and use them along with the sticks to craft an armor stand.
Steps to Make an Armor Stand in Minecraft
Now you are all set to craft an armor stand in Minecraft. Just follow the steps explained below:
Step 1: Open the Crafting Menu or Table
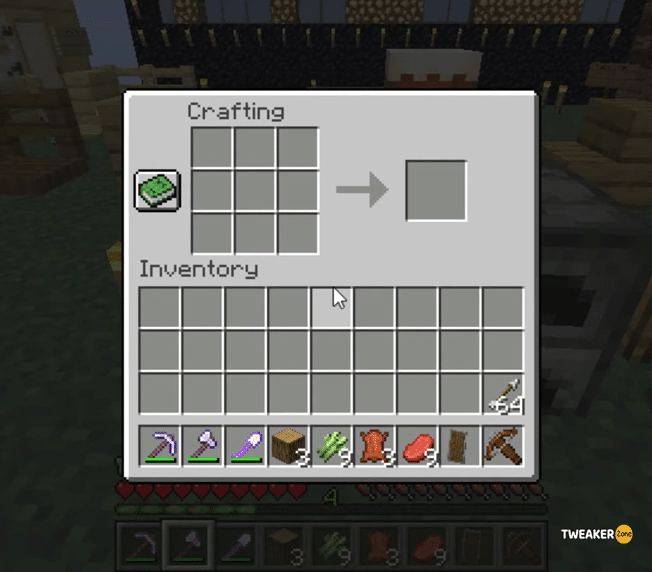
Open your Minecraft crafting menu or table. A table has nine grids and looks something like the image attached below. To make an armor stand, the table should be completely empty.
Step 2: Add Ingredients to the Crafting Table
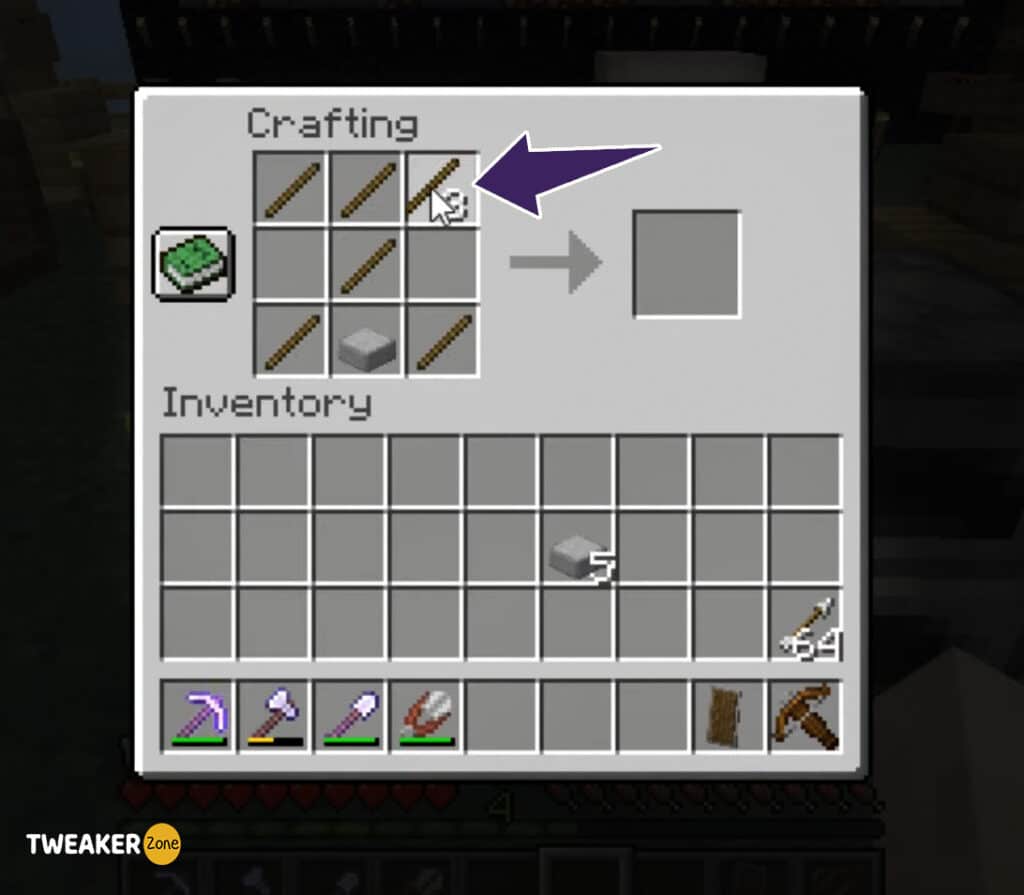
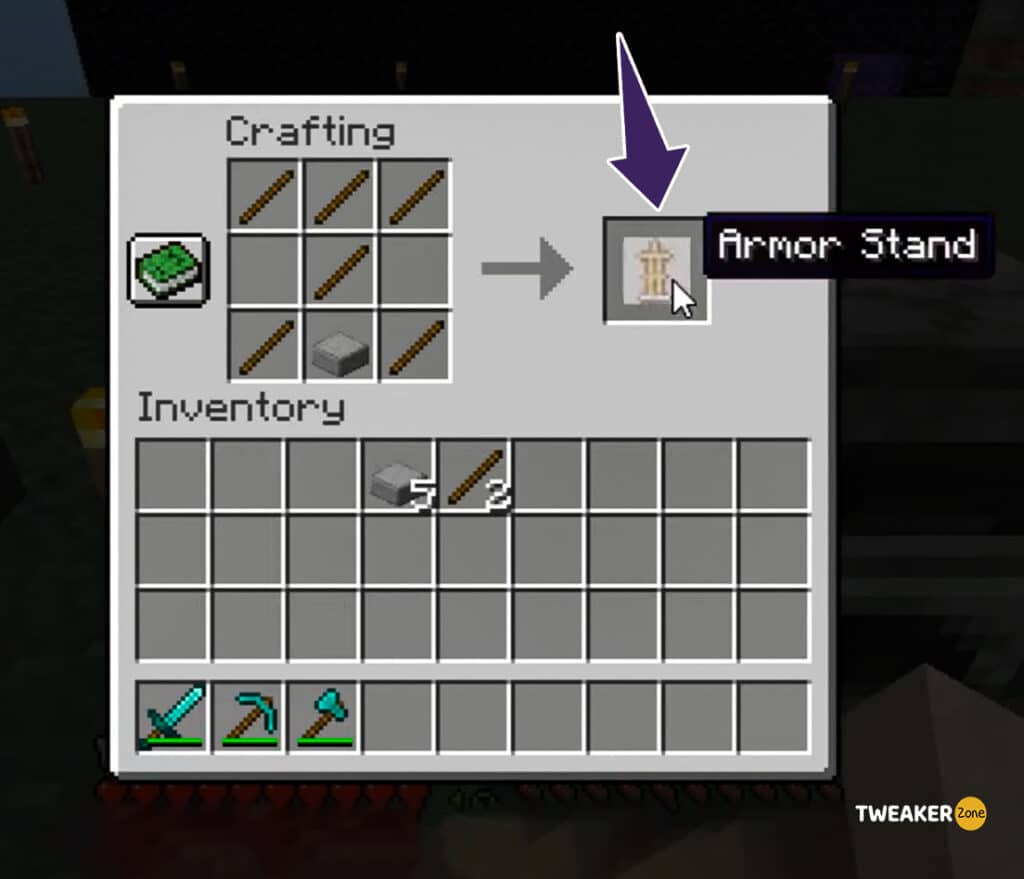
Now you need to add ingredients to the crafting table. Place “three sticks” in the three grids of the first row and “one stick” in the second grid of the second row.
And “two sticks” in the first and third grid of the third row. Add “one smooth stone” slab to the second grid of the third row. You need to replicate the crafting menu, as shown in the image below.
Step 3: Move the Armor Stand to the Inventory
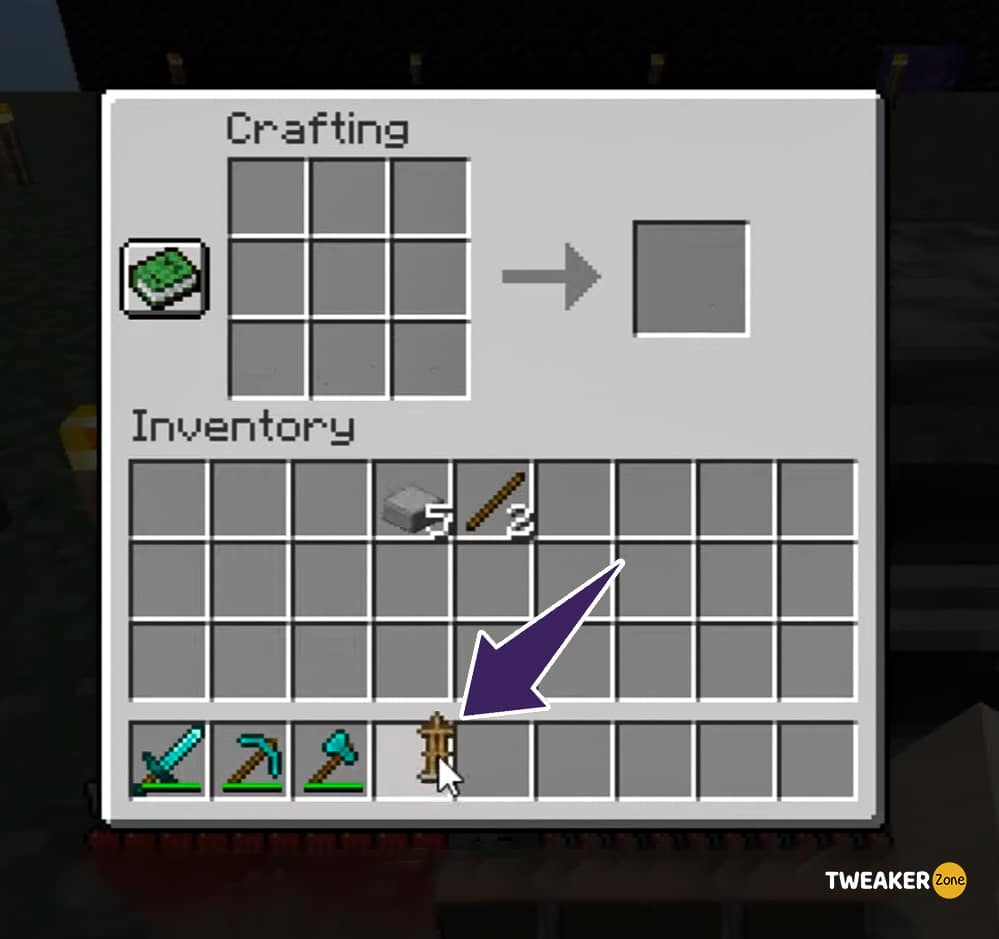
Select the armor stand and drag it to the Minecraft inventory. Place it anywhere in the inventory, and you can use it to decorate your Minecraft items. Also, you can Make Candles in Minecraft, by following step by step.
Commands to Make an Armor Stand in Minecraft
A lot of Minecraft players wonder if they can craft an armor stand without using the recipe. It is possible to make these stands without using the recipe, but it requires you to use the commands.
Below is a table with multiple commands you can use to get an armor stand.
| Minecraft Edition | Command |
| Java | /give @p armor_stand 1 |
| Pocket Edition | /give @p armor_stand 1 0 |
| Nintendo | /give @p armor_stand 1 0 |
| PlayStation | /give @p armor_stand 1 0 |
| Education Edition | /give @p armor_stand 1 0 |
| Xbox | /give @p armor_stand 1 0 |
| Windows 10 | /give @p armor_stand 1 0 |
Can You Find an Armor Stand? If Yes, Where to Find It?
No, you cannot find armor stands in Minecraft, and the only way to get one is by making it. You need to follow the detailed recipe to craft an armor stand and use it for multiple purposes explained in this article.
How to Use an Armor Stand in Minecraft
In this section, you’ll get all the required details to use the armor stand. These steps work well in all supported Minecraft versions, including Bedrock and Java.
Items You Can Place on an Armor Stand
There are plenty of things you can hang on an armor stand. From a leather tunic to a leather cap, you can hang your accessories on the stand for improved gameplay. Here’s a list of a few items you can place on the stand.
- Iron boots
- Leather tunic
- Leather boots
- Netherite helmet
- Netherite leggings
- Netherite boots
- Turtle shell
- Diamond helmet
- Diamond leggings
Steps to Use an Armor Stand
Step 1: Place or Organize the Armor Stand
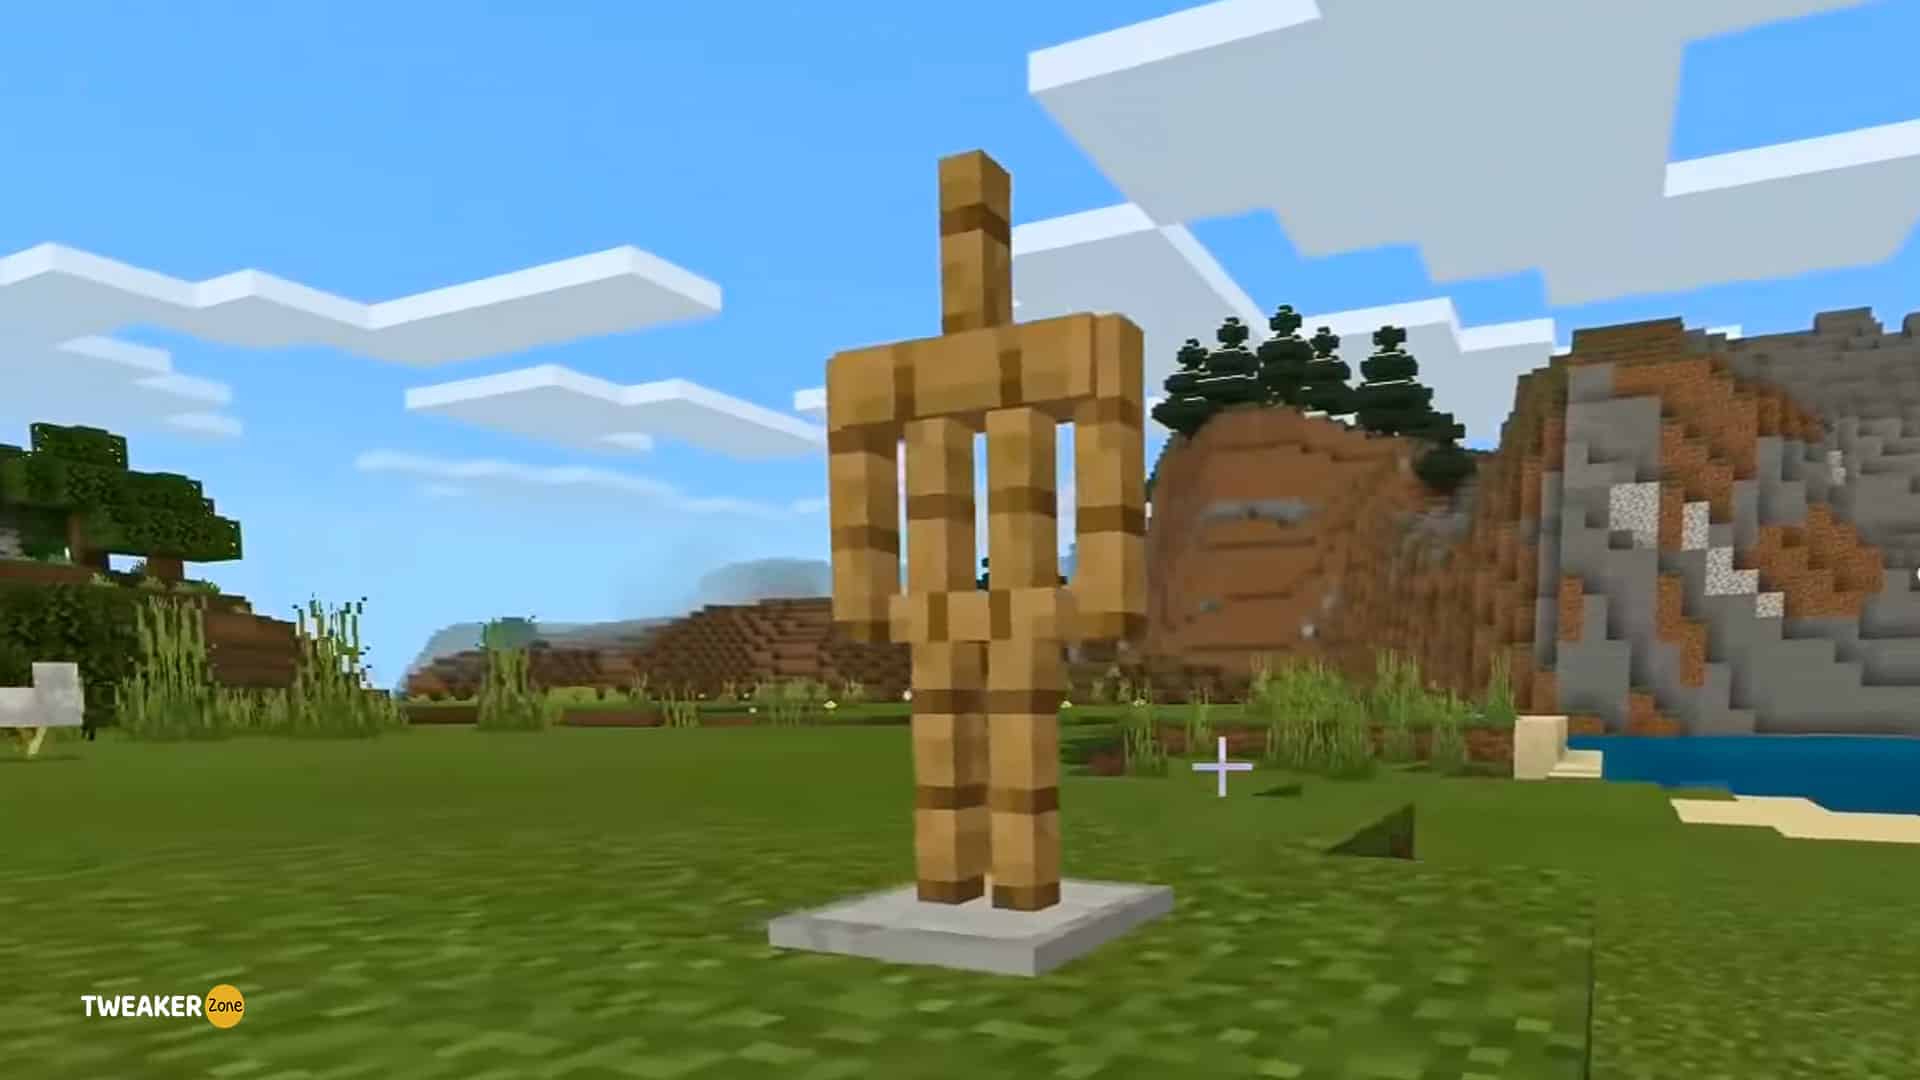
In order to use the armor stand, you need to place it somewhere, for example, in your Minecraft shelter. To place the stand, you need to select the armor stand in the hot bar. Now, position the pointer on the block where you want to place the armor stand.
You’ll see the game window highlighted. To place the stand, you need to process a command, and that depends on the Minecraft version you are playing. Below I have attached a table along with the commands you need to process:
| Edition | Command |
| Java Edition | Right-click on the block |
| Xbox One and Xbox 360 | Press the LT button |
| PlayStation (PS3 and PS4) | Press the L2 button |
| Wii U | Press the ZL button |
| Nintendo Switch | Press the ZL Button |
| Windows 10 Edition | Right-click on the block |
| Education Edition | Right-click on the block |
Step 2: Move the Items to the Stand
Now you can start moving items to the stand from the hot bar. First, select the piece of armor you would like to hang the item on, and then select the item. Below you’ll find some steps to hang a diamond chestplate on an armor stand in different editions.
| Minecraft Edition | Command to Activate the Armor Stand’s Part |
| Java Edition | Right-click on the armor stand |
| Xbox One and Xbox 360 | Press the LT button |
| PlayStation (PS3 and PS4) | Press the L2 button |
| Wii U | Press the ZL button |
| Nintendo Switch | Press the ZL Button |
| Windows 10 Edition | Right-click on the armor stand |
| Education Edition | Right-click on the armor stand |
Step 3: Remove Items from the Stand
There may be times you are required to remove items from the armor stand. This is a bit tricky but inevitable if you want to place some other items on the stand. Take the pointer on the items you want to remove from the stand and follow the commands listed below.
| Minecraft Edition | Command to Activate the Armor Stand’s Part |
| Java Edition | Right-click on the armor stand |
| Xbox One and Xbox 360 | Press the LT button |
| PlayStation (PS3 and PS4) | Press the L2 button |
| Wii U | Press the ZL button |
| Nintendo Switch | Press the ZL Button |
| Windows 10 Edition | Right-click on the armor stand |
| Education Edition | Right-click on the armor stand |
You’ll see the items back in the hot bar after you remove them from the armor stand. Following these commands, you can quickly remove items from a stand and make them empty for new items.
Frequently Asked Questions
Q: Can armor stands hold an item in each hand?
A: An armor stand can only hold an item in the right hand. However, players can position the stand accordingly, and it may look like the armor stand is holding an item in the left hand.
Q: Is there a limit to armor stands in Minecraft?
A: As per several Minecraft players, there is a limit to making armor stands. You can make as many as 30 stands at once and use them to decorate your main hallways.
Q: Can you add weapons to armor stands?
A: Yes, you can add weapons to armor stands by following several cheats or game commands. You can also remove the weapons when required.
Q: Do Armor stand despawn?
A: No, armor stands do not despawn automatically. However, there is one server that may despawn the armor stand. Also, some versions like 1.8 had some glitches with the armor stand.
Final Thoughts
Every Minecraft player should have at least one armor stand to decorate their main hallways. This article has everything you need to know about crafting an armor stand in Minecraft and how to use it properly.
Got any questions in mind regarding armor stands? Drop your queries in the comments section, and I’ll get back to you ASAP.




Leave a Reply
View Comments